Knit to Fit: Bust Dart, Top Down

Let’s get back to my first love, Top Down knitting. One of the things I like best about knitting from the top is that everything does not have to be planned ahead of time. I will decide that I am going to add bust shaping to widen the front of my sweater. As I approach the bottom of the Yoke I can think about how I might do the bust shaping since it can be done in several different ways.

One method to use is Easy Bust Shaping , working the bust shaping into the last couple of inches of the Yoke, above the underarm.

Here is a second method, a Bust Dart. The bust shaping occurs just where you need it, in the couple of inches between the underarm and the largest part of your bust.

NAPC Bust shaping (559x640)

I introduced this method in the Need A Plus Cardigan book where the Front of the cardigans are set up to be 3″ wider than the back. Two inches were added through the bust darts and the third inch in the buttonbands. The extra width is incorporated into the final sizing of all the cardigans.

NAPC Cover

Set up a Bust Marker on each side of the Front and work increases every other round.Bust shaping Top Down increases showing

bust shaping

Could you add more than 1″ worth of stitches? It depends on how much vertical room you have between the underarm and the largest part of your bust.Bust shaping Top Down vertical

Your bra matters here! Put on your best figure enhancing bra and measure. Since you are working an increase every other row you need to check the number of rows you can fit into this vertical distance. You may be able to sneak in a couple more increases. I usually do.

DSC00875
Me, wearing a Lace Panel cardigan from Need A Plus Cardigan book.

Could this method work for you?

Thanks for reading,

Deb

ANY GAUGE and GAUGE-FREE patterns by Deb

Cabin Fever books and patterns

Deb on Instagram

Knitting Boredom

I’m working on a new project made up of triangles that join together as you work. You’ll be seeing some of it soon but I have to tell you that I’m bored.

This is a good sign. To me it means that I have the fundamental parts of the construction figured out. Once I’ve figured things out I get bored.

When do you get bored? Maybe there is too much stockinette stitch in your pattern. I can hear my friend Jen saying “that’s what a knitting machine is good for, all that stockinette stitch”. You may or may not agree with her but it does free her up to do all the interesting bits. What do you do when you get bored?

I think boredom can improve your knitting. Let’s say you intend to knit a dozen hats for charity or for everyone on your Christmas list. You start with your favourite hat pattern. Now knit another, maybe in a different colour. Cast on for the next and the next. Are you bored yet? Where would this take you? You still have 9 hats to go. Would you buckle down and just get them knit, grinding your teeth? Would you cruise through ravelry and buy a new pattern for each hat? Would you buy variegated yarn to jazz things up so you have something pretty to look at? What are you going to do?

Now let’s pretend you only have one pattern. The desert island scenario. Your internet is not working, your car is in the shop, you are stranded with your yarn stash and one hat pattern. Now what do you do?

  1.  Work some colour blocks or stripes into the hat. Not too hard and kind of fun.
  2.  Introduce some cables, lace or textured stitches into your hat. More of a challenge. Remember that cables will pull your work in and make the hat a smaller size. Lace will stretch and make a larger size. You can adjust for this by working increases for the cables or decreases for the lace work above the brim treatment and then adjust back to the original number of stitches before working the crown.
  3.  Knit the hat in the opposite direction. You might have guessed that this is where I would go. I love playing with the construction of garments. Knit a standard brim-up hat from the top down. Read the directions for the cast off backwards to the beginning. Cast on the number of stitches you previously cast off. Increase for the crown instead of decreasing. Here is a stretchy bind off for the brim of your top down hat . It’s important that it is stretchy: Knit 2 sts, *insert your Left needle into the fronts of the 2 knit sts on the Right needle, from left to right, and knit these 2 sts together (just like an SSK), K1 so there are 2 sts on Right needle; repeat from *.
  4.  Knit the same pattern in a different weight of yarn. You do have your stash with you. This is a challenge and if you know my Cabin Fever books you know I’ve already done this in the Need A Hat book where all the hat patterns are written for all gauges. Here are two ways you can do it yourself. Decide on the size of hat you want, say a 21″ hat, and multiply it by your new gauge (#sts = 1″) for a new number of stitches to cast on, example: 21″ x 5 sts = 105 sts. Feel free to adjust to an even number if needed and knit your hat from there.  OR since your desert island hat pattern probably comes in several sizes, take the stitch count for each size and divide it by your new yarn gauge (#sts = 1″) for a new set of sizes. Follow the instructions and stitch count for the new size you need, examples: 104 sts in worsted weight yarn makes a 21″ hat (104 sts divided by 5 sts = 1″),  104 sts in DK weight yarn makes a 19″ hat (104 sts divided by 5.5 sts = 1″).

NAH hat P1020855Snowshoe Hat in Aran & Fingering weight yarn, Need A Hat book

If you have done any of this, you are designing. Yes, you. Did you enjoy the excitement of experimenting?

There is always uncertainty about the results. Was that difficult?

I can’t wait to hear about your adventures and experiments. Thanks for reading,

Deb

ANY GAUGE and GAUGE-FREE patterns by Deb

Cabin Fever No-Sew patterns

Deb on Instagram

Knit to Fit: Vertical Darts II (for Bottom Up sweaters)

Let’s say you have a pattern for a sweater with a straight body. You’ve worked your sweater from the bottom up and to accommodate your figure, you have worked increases between your waist and your bust, making Vertical Darts to add extra width at the bust.

Now things get interesting. You have to work decreases to get back to the correct number of stitches for the upper chest and the shoulders on your pattern. How and where can you do this? Here are three ways.

OPTION 1:  You can continue the princess lines straight up to the shoulder.princess line blouse drawing

Keep the markers used in your Vertical Darts in place and work a decrease before the first marker and after the second marker as your work up to the shoulder.Vertical Darts body schematic II

If I was doing this option I might consider making the princess lines prominent. They would form strong vertical lines from the bottom edge to the top. A couple of stitches beside the markers could be worked with twisted stitches or with a purl stitch on either side to delineate them. This shaping could also be worked along the outside edges of a centre panel of textured or lace stitches. As a short person, I think any vertical line is a good design feature.

OPTION 2:  For a sportier model you can work the decreases quickly on an angle toward the body-sleeve edge.Vertical Darts body schematic II Sports look

You have seen this idea many times in sports clothes where the side panel is in a different colour, usually darker or brighter so your eye moves along the curved line adding visual shape to you and your garment.flaxey_team1280 curling morgan sports wear

Another benefit of this model is that the decreases are done quickly (every other row) making the upper chest smaller for a better fit.princess line blouse sporty look drawing

OPTION 3:  If you are working in pieces, you could decrease the extra bust stitches away as you work the shaping for the armhole.sweater schematic decr bust sts

Work the darts, adding extra width to the body at the bust and work straight up to the armhole. Work the armhole shaping as written and then continue to work the decrease shaping, extending the angled line until the number of stitches across the upper chest matches your pattern.

DONE. You will have a nicely shaped sweater which fits your unique figure.

Thanks for reading,

Deb

ANY GAUGE and GAUGE-FREE patterns by Deb

Cabin Fever No-Sew patterns

Deb on Instagram

Knit to Fit: Vertical Bust Darts I (for bottom up sweaters)

Do you have a blouse or shirt that you love but hesitate to wear? Is it that shirt where you need to contort yourself to place a safety pin at the bust line because it wants to gap there? If you wear it without the safety pin you have to hunch your shoulders forward every time you notice. In fact you can probably hardly move once it’s on but it’s the greatest blouse so here we go again with the d#%* safety pin.

Then there is that blouse which is not so great but is soooo comfortable to wear that you reach for it quite often. This blouse might have princess lines – those vertical lines that run from the bottom of the blouse, over your bust to the shoulder. They allow the front of the blouse to widen at the bust and then narrow back down at the shoulder. They fit really well for those of us who are somewhat busty. This style of blouse doesn’t gap at the bust line.princess line blouse

Can this be duplicated in knitting? Yes. Especially easy when working from the BOTTOM-UP.

You can add vertical darts. Widening the fabric at the bust area on the front only means the sweater will not be overly tight across the bust and pull the front of the sweater up at the bottom. The extra width relaxes the front so that it can fall properly at the bottom edge.Vertical Darts body schematic


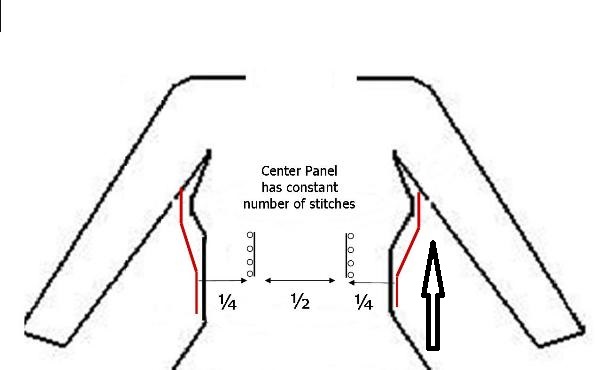
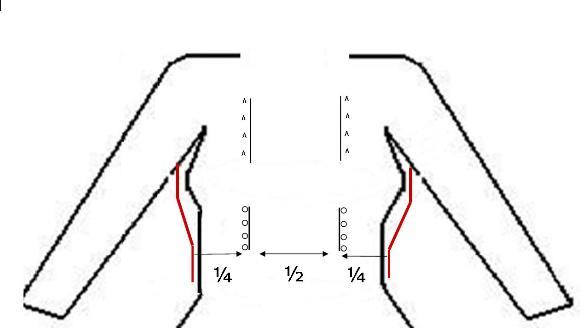
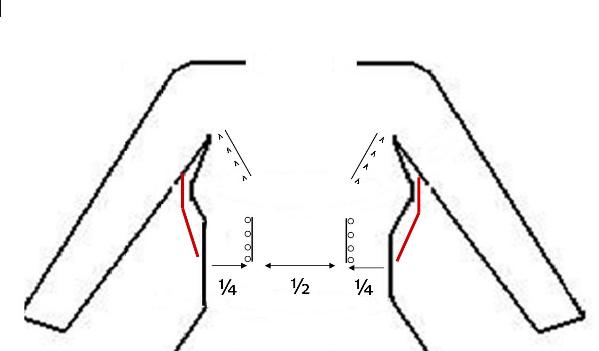
Starting above the waist, place a marker 1/4 of the width in from each side seam. As you knit up the front, work an increase before the first marker and after the second marker, creating two lines of increases which will widen the front.

I tried to find some clear photos of vertical darts on sweaters but had very little luck. Guess what? They don’t show that well. So no worries about adding the increases since you’ll have to look really closely at this photo to see them. They are there, I checked.Amy Herzog petrea-final-front waist shaping

This is Amy Herzog’s Petrea pattern. If you knit from the bottom up and are looking for expert advice on bust shaping, she is your go-to person. I would recommend her Fit to Flatter book for more information.

Now back to the nitty gritty details. How many extra stitches do you need? That depends on how much extra width (in inches) you want on the front. See Do I Need Bust Darts?

How often do you work the increases? That depends on how many increases you need to work and how much vertical room you have between your waist and your underbust.Body schematic waist to bust


You want to work the increases starting 1-2″/2.5-5cm above your waist to 2-3″/5-7.5cm below the largest part of your bust. Use a measuring tape to check. I barely have 4″/10cm of room but I am very, very short. You may have more room than that.

Let’s say you want to add 3″ to the width of your front and you are working in worsted weight yarn with a gauge of 5 sts = 1″/2.5m. You want to add 16 sts and since you are working them in pairs (2 increases worked on every increase row) you need 8 Increase Rows to achieve this.

Work an Increase Row, then [3 Straight Rows & then an Increase Row] 7 times = 29 rows.

For worsted weight yarn your row gauge is 7 rows = 1″/2.5cm  so 29 rows is going to take approximately 4″/10cm vertically to work.

Do you have at least 4″/10cm of room between 1-2″/2.5-5cm above your waist and 2″/5cm below the largest point of your bust? If you have more room you could work 5 straight rows between increase rows and see how much room that needs. (1 Increase Row + [5 Straight Rows + Increase Row] 7 times = 43 rows = approx. 6″/15cm)

Would this be easy enough to add to your next bottom up sweater? I think with a couple of measurements and a few calculations you could be making a better fitting sweater.

The next question is how do we reduce these stitches above the bust line? The sweater front needs to fit at the shoulder according to the original pattern. There are several ways to do this and I will tackle that next week in Vertical Darts II.

Thanks for reading,

Deb

ANY GAUGE and GAUGE-FREE patterns by Deb

Cabin Fever No-Sew patterns

Deb on Instagram


%d bloggers like this: