Lace is just holes

Lace, it’s just holes, right? So how hard would it be to come up with my own set of lace patterns. No problem, right? Ahem, maybe and maybe not.

The last section of this 3 part scarf is worked in garter stitch which makes the lace patterns in garter stitch too. I thought I would come up with 3 different lace patterns you could work in any order and each would morph seamlessly into the next one.

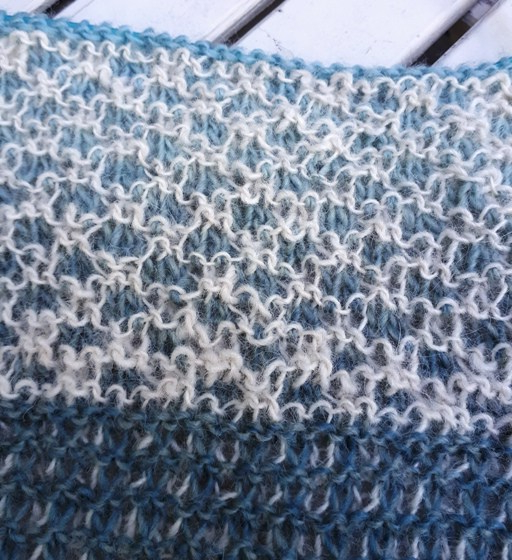
The garter stitch ridges worked every other row renders a complicated lace pattern very difficult to see. You can’t see the lines of decreases at all. The design depends on hole placement only and needs to be fairly obvious. Oh dear, this is already harder than I thought.

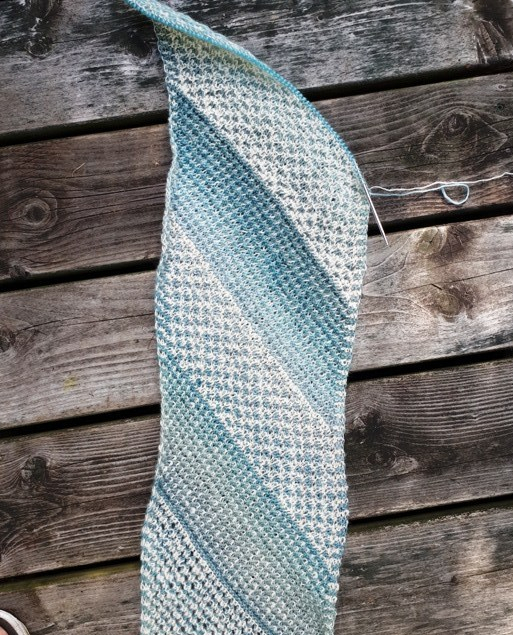
First I tried this. Fairly easy to work and the double row of holes makes a design you can see. It moves on the diagonal which is pleasing but …

20200719_132218 - Copy

when this scarf is worn this tail will fall down the front of the wearer and then the nice diagonals look like vertical lines. Sigh. Not exactly what I was looking for.

20200719_132239

Wait a minute, if I work this double row of holes as a straight line they will look like a diagonal when worn, right? (photo on the right). OK, that will work. One done.

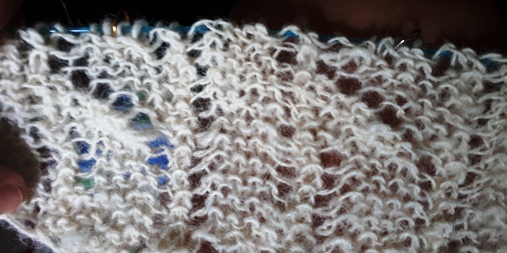
Now to modify it for a couple different looks. Do you like this? I’m not sure the pattern is clear enough. It’s supposed to look like the line of holes crossing. I don’t know that it’s clear enough.

20200721_144944

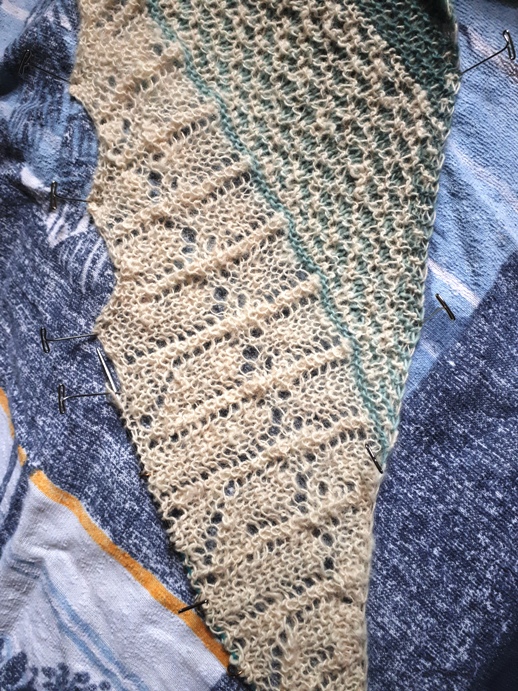
Try again. I like this one much better. How about you? A little more tweeking and I think this one’s a keeper.

20200721_145106

Does it need a diagonal in the other direction?Maybe.

20200722_114109

Time to sleep on it.

Stay safe and knit happy,

Deb

Gauge-Free and Any Gauge patterns by Deb

Cabin Fever No-Sew patterns by Deb and Lyn

Deb.Gemmell on instagram

Slip Stitches, different effects

Slip stitches are easy to work. You’ve probably done them to work decreases and maybe a selvage or two. Have you used them to work a decorative 2 colour pattern? If you haven’t here’s how it works on a garter stitch scarf.

Tech notes: Slip stitches are always worked purlwise. That means insert your needle into the stitch as if you were going to purl the stitch and transfer it over to the right needle without working it. It’s simply a transfer of a stitch from left needle to right needle. The yarn, while working the slip stitch, is always carried across on the Wrong Side of the fabric. OK, that’s it.

When using 2 colours in a standard garter stitch stripe (2 rows in colour 1 and 2 rows in colour 2), slipping one stitch pulls the colour of the stitch you slipped up into the row you are now working. So working [K1, Slip 1] makes every other stitch a different colour. In this first pattern the white yarn works K1 and the blue yarn is slipped. The blue yarn from the previous row is pulled up into the white row. On the wrong side row the white yarn is knit and the blue yarn is slipped again (with the yarn in front – the wrong side of the fabric). The working yarn (white) moves back and forth between knitting and slipping, much like when you work a 1×1 rib. A bit of a pain but I think it’s worth it.

Rows 1 & 2: With blue, knit. Row 3 (RS): With white, work [K1, with yarn in back SL1]. Row 4: (WS) Work [with yarn in front SL1 (the blue stitch), K1 (the white stitch)]. The white stitches are in garter stitch (knit on both the RS and WS). The blue stitches look like stockinette stitches but they aren’t, they have been slipped over two rows.

20200717_090106

If we can work this as [K1, SL1] we could also work it as [K2, SL2]. Why not? That’s easy enough, right?

This time the first two knit rows are white and the slipped stitch rows are worked in blue. Rows 1 & 2: With white, knit. Row 3 (RS): Work [K2, SL2]. Row 4 (WS): Work [with yarn in front SL2, K2]. You can see the difference from the 1×1 pattern below it. Cool, eh? Just a little change and it looks quite different. Switching which colour works the first 2 knit rows also makes it look different.

20200717_090141

Why stop here. What if on Row 4 (WS) we purled instead of knit. What would that do? This is the first 1×1 stitch pattern worked as: 2 knit rows in blue, Row 3: With white [K1, SL1]. Row 4: (WS) Work [with yarn in front SL1, P1]. On this wrong side row you are keeping the yarn to the front of your work, on the purl row side, all the time which makes this quite a lot easier to work. None of that back and forth business, yay. But a little harder to see clearly. Can you see that it now looks like there are 2 stockinette rows worked between the blue garter ridges?

20200717_090231

Now that we’re on a roll let’s do the 2×2 stockinette version. Work 2 knit rows in white. Row 3: (RS) With blue, work [K2, SL2]. Row 4: (WS) Work [with yarn in front SL2, P2]. It’s easier here to see the blue stitches are knit on the right side and purled on the wrong side. It looks like the white garter stitch rows are floating on top of a blue stockinette stitch fabric or maybe I’m being a bit fanciful here, ha, ha.

20200717_090306

One, two, three, four. Here’s the total affect.

20200717_092258

Stay safe and happily knitting,

Deb

Gauge-Free and Any Gauge patterns by Deb

Cabin Fever No-Sew pattern by Deb & Lyn

Eyelets 4 ways

I’m working on the beginning triangles of a new scarf pattern. The triangles get larger and larger until you have the depth of scarf you desire. These triangles will form one of the tails which will hang down the front of the body. I don’t like to have a colour pattern on the tails of a scarf because then I am always fussing to keep the right side of the pattern showing. I decided to try different ways of working eyelets since they look good on both sides.

I put my scarf in the sink while still on the needle and hung it out with my laundry. I wanted to see how deep the scarf was going to be. The white hand-spun really bloomed. Good to know that as I go forward. 20200707_132839

Triangle One (on the far left) has eyelets worked on the wrong side of the fabric. This is a 4 row pattern more or less based on a stockinette stitch background:

Right Side Row 1: Knit.  Wrong Side Row 2: [YO, P2tog] repeat.  Right Side Row 3:  Knit.   Wrong Side Row 4:  Knit. This last row creates a ridge on the Right Side.  I really like that the eyelet holes sit between 2 Right Side knit rows. I think the holes look bigger and more defined.   

Why bother working the eyelets on the wrong side row? I find that the needle position for working P2tog makes more sense to me and is easier to work than the K2tog. But I get that P2tog may not be your favourite stitch.

So I made Triangle Two with the regular eyelet pattern worked on the Right Side rows with several garter rows in between.

RS Row 1: [YO, K2tog] repeat.  Rows 2, 3, 4, 5 & 6:  Knit.  This pattern places the eyelet holes between two garter ridges.

Just to try that again I worked Triangle 3 with Eyelets worked on the Right Side, every other row. This is one you are probably quite familiar with.

RS Row 1: [YO, K2tog] repeat.  WS Row 2: Knit. 

One more triangle, Triangle Four, and back to the beginning with the P2tog eyelets because, well I’d had enough of the other ones. This time I added a second colour. Same 4 row pattern though.

With Main Colour, work  RS Row 1: Knit.  WS Row 2: [YO, P2tog] repeat.

With Contrast Colour, work  RS Row 3: Knit.  WS Row 4:  Knit. 

I have to say I loved this last one and was sorry when the triangle was finished. I’m going to have to use this again somewhere soon. Do you want another look at my laundry?

20200707_132856

There are many ways to use eyelets. These were a couple of easy combinations. Enjoy.

Stay safe and happy knitting,

Deb

Any Gauge and Gauge-Free patterns by Deb

Cabin Fever No-Sew patterns by Deb & Lyn


A Counter for a 3 row repeat

How would you handle a stitch pattern with a 4 round repeat with increases worked every 3 rounds. Whoa, working a 4 round/3 round combo is very complicated. How would you keep track? Do you have a system? I found one that worked perfectly for me.

The Bartholomew’s Tantalizing Socks from the New Pathways for Sock Knitters has just this set up for the gusset shaping. Do not fear, Cat Bordhi has written out every row for her knitters. But as I seem unable to follow line-by-line instructions faithfully I had to find another solution. Could I keep track with a counter on my phone, put little ticks on a page, write out a long list of row numbers and cross them off? If you’ve been in a class with me you might be laughing here.  I hate the tick method. I urge knitters to look at their knitting and use it to keep track. But in this case the stitch pattern makes it really hard to see the increases. So the laughs on me.

During one of my walks a solution came to me. My friend Dana had, many years ago, told me how she keeps track of sleeve increases. Now was the perfect time to try her system out. Are you ready? It’s really high tech.

Take a piece of yarn and tie 3 knots in it so that you have 3 loops.20200702_104438

Put loop 1 on your needle somewhere convenient. I put it one stitch before the marker where I will work the first increase and start the stitch pattern. Loop 1 means work an increase at the beginning and at the end of the stitch pattern on this round.20200629_085444

Next round insert your needle into loop 2 and work stitch pattern. Next round pick up loop 3 and work stitch pattern. Next round pick up loop 1 and work increases again along with the stitch pattern. Repeat.20200703_093234

I found the stitch pattern easy to keep track of. It was getting the increases in the right place that was difficult. You could also make another 4 loop string for the 4 row stitch pattern if you needed it.

I have a couple of suggestions for improvements.

  1. A smooth yarn would have worked better. The loops would have been easier to find quickly. I grabbed a piece of  yarn that was within reach but it would have been better to get up off my chair and find some smooth cotton to make my looped string.
  2. Tie a bead or button to the bottom of the string. This will make it hang like a fancy stitch marker on the needle since the bottom would be weighted. I’m going to try this next time. I’m sure I have a bead or two in my button jar. If you use this for more than 3 loops this would help to keep track of the last loop in the sequence.
  3. A high contrast colour would have helped too.

This is a game changer for me. You’re never too old to learn a new trick.

Deb

Any Gauge and Gauge-Free patterns by Deb

Cabin Fever No-Sew patterns by Deb & Lyn


%d bloggers like this: