Reconditioning Wool

Have I mentioned that I’m somewhat impatient when it comes to getting started? I probably have. I want to jump in right NOW. Before I jump though, I’m going to unravel a sweater I don’t wear so I can make one I will wear. If I could, I would undo the cast off edge of this sweater and use it to cast on the new one.

But … that’s not a great idea if I want a smooth finish to my new sweater. So I spent an afternoon getting this wool in some sort of shape to reknit.

This is my quick method. It’s probably not the best way but, did I mention it’s quick?

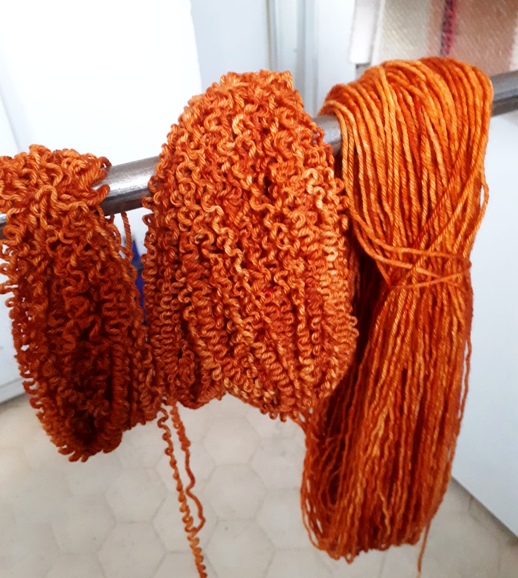
I unravelled and wound the wool around a large book. Any hardcover book will do, as long as it’s a large one. Tie one end around the skein and pull it off the book (this is the hard part because it’s probably wound quite tightly). Since I am using objects found around the house, I slip the skein onto a broom handle, which is sitting on the counter and weighed down at the broom end with something heavy. Keep winding. Three skeins are ready.

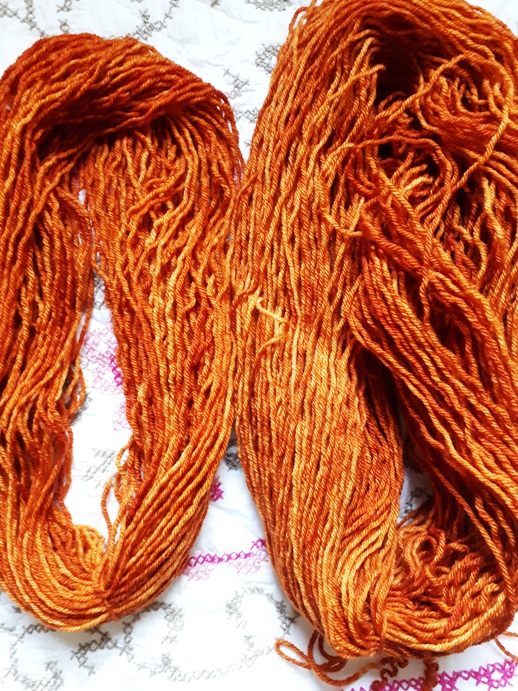
Whoa, a krinkly mess. Now for the secret weapon, the steamer.

This is it. My Little Steamer. It’s small, it heats up really fast and it has a plastic end which you can put really close to the wool. The only problem I have with this little machine is that it leaks like crazy. A towel on the floor fixes that. Now I steam and rotate the skein around the broom handle. Be careful handling the wool. You do not want to squish it while it’s wet and hot, really hot.

One done. It only takes minutes. A few more minutes and …

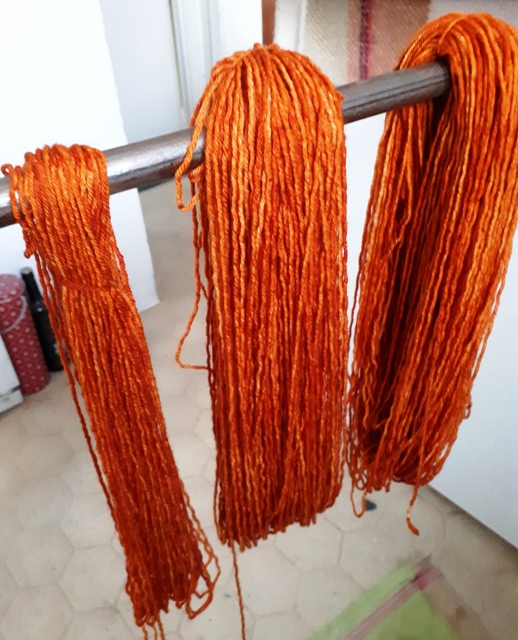
… done. I readily admit that they are not perfectly unkinked (is that a word?) but they are relaxed and only slightly damp.

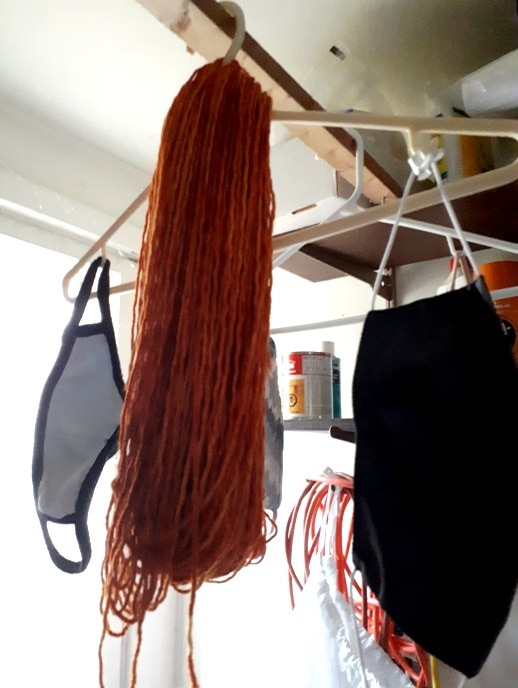
I hang them on a hanger and tomorrow they will be ready to wind up so that I can, at last, cast on. Oh boy, I can’t wait.

Cheers, Deb

Gauge-Free and Any Gauge patterns by Deb

Deb on instagram

Rescue: Rip and Reuse

I’m antsy and can’t settle, so it’s obviously time to demolish something. I’m frogging (rip, rip, ripping) a sweater that I don’t wear even though I love the colour. Let’s call it rescuing the wool. I want an orange sweater, just not this one.

I can’t stand the colour pooling. I worked this as a gradient between the different balls of yarn, working a couple stripes with the old ball and the new ball. But that didn’t really work, did it? The pooling is not good, especially across the chest. So here I go.

It’s actually strangely satisfying.

Now that I have Helical Knitting down pat, I’m going to use this technique to mix up the balls of yarn throughout. It has to work better than what I had.

I don’t know whether to use 3 balls or four. It’s so hard to tell which balls match each other. The colour saturation is different in each skein. I think these first two balls are similar with more light colour.

I think these last two balls might be slightly more uniform in colour but … I’m not too sure.

So I’m thinking 3 balls at a time should do it. One of the balls is smaller which is great. I don’t want to switch out 3 balls for 3 different balls. It might cause a line across the sweater, so having to sub in a new ball when this small one is used up will be a good move.

I’m off to cast on. I hope this works.

Are you working on any challenges lately?

Deb

Any Gauge and Gauge-Free patterns by Deb

Deb on instagram

Helical knitting to the rescue

Sometimes, a technique that is used for one application can be used somewhere else to solve a different problem. It might be nothing the original technique was ever set up for. That is the case with Helical Knitting.

Helical Knitting is working coloured stripes in the round without a jog at the beginning of the round. In this sock, one stripe was a solid colour and one stripe was variegated.

If you haven’t heard of this or haven’t given it a try, this video is from the book Something New to Learn about Helical Knitting:

Basic 1×1 Helical Stripe video by Jen and Jim of Arnall-Culliford Knitwear.

Once you have mastered 1×1 stripes you can work 3 or more coloured stripes: Multi-round Helical Knitting. This hat has 4 colours.

All that’s great but where is the alternative application? Right here.

I am knitting with kettle dyed yarn. The general rule for knitting with yarn that’s not commercially dyed is to work with two balls of wool, alternating rounds. I am always afraid there might still be some pooling so I used 3 skeins and the Multi-Round Helical Knitting method.

I set it up for 3 stripes. I’m calling them stripes even though all the stripes are the same colour. It seems silly but it ties into the Helical technique video above. It means I have 3 balls coming from my project and yes, they do tangle but … I have very smooth colour with some colour variation but no pooling.

I will certainly be doing this again. This might be a terrific technique for you too.

Keep on, keeping on. Cheers, Deb

Gauge-Free and Any Gauge patterns by Deb

Deb on instagram

Knitting with a different gauge of yarn

I was looking to knit something light weight, cheerful and easy to pop on. I also wanted a garment with a colourful pattern. A fairisle patterned poncho seemed like the perfect garment.

I chose the Ninilchik Swoncho pattern which is knit in double knitting weight yarn. I wanted to knit it in fingering weight wool even though it meant I would be knitting in an entirely different weight of yarn than the pattern calls for.

80/20 Fingering wool by Shelridge Yarns

Have you worked a pattern with a different weight of yarn? Did it work? It’s a skill you need if you’re serious about stash busting.

So, here we go. This is one way to do this. Are you ready for some math?

First steps are to convert the Pattern Gauge and my New Yarn Gauge to the number of stitches in 1″/2.5cm.

  1. The pattern calls for double knitting weight yarn with a gauge of 20 sts = 4″/10cm. I’m going convert this to #sts = 1″/2.5cm and call this the Pattern Gauge. Pattern Gauge: 20 sts divided by 4 = 5 sts = 1″/2.5cm.
  2. My New Yarn Gauge for my fingering weight wool is 28 sts = 4″/10cm. New Yarn Gauge: 28 sts divided by 4 = 7 sts = 1″/2.5cm

Next up is to choose which size in the pattern will give you the Finished Size you want. You’re not working to the pattern’s gauge so you’re going to have to follow the stitch numbers for a different size to get the Finished size you want. I know, it seems weird.

Read through the pattern and find the number of stitches in the pattern for the Body. That’s the finished size that matters. Divide the Body number of stitches by the New Yarn Gauge. This will give you the finished size, in inches or cm, that knitting in your new yarn will give you. Do this for every pattern size.

3. This Swoncho pattern only has 2 Finished Body sizes: 69 (83)”/175 (211)cm. I want to make the small size but because I’m knitting with finer yarn I am going to have to follow the stitch numbers for the larger size. The larger size has 416 sts for the Body. So, 416 sts divided by New Yarn Gauge of 7 sts = 59″ . In my finer yarn the Body of the poncho is going to be 59″ around after dividing for the sleeves, even using the stitch numbers for the larger size. It’s a pretty big poncho so I’m fine with a slightly smaller version.

I worked the stitch numbers for the larger size with the finer yarn. It is a light, swishy poncho and plenty big enough for my daughter.

Now I have lots and lots of plain knitting but more on that next time.

Keep on, keeping on. Cheers, Deb

Gauge-Free and Any Gauge patterns by Deb

Deb on instagram

Fairisle: a fan or not?

I decided to dust off my fairisle knitting skills and knit the Ninilchik Swoncho by Caitlin Hunter. It’s a lovely design with terrific charts, and you know I love a chart or three.

My daughter liked this pattern. Do you think looking outside affected her colour choices?

80/20 fingering by Shelridge Yarns

The first couple of inches were a bit painful. I was very rusty. After working 8 inches, with a colour in each hand, it felt like my hands were beginning to know what to do.

I did learn a couple things about myself:

  1. I need to work on knitting with my right hand. It needs a lot of work. I’m a continental knitter (yarn in my left hand) even though I am right-handed. Knitting with the right hand looks so easy when I see other people doing it but they probably – OK they do – say the same about me.
  2. Long floats cause great anxiety. Are the floats loose enough? Is it going to pucker? Should I catch a stitch? Ooops, too late, next time?
  3. I like to make quick colour changes. So I dropped a few extra stitches into the last pattern. It changes the pattern but who’s the boss of this knitting anyway!

The colourwork is beautiful but now that I’m done, I must admit, I’m a little relieved.

It turns out that I’m not a fairisle knitter after all.

Now I can enjoy all those beautiful colourwork sweaters I’m seeing everywhere and know that I am not going to knit them. Phew, good to know.

Hope you’re knitting something you love.

Cheers, Deb

Gauge-Free and Any Gauge patterns by Deb, dive into your stash and cast on.

Deb on instagram

%d bloggers like this: