Knit to Fit and Fade

My first fade is finished. I love it. I knit it in Dragon Strings,   Fairy Wrap (worsted weight) in Dirty Hippy colourway with 4 colours. The Fade stripes were easy to work and it’s so much fun getting to see the next colour blend in. I would totally do another sweater this way.

20180924_094823


KNIT TO FIT:    Usually your Top Down pullover will have a specific number of stitches to reach for the bottom of the yoke. That was the case here but I still wanted to have extra width across the Front for 2 obvious reasons. The easiest way to do this was to work the increases that would normally be worked on the Back, on the Front as extra increases. The stitch count remains as it should and there would then be extra width on the Front where I needed it.

Continue reading “Knit to Fit and Fade”

Obsessed with the Fade

Have you done one of these? What did you think of it?

The title says it all. I’m having so much fun I don’t want to put my pullover down. I started another Any Gauge Raglan 6 days ago and it’s almost done (OK, no sleeves makes it pretty fast). This is worsted wool from Dragon Strings, wonderful to knit with which is  more than half the pleasure, with colours that go around the colour wheel: red, gold, green/blue, blue. I am just into the blue now.

20180917_095606

The blending is interesting for a newbie. I did [2 rounds new colour, 2 rounds old colour] twice between the red and gold. I think I could have done more blending here.

20180917_105000

When I went from the gold to the green/blue I worked the set of 4 blending rounds 3 times. I thought that worked better. It just meant starting to blend when I had more yarn left in the colour I was working on. It’s definitely a bit of a guessing game.

20180917_105048

The blue/green to blue hardly needed any blending at all but I did some anyway.

20180917_105142

And now I’m working with the blue alone.

20180917_105026

I looked up what other people recommend. Here’s a short list:

  1.  Stephen West (youtube video) recommends working 2 row stripes with the old and new colours for as long as you like. You have to love that relaxed attitude.
  2.  Fruity Knitting (youtube podcast) did a lovely interview with Andrea Mowry , one of the most popular fade designers. The interview starts at 46 minutes into the program.
  3.  The Unique Sheep (blog post) recommends  2 rows New; 4 rows Old; 4 rows New; 2 rows Old.
  4.  For an analysis of the Fade trend read Grading the Fade by Stichcraft Marketing.

I will be doing another one for sure. All those lonely balls of yarn in my stash will get some friends. It’s really a community project for my stash. How can I resist that?

Thanks for reading. Let me know if you’ve tried this and how you liked it.

Deb

FOLLOW ME for more knitting adventures.

Cabin Fever Patterns on Ravelry

Cable Trick, for spectators

The season has started. The spectating/knitting curling season for us as fans of our daughter’s curling team began last weekend. Spectating from behind the glass while knitting this weekend was a reminder of  what an emotional roller coaster ride it is to watch your child (even when they’re grown up) do what they love to do, win or lose.

20180908_221546

Team Harrison (playing China here).  With a newly constituted team we didn’t know what to expect but 5 wins and 2 loses put them into the playoff quarter finals where they lost to the team that won it all. Yay Team.

I knit so I don’t chew my finger nails to bits. I’ve been doing this for years so I am aware of some of the pitfalls in choosing the wrong project. Is tense knitting going to show because there will be some. Can I do most of it while still  watching? Can I sit in a chair and not disturb any people around me because it is often a tight squeeze which I realized the time I took straight needles. Imagine needles ends waving around in front of my neighbours. Yeah you get the picture.

This was a good project choice. Thick wool which will not show when things got tense. It’s worked on a circular needle. Cable Trick (see below) meant I could keep track of cable crosses easily. No cable needle needed so it can’t fall on the floor and get lost. Straight forward knitting between cable crossings.

20180910_104240(0)

Preparation is everything. I spent the day before getting my project ready. I cast on and then with removable markers, set up where I wanted the cables to go. The thin metal markers are the raglan markers and the coloured plastic markers indicate my cable locations: a small cable on both sleeves and a larger cable down the front and back.

20180905_143308

I did the first set up round, increasing stitches between the cable markers. Cables suck your fabric in so you need to increase stitches before working the first cable cross. I decided to do it right away. This is the sleeve cable.

20180905_135947

The set up started with 4 sts: 1 border st, 2 cable sts, 1 border stitch. I want to have a 4 st cable so I will increase 2 sts in these 2 cable sts in the next round.

I used a new to me increase which I thought worked quite well. This is a variation of the Kf&b:  Knit into the front of the stitch and without taking the stitch off the needle, insert right needle into back of  the same stitch and slip it. Take stitch off left needle. You have increased one stitch. One of the stitches is knit and the second stitch was slipped.

20180905_144325

Once I was set up like this and worked the first cable crossing, this project was ready to go.

You may be wondering if crossing cables is a good choice for a project where your mind is partly occupied. Keeping track of when to cross is the trick to working good cables.

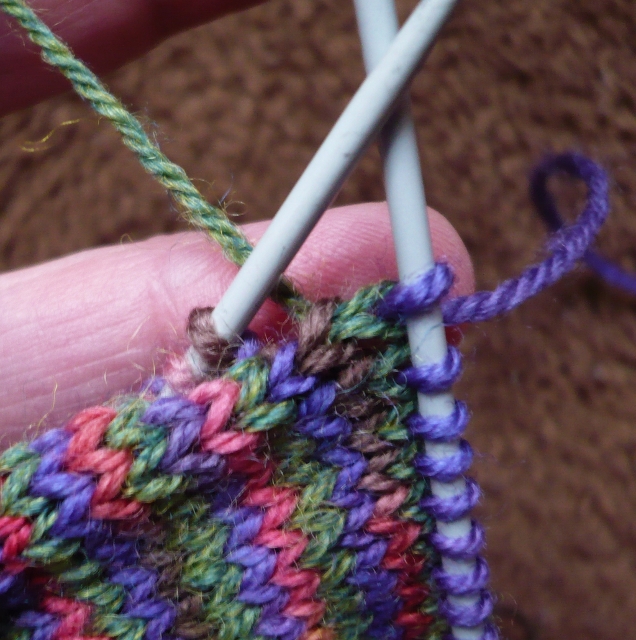
Here’s the TRACKING WHEN TO CROSS CABLES Trick. Every time you cross a cable you create a hole right where the cross took place.

20180906_115937

When you are close to working the next crossing stick a needle tip, pencil or your cable needle into the hole of the last crossing and run it up behind your work, popping it out right below the working needle, between the edge of the cable and the next purl border stitch. All the bars between these two stitches will be on top and you can count them.

20180906_120056

I’m crossing this 4 stitch cable every 4th round as follows:  The first bottom bar showing is the round where I did the last cross (Round 1 cross cable). The next 3 bars indicate the next 3 rounds (Rounds 2, 3 & 4 work as set). Cross cable again on the next round (Round 1 cross cable).

20180906_121614

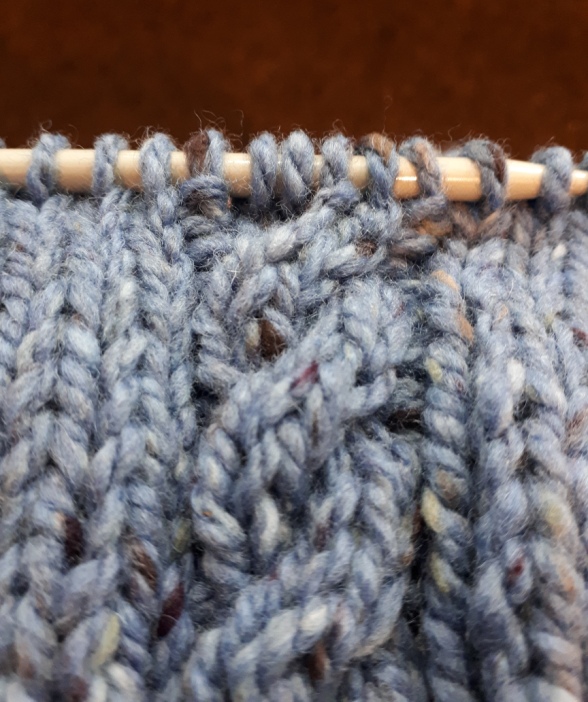
You can keep checking to make sure you on the correct round to make the next crossing. It makes cables in this nice thick wool the perfect project.

Thanks for reading,

Deb

Follow Me for more tips and tricks.

Cabin Fever Patterns on Ravelry


Spiral Stripes

I went diving into my stash for worsted weight yarn for another Any Gauge Raglan pullover. I found 6 50g balls of royal blue (300g in total). A great colour but not enough for a sweater. I didn’t find any sweater amount of anything else that caught my eye. What to do? Spiral Stripes, that’s the answer. I have lots of single balls in several different colours. I’m going to go stash diving to see if I can find 4 more colours that will go with my royal blue. Wish me luck.

For quite some time I have thought that a raglan would be perfect for working Spiral Stripes (also known as Helix stripes). This method gives you single rounds of stripes without any jog at the beginning of the round.

I’ve worked Stash Buster Socks with 3 colours and with 4 odd balls I worked the Stash Buster Striped Hat using spiral stripes.

These are the rules I follow:

  1.  One more colour than sections your project is divided into.
  2.  Do Not Twist when changing colours.

That’s it.

Rule 1:  Divide your project into sections and work with one more colour than the number of sections. You can use markers to make arbitrary divisions in your project or use any natural sections your project may already be divided into. The sections do not have to have the same number of stitches. For example, a sock can be divided into the front of the leg and the back of the leg. My Top Down Raglan will be divided into 4 sections: Back, shoulder, Front, shoulder. There are 4 markers, each placed between these sections. At each of the markers the colours could change. Since I have 4 sections in this raglan pullover I will be looking for 5 different colours.

Rule 2:  Do Not Twist. Usually when changing colours you would pick up the new colour so that the old and new colour link together (twist around each other). This prevents holes at the change. For this method of stripes you purposely Do Not Twist the colours at the change.

I’ve knit this method in the Stash Buster Socks with great success. I used 3 colours and divided my sock into 2 sections (front of leg, back of leg). At the colour change spot, I took the colour I just used, placed it to the right and dropped it. Then I picked up the new colour from the round below (it will be sitting right there where you need it) and began knitting the next section of my sock. The two colours do not twist.

These socks were knit with a solid purple colour, a solid green and a variegated brown/pink/gold combo.

In this photo the purple has just been used and placed to the right and the green from the round below will be picked up to start knitting the next section.

Stash Buster Sock P1040010 (636x640)

Can you see that the green round will continue over the brown/pink variegated round on the left needle? All the rounds are continuous so there is no jog.

So far I have knit 5 pairs of socks. The Stash Buster Sock is a great for those lonely 50g balls of sock yarn you might have in your stash. Pair them up with some interesting friends and see what magic happens.

Stash Buster Sock P1040016 (640x621)

I’m starting my Spiral Stripes Raglan this week. I’ll keep you posted on my progress. This is the result of my stash dive.

20180826_140218.jpg

EVENTS: On Saturday September 8 Cabin Fever will be at the KW Knitting Guild’s Knitter’s Fair in Kitchener, ON. It’s a terrific show with tons of vendors and lots of like minded knitters. Drop by and say hello.

Thanks for reading,

Deb

Cabin Fever patterns on ravelry.

%d bloggers like this: