Why We Testknit

Sending your brand new pattern to a testknitter is a lot like sending your baby to a new daycare. The phone rings, “your baby is misbehaving”. Your reply, “Oh, no, no, no, not MY baby.”

So there I was knitting away on my adult-sized sweater and thinking I was doing pretty well and then the email pinged and Yup, misbehaving big time.

My first thought was no, no, no (denial). Then cursing (anger at myself for missing this). Saying, “it will block out” over and over, was probably my first clue. After kicking myself black and blue, I had to finally accept that there was, indeed, a problem. Problem solving is my thing, right? I can do this. Hands rubbing together gleefully, it’s time to solve this puppy.

The problem? The myth that you can pick up 1 stitch for every ridge along the side of a garter stitch piece and it will always, but always, allow you to knit in a perpendicular direction with a smooth edge.

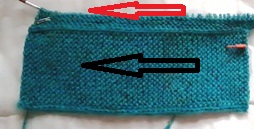
If this wasn’t embedded in your brain from your first garter stitch project, here it is. For garter stitch, if your row gauge is 5 Ridges = 1″/2.5cm (black arrow) and you pick up & knit along the side (red arrow), your stitch gauge will be 5 Stitches = 1″/2.5cm, always. Doesn’t that look lovely and smooth?

garter stitch ridge vs sts

Not so smooth on my adult sample.20200306_110448

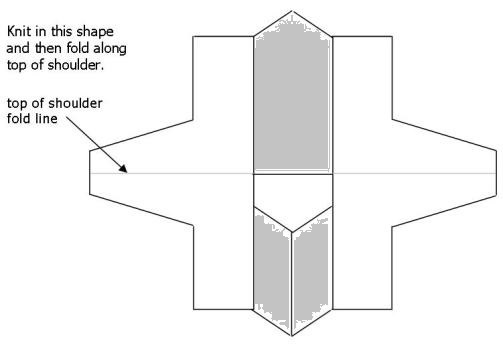
See all that puffiness? The pick up & knit is not smooth and the Side panel is much shorter than it should be, that’s the real problem. Apparently working decreases at that outside edge of the Front piece so that the Front stitches go in a diagonal direction causes enough distortion that the myth of picking up 1 stitch for each ridge Does Not Work!

It was much worse on the Back. I had been trying not to look.20200306_110526

I know what you’re thinking. How could she miss that?!

Denial is an amazing thing. In the back of my mind I did think something was just a little  wonky but the rule of stitches to ridges thing works every time, doesn’t it? I’m sure of it. I’ve been sure of it for decades.

Nothing for it but to rip back. There might have been a little cursing. OK, more than a little.20200306_174728

I did mention the denial thing, right? Two x 100g balls, plus a bit more, worth of denial. I was into it big time.20200307_093247

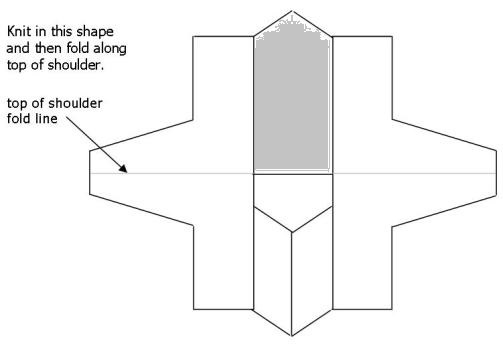
And so the midnight awakenings begin until I finally came up with a workable solution. It was actually the second solution that worked but who’s counting. Solution: Work some increases as you pick up and knit.

Ta, da, look at that! Smooth along the pick up edge and a Side Panel that is the correct length. Worth every sleepless night.20200309_172742

I’m sure you’ve never done this. But if you have I feel your pain.

My child-sized Build a V is published and has the correction in it. Yay.

Hope you’re keeping well and happily knitting. Tell me what you’re knitting on my NEW ravelry group: Debgemmellmods.

Stay well.

Deb

Any Gauge and GAUGE-FREE patterns by Deb

Cabin Fever No-Sew patterns

ravelry group: Debgemmellmods

Deb on instagram

Build a ‘V’ for children

I would like to introduce the Build a V cardigan for your favourite child. Maybe right now is the time to be adventurous and try a Gauge-Free sweater pattern. That’s right, there is no mention of gauge throughout the whole pattern, ever.  NO SWATCH needed,  YAY. Grab any yarn you love, needles and a trusty tape measure and cast on.20200320_103518 - Copy

20200320_103718 - Copy

It’s knit flat in garter stitch and then folded at the top of the shoulder line to make a cardigan.

Here’s an overview. The Back Panel  and then 2 Front Panels are knit as separate blocks.

Then … pick up along the sides of the Back and one of the Fronts (along the black line in the schematic) to knit sideways for half the Body.


Here are some photos of the Build a V testknits.

Is this beautiful for a little boy? Done in Lion Brand Ferris Wheel, a variegated yarn with a long colour change. Pretty cool looking.build a V baby R

Once the Side Panel for the Body is knit you put side seam stitches on spare yarn so that all you are left with on your needle are the sleeve stitches. Knit your sleeve and voila … half your sweater is done.

Build a V child blank schematic - shaded sleeve

Work the other side, fold, sew the sleeve seam and it’s a garter stitch cardigan for your special little one.


Is this cute or what?! One of my testknitters did the stash dive and worked in 3 colours. Stash diving at it’s best. Build a V 1 - Copy

Since there are many distinct blocks of knitting you can play with them and have some fun with colours or maybe even knit the Side Panels with stripes (I wish I had thought of this when I knit my sample).

Thanks testknitters for your work.

I’ve started a NEW Ravelry Group: DebGemmellMods   I’m handy there for answering questions. I’d love to see your Build a V photos. Join me.

Deb

Any Gauge and Gauge-Free patterns by Deb

Cabin Fever No-Sew patterns

Deb on instagram

Ravelry Group: DebGemmellMods

Gauge-Free FREE beginner scarf

Does this idea of Gauge-Free really seem weird to you? What do you mean you can just pick out some yarn and start with no stitch counts and no idea of a gauge you need to get? How can you knit the correct size? Any yarn at all? Any needle I think is reasonable? How can that be?!

If you are knitting at home more than usual during this time and want a stash diving  project, give this a try: Gauge-Free Triangles Scarf/Shawl. This is one of the workshops I teach and I’m offering it Free here for the duration. Knit GAUGE-FREE or, as I call it, knitting without a safety net!

The trick to knitting Gauge-Free is getting started in the right spot. You need to start where you can get to the size you need, regardless of your gauge, and measure it with a ruler (tape measure).triangle workshop height measurement


Here’s a beginner project, the GAUGE-FREE TRIANGLES SCARF/Shawl that totally works because it starts at the corner of the first triangle.

gauge-free triangle scarf workshop

It’s a modular, join-as-you-go project. You can use any yarn with any needle you think is reasonable. You can knit a scarf with all your odd balls or have a more thought-out plan of two colours. You can knit every triangle a different colour or knit stripes (as soon as you work stripes you have a right side and wrong side, keep that in mind). You can knit this as a large rectangular shawl (or is it called a stole?) if you make ‘Triangle I’ about 12″-14″/30-36cm deep or even deeper and then go on from there for as long as you need it to be. Add a stitch pattern or two?

If you make many scarves you can sew them together into a blanket.triangle scarf blanket

The options are endless.

Enjoy,

Deb

Any Gauge and Gauge-Free patterns by Deb

Cabin Fever No-Sew patterns


No Math and Gauge-freedom

Can you make a Gauge-free sweater Math-free too? No gauge swatch needed and no calculator?

What if throughout a sweater you only had8 to refer to one number, call this the primary number. Then you might need 2 times that number and then later, half that number. Does that count as doing math? You can do it in your head. No calculator needed.

I seem to be drawn to what I call Magic Numbers. It happens without me knowing it. When I wrote the Need A Hat book by Cabin Fever, it became clear, very quickly, that the entire book is based on the number 8. It’s one of my favourites. The idea for the book came when I was giving a talk about knitting hats. You take someone into a yarn store to choose yarn and they immediately go to a colour they love. Now you have to find a pattern for that yarn weight and size and with a style the recipient would like. What if we wrote a book where every hat could be worked in any weight of yarn? That got it started.

Now I’m working on this Gauge-Free cardigan idea, Build a V, without stitch gauge numbers in it at all.

The entire sweater is based on one number. That number is the number of Ridges it takes to make the Beginning Triangle for the Back of Neck measurement. It’s a different number for everyone.

build a V count R on triangle

I called this measurement D, for the only reason that it’s the 4th thing you do in the cardigan.

So now we have ‘D’ number of Ridges. For my little person cardigan in worsted weight yarn, ‘D’ = 6 Ridges. That number ‘6’ is going to be used over and over in the making of this sweater.

Make the Fronts ‘D’ number of ridges shorter than the Back. You got it, 6 Ridges shorter.

Publication1

That makes two more pieces of the puzzle that is this cardigan.

Build a V child blank schematic - shaded back panel and front panels

Now join it up to make a half a sweater. Pick up & knit along the sides of the Front. For the shoulder, which is going to link up the Front and Back, Cast On 2 x ‘D’ number of stitches. Pick up & knit along the Back. There it is again, that Magic Number: if ‘D’= 6 Ridges then 2 x ‘D’= 12 sts for the side of the neck opening.

Now knit for the width I want.

Publication2

Half the cardigan is done. YAY. Build a V cardigan is now published.

Thanks for reading,

Deb

Any Gauge and Gauge-Free patterns by Deb

Cabin Fever No-Sew patterns

Gauge-Free Back of Neck

The Back of Neck is an important measurement. I’m sure you know what your favourite Back of Neck width is, No? Go and measure some sweaters. I’ll wait here ….. well, what did you find?

I bet you found that you wear not one but several different neck styles with different widths for the Back of Neck. Me too. Wider for the summer and narrower and cozier for the winter. I’m sure you like to wear some better than others. Maybe the neck width has something to do with that.

To knit this Gauge-Free sweater you get to choose. You are the boss of this knitting.20200120_164454 - Copy

The Beginning Triangle sets up your Back of Neck measurement to whatever you feel like making it for yourself. Then you knit a long strip the length of the cardigan.

Build a V child blank schematic - shaded back panel

But I can’t seem to leave it alone. So for the adult versions I added a 2 stitch I-cord to each side edge. That gives you 2 stitches of stockinette stitch at the edges of the garter stitch. I  think the I-Cord edging looks so neat and tidy. It also holds the garter stitch from stretching when you have a narrow strip of knitting that is at least 20″/51cm long. 

The other change I made from the child version,Build a V, to the adult version is to give the bottom of the Back Panel strip a rounded bottom. The child version has a nice pointy bottom edge, fine for kids, not so wonderful for adults. I didn’t want an arrow pointing to my butt.   

I made it rounded by working the centre increases further and further apart as the strip is knit. It makes the knitting go quickly when there is something to concentrate on. That seemed like a good idea at the time too. 20200128_092409 - Copy

So now the Back Panels are done for all three of my cardigans. Now onto the Front Panels. My testknitters are also hard at work. But that’s another story.

Thanks for reading. I have to get back to my knitting so see you next time,

Deb

Any Gauge and Gauge-Free patterns by Deb

Cabin Fever No-Sew knitting patterns

Deb on Instagram


%d bloggers like this: