Sloped shoulder sweaters. Are you a fan?

I’ve been checking out the sloped shoulder sweaters for a while now. There are many variations.

Have you done one of these? What did you think of it?

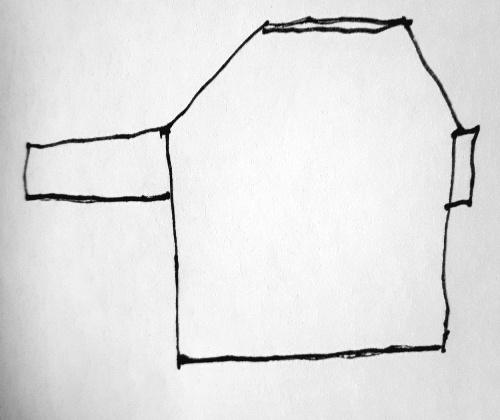
I am knitting the Centerpopover which is this one. We’ll call it #1.

Would you call this a batwing or a dolman style pullover? The shoulder line is extended out past the body. The long sleeve would extend straight out from the extension. When blocked, I think the long sleeves would slope down slightly.

I blocked mine and stretched the shoulder line. I wanted the sleeves to come down my arms to form short sleeves.

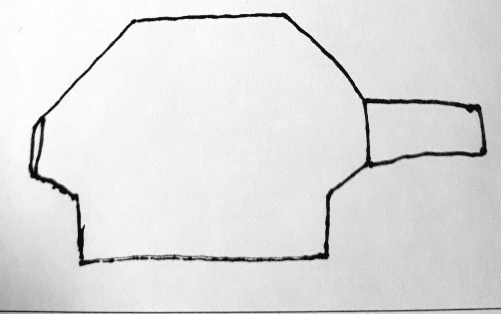
Here is #2. This one has some shaping. The shoulder line is again extended past the body line but then decreases are worked along the sleeve opening. The sleeves would definitely extend the shoulder slope.

Would this one also give you a batwing/dolman look? You could definitely work decreases in the body below the sleeves to get that effect.

Then we have a simpler style with a straight body line. #3

The sleeve would angle down a bit when worn. At least I hope it would.

And for #4.

A straight body line again. Short rows are worked at the top of the long sleeves so that they match the shoulder slope.

I’m finding all of this most interesting. Have you knit one of these? Did it work for you?

Cheers, Deb

Any Gauge and Gauge-Free patterns by Deb

CenterPointPopover

Happy long weekend. I hope you are enjoying some knitting. I have been busy knitting the vest version of the Centerpointpopover by mamasteddybear. I’m going to show you my progress. My vest doesn’t look nearly as neat and tidy as the pattern photo below but that’s life as a knitter.

I’m very interested in these sloped shoulder top down knits that I keep seeing. So I thought I would start with a small project just to see how it looked on me. This one was terrific fun to knit. It starts with the Front which looks like this:

Then the Back begins:

Here the back of neck is the correct width and the stitches are put on spare yarn. Now the front and back get attached at the shoulders and the shoulder shaping begins. From here it looks like a knitting blob and is not worth photographing. You know how that goes, right? You just have to keep the faith that it will turn into something.

Body shaping is done and one sleeve worked and it’s clear that it is a garment.

This is the true colour of the popover. I don’t know why my phone insists that it might be blue.

Now I have the other sleeve done and a short bit for the body length.

I haven’t bound off the bottom edge yet because I would like it to be longer. I washed and blocked it with 2 circular needles still holding the bottom edge open.

I gained 3″ in length from the blocking. Yay. Just what I wanted. It’s drying now. I have to finish the neck edge and cast off the bottom and then we’ll see. I’m going to go do something else now. Standing and watching it dry does not seem to be moving things along any faster.

I really enjoyed knitting the Centerpointpopover. This is a very inventive construction and you know how I like that. I would recommend it.

Cheers and here’s hoping you are knitting something fun too. Deb

Any gauge and Gauge-Free knitting patterns by Deb

Looking back from the Finish Line

I finished my last Saddle Up pullover. I started with this design idea as a pullover for my son. It has a complicated 32 row centre cable pattern that I thought reflected his passion for skateboarding.

My son likes it.

Caught him at work to get some photos. I think it fits very well.

I had to do some ripping after the first fitting. The back was flapping around his hips. This seems to be a problem with oversized pullovers for men. So I took out the garter border at the back, worked 3 sets of short rows, went down a needle size and knit the border again. Now it’s narrower and voila …

I think that fixed it. Yay.

Now onto something new I think. Cheers, Deb

Any Gauge and Gauge-Free patterns by Deb

%d bloggers like this: