I’m trying not to cast on something new. It’s time to buckle down and finish my second Twelve-Point Circular Yoke.
The yoke is done. The body and sleeves are next.
But look at this. I’m so happy my protype is done and wearable, if only it would warm up and be spring.
Prototypes are experiments, so not even close to perfect.
Every time I begin though, I’m fully convinced that this design is fully formed in my head, and all I have to do is knit it. But you guessed it, that’s not even close to how it goes.
Problems crop up. I work out these problems while I knit, rip, and re-knit. Then, I decide on the changes I need to make for the final design. That is what I’m knitting now. But I have to admit that the prototype, for me, is much more exciting to knit.
Part of the problem solving was around coming up with a way to add some extra width on the front for those of us who need it. I’ve added an explanation of how that works in this video.
Yes, the prototype of the Twelve-Point Circular is done. Yahoo, sleeves are finished. Phew.
Why are sleeves such a slog? Anyone?
I have set myself up to knit 6 sleeves. Yikes, that’s bad news. The good news is that the first two are done! I’m celebrating 🍾.
Everything else is stuck in the middle. I have the ribbing to do on my Lunenburg and then 2 more sleeves.
The cotton/Hemp Twelve-Point Circular is on hold for the moment. I want to show you how I added extra width on the Front. Coming up soon.
Because 2 sweaters is not enough, I’ve started a Puzzle-Pillow Blanket by Meg Swansen.
cmp3.10.3.3Lq4 0xcfaee675
It’s all mitred corners which keeps me interested and is lots of fun. It’s from this book.
I’m using up all my odds and ends, working them doubled up on a 5.0mm. The pattern is a bit obscured, ok, a lot obscured, but I’m using each ball until it runs out. Otherwise, I’ll end up with even more tiny balls. I need to move all these bits of yarn into something I can use.
Since it’s garter stitch, and is getting larger, I am also practicing my Purling Back Backwards so I don’t have to flip it over every row.
That’s me, up to date on my projects which are all stuck in the middle. I hope your knitting is moving along. Cheers, Deb
… I have an ‘almost’ sweater, almost done that is. The pattern has been uploaded onto ravelry: Twelve Point Circular Yoke and it’s free. The sweaters aren’t even done but I thought you might like to see it since I’ll be talking about it for the next couple weeks as I finish up.
It always looks so great when it’s this far. I tend to forget how much back and forth it took to get here.
This is my dubious process:
Have an idea. Start knitting (that’s the really easy part). Go to bed.
Decide to write the pattern and start writing. As I knit I write what I’ve done. Then, I write ahead of my knitting, trying to write the instructions for the sweater that I will follow because I’ve got this, right?! Then I go to bed.
Next morning I decide that I should have done something slightly different for the neck edge. Rewrite the instructions and decide it’s too late to redo that part since I’ve done too much knitting by now. Wonder if this is going to work out. Go to bed.
I need to figure out a step by step way for you to do the math for setting up the yoke markers. Will this make sense to the knitter? It’s totally logical to me. Sigh. Go to bed.
Double check that the math works even though I’ve just knit it up and it’s fine.
Next morning decide that I can’t leave that neck edge problem alone and start another sample. This time it works better. Phew. Happy dance.
Next, write out the math for figuring out the stitch count for the bottom of the yoke. That’s easy since it’s the same method I’ve used on my other Any Gauge patterns. Then I start counting stitches to see how close I am to the bottom of the yoke. Counting all those stitches is a pain! I must be able to figure out an easier way to know when I’m getting close. Got to bed.
Next morning, work on an idea I had during the night. It seems to work. Yay. Happy, happy.
As I approach the bottom of the yoke I think about how to make the Front wider than the Back, for those of us who need this modification. I think I have it worked out. Write it down. Do a diagram and realize it’s not working. Stomp around for a bit. Start over. Doesn’t work. Knit something else for a while. Actually, quite a while as you can see (Lunenburg).
Back to the question of extra width of the Front. A solution comes to me now that it’s been on my mind for several days. OK, start knitting on my prototype again. Happy days again.
Write out the Helical sequence for putting the sleeves on spare yarn. Knit my prototype and realize I wrote it all wrong. Correct it. Keep knitting.
So here I am with a finished body. I’m a happy camper.
My second yoke is also coming along.
The pattern is up on ravelry: Twelve Point Circular Yoke and it’s FREE. I will update it with more photos when I have finished my sweaters. If you want to knit along with me as I knit my second circular yoke, I’m happy to have you along for the ride. I’ll be at this for a couple more weeks.
Here’s my video update if you want to see the sweaters in real life (is it real life if it’s a video?).
I’ve been having fun, really, I love this. Cheers, Deb
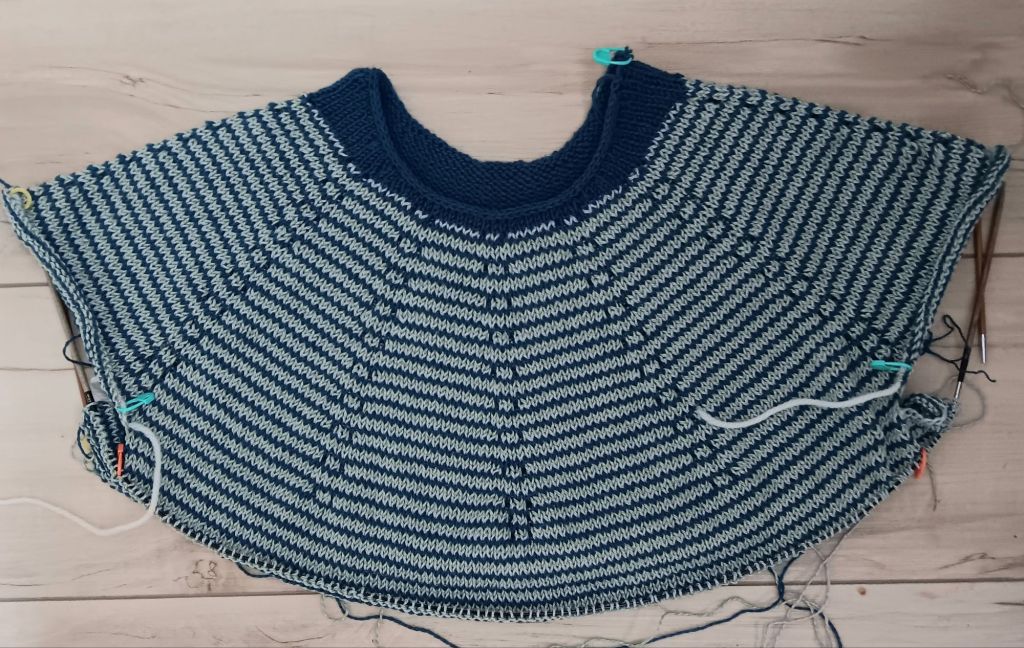
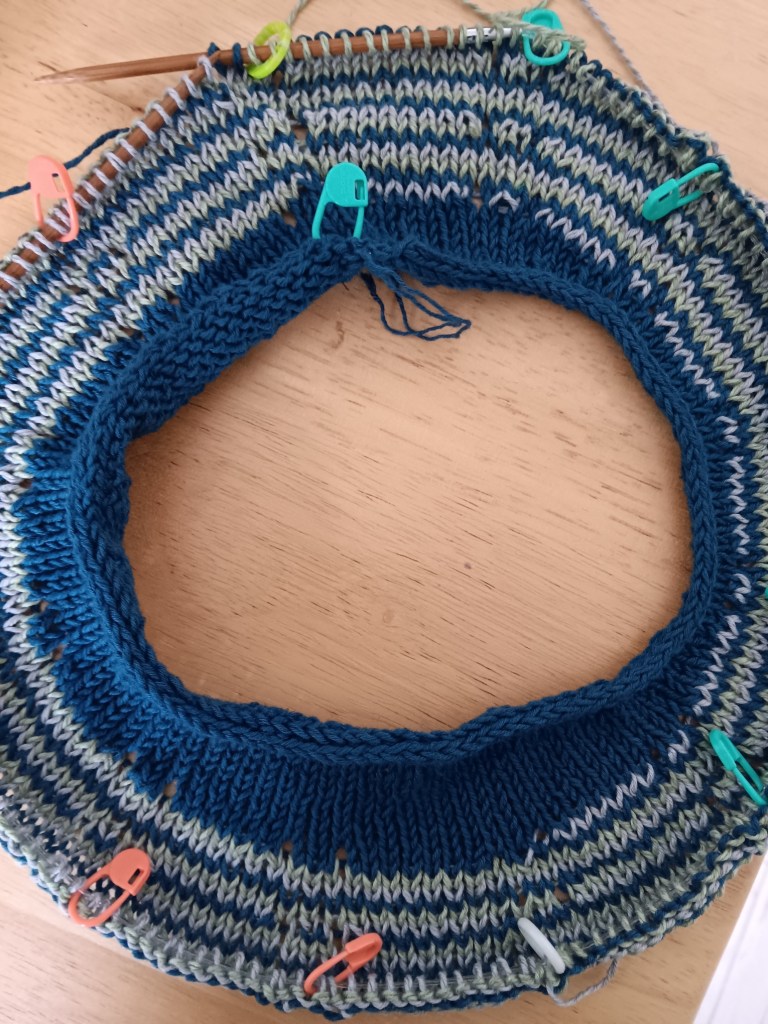
This is my latest circular yoke. What you can’t see if that I ripped back a couple inches, knit it again, ripped it back, and knit it once more. It’s been that kind of week.
I was trying, for a couple of days, to figure out how to get a bit more width on the Front of my circular yoke (for two obvious reasons) and still arrive at the needed number of stitches at the bottom of the yoke. If you also need this, good news, I was successful in the end. I figured out how to work 12 more stitches across the Front, above the bust and the divide, with 12 fewer stitches across the Back. This suits me and maybe it suits you too.
I’m hoping to post the pattern next week, all things going better than they did this week!
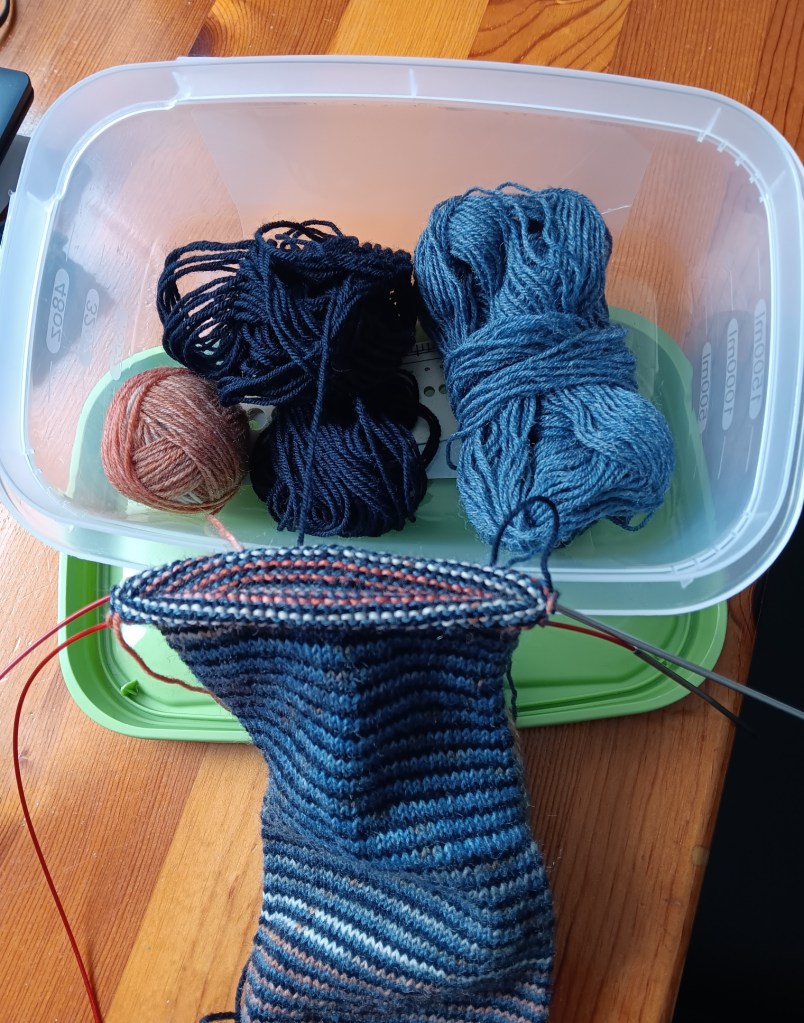
I now have 3 projects working the helical method. I thought I would just show you how the yarn you use affects how it looks.
This is the 3 colours, one-round stripes, in 3 solid colours.
Again, 3 colours, 2 solids and one variegated with a long colour change (cinnamon to light blue).
This is my stash bust of 2 variegated and one solid (brown).
All three using the same technique with very different results. Is this amazing or what?!
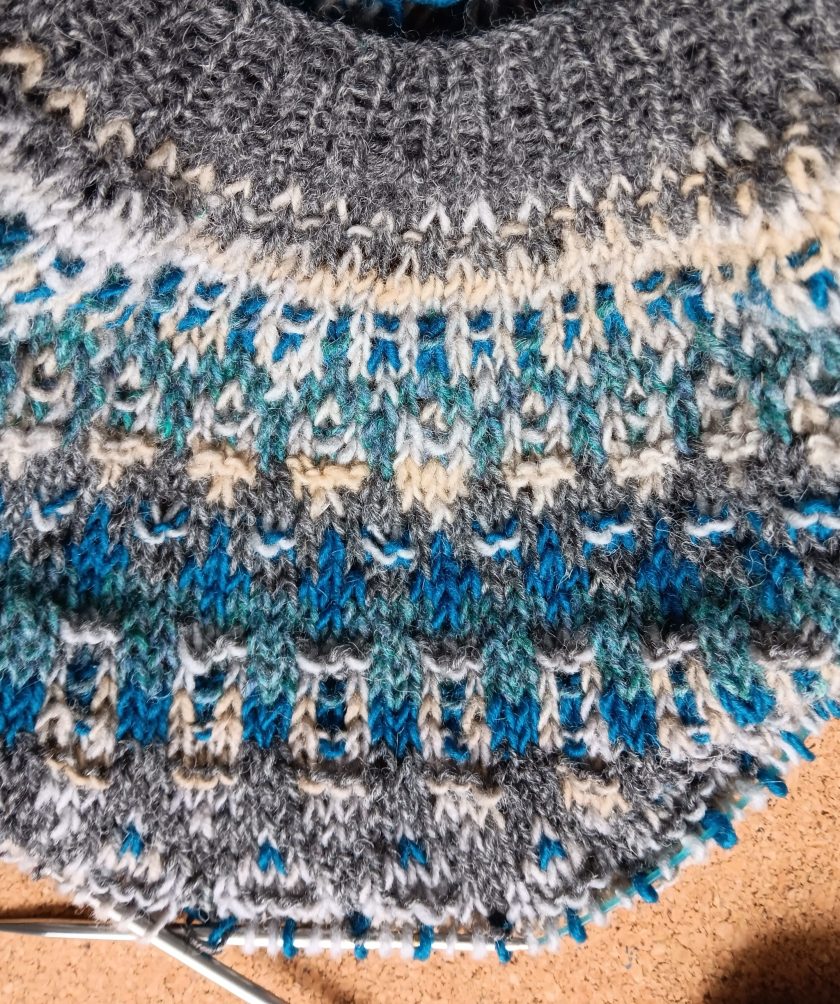
To continue my forward/back week, I started the Lunenburg circular yoke. It’s way more complex than mine. It is a Bohus style colour yoke with purl stitches which are part of this style. I am, at the moment, curious about all things circular.
I find picking colours really difficult so choosing 4 contrast colours against the main colour, grey, was not smooth sailing. I started with this.
I decided that I wasn’t feeling the pinkness. Ripped this back too.
Also, this pattern has lots of colours you use for only one round which means lots and lots of ends. So I decided I could take it down to 3 colours and the main colour. One of my colours goes from light grey to yellow (unfortunately you can’t see that in the photo) so I’m substituting it for the two light colours in the chart. Fewer ends, hoorah. I’m really happy with my decision.
I’m using Briggs and Little Sport in medium grey, teal blue, grey heather and Softspun Lite ‘n Fancy in the grey/yellow (the colour I’m using as both the 2 light colours in the pattern). After several inches of knitting the yoke, I finally feel like I am relaxing into the colour knitting. It’s been a while since I did any.
We are in the middle of the southern ontario snow dump. I live in a basement apartment and my view is filling up with the white stuff.
I’m feeling that middle-of-the-winter slump. I curl 3 times a week, which usually helps the winter go by, but I am not doing very well, in fact, I have lost every game for 2 weeks. I guess that’s not helping! My knitting is coming through for me though. What do people do who don’t knit?
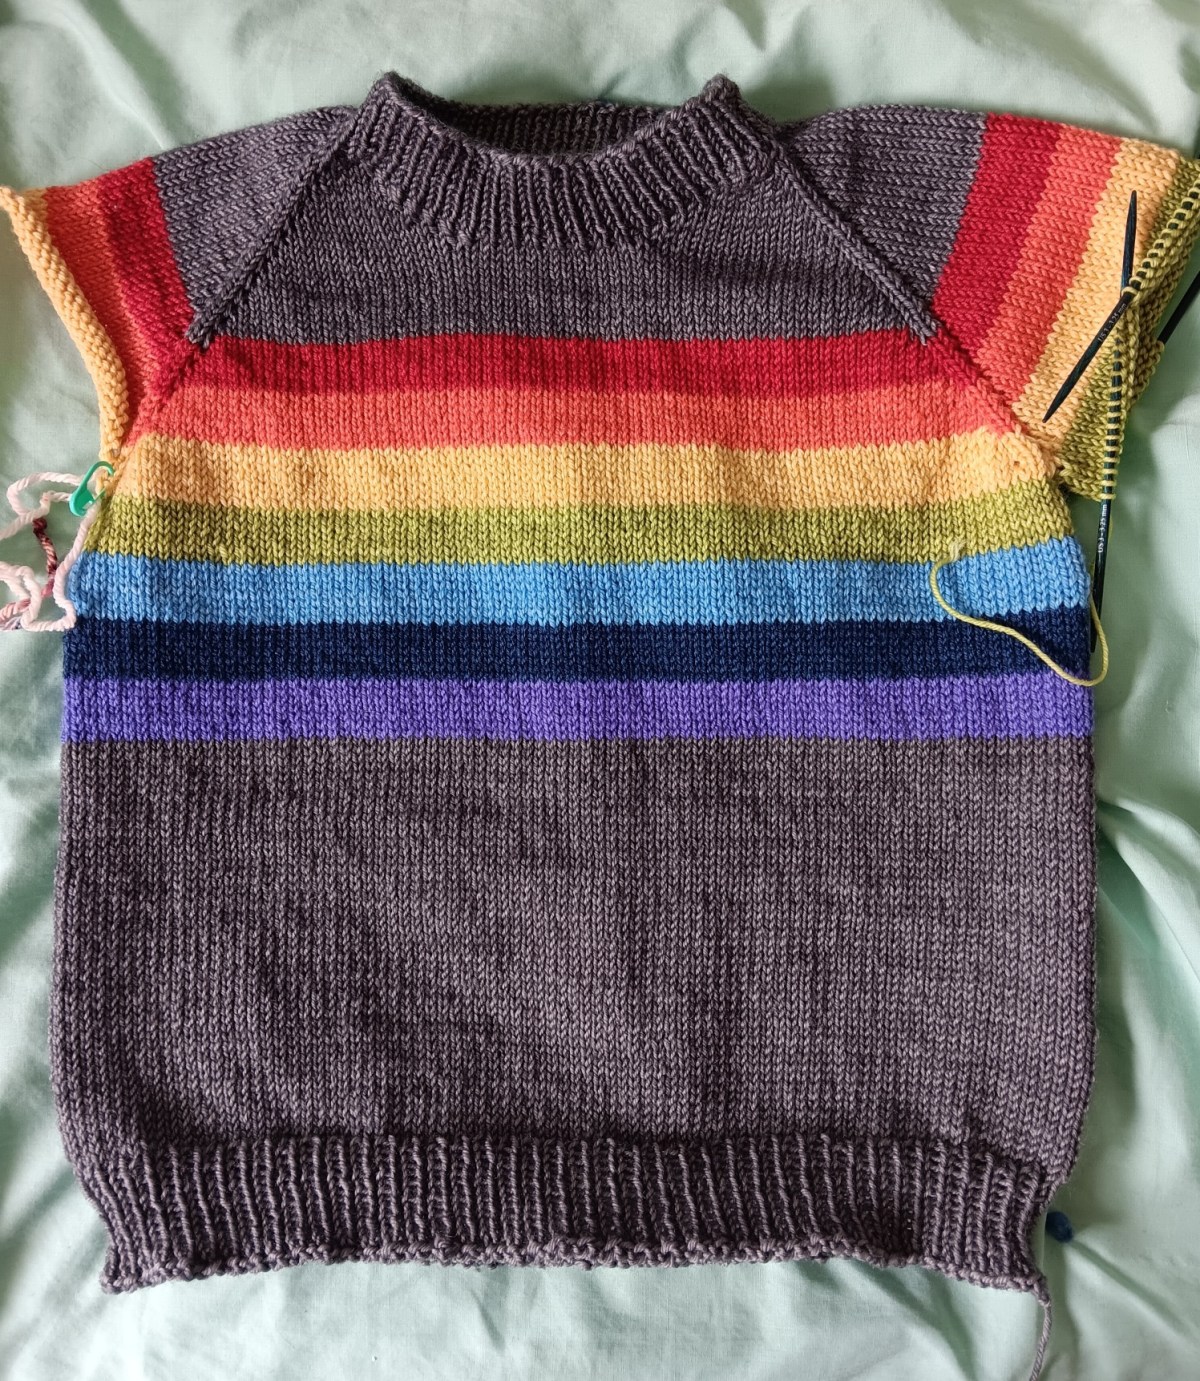
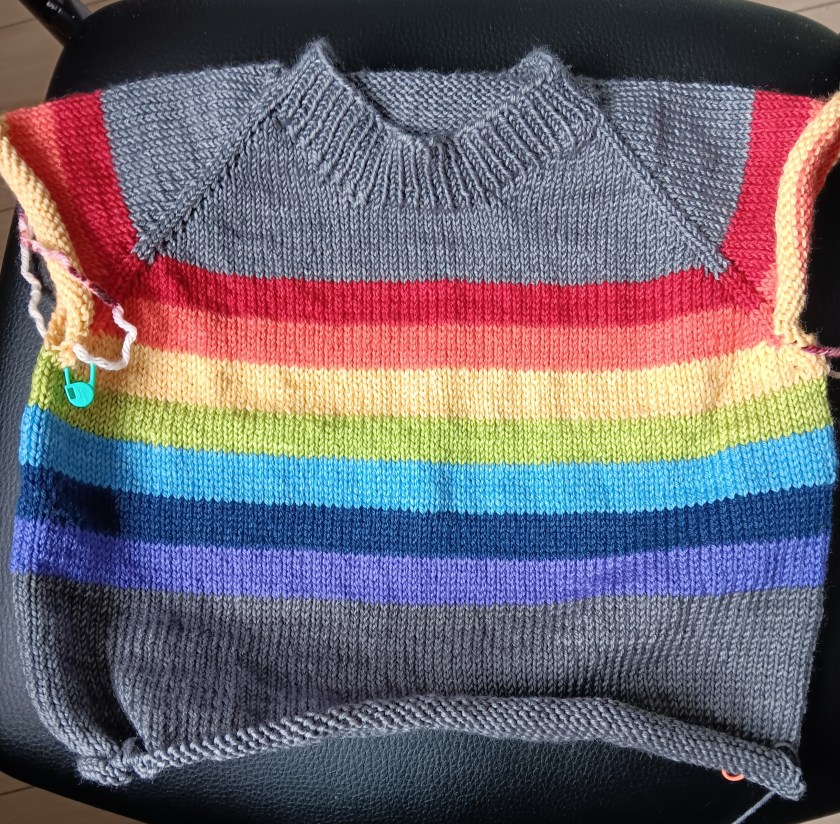
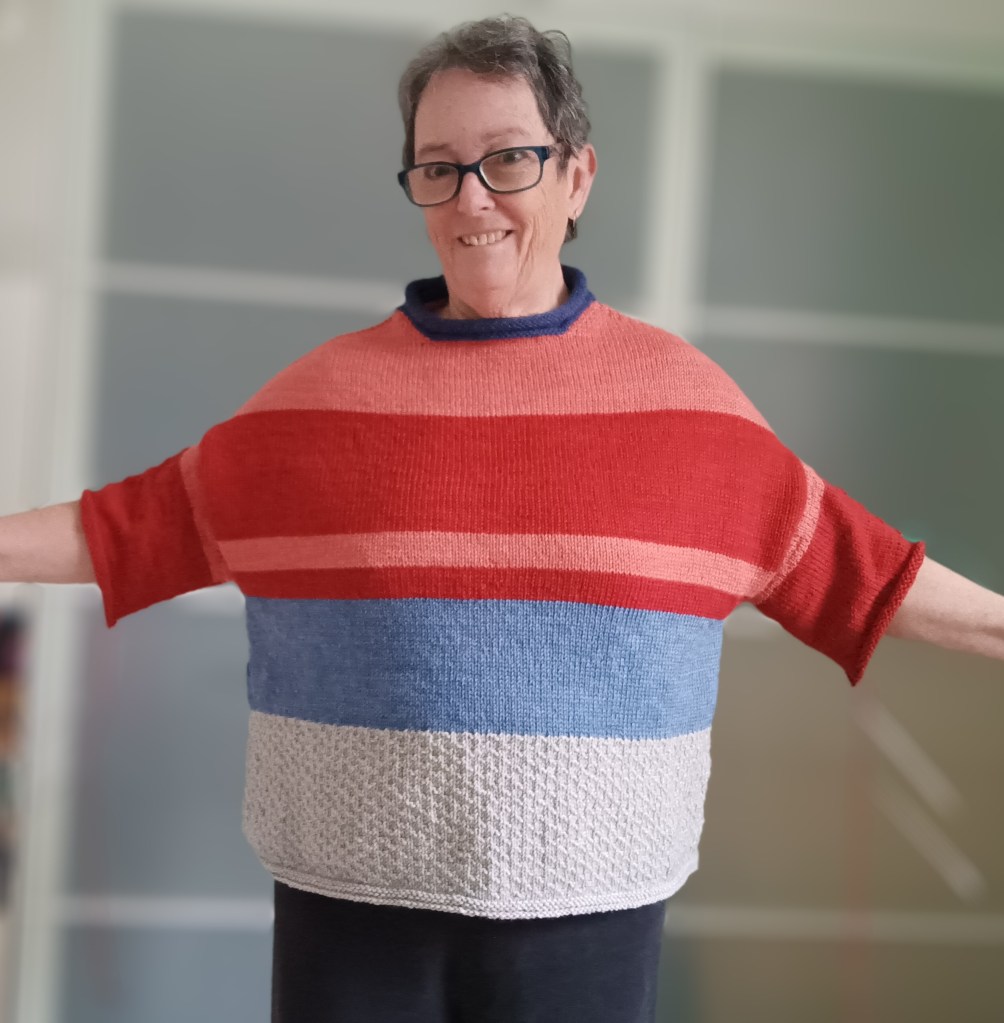
I finished the body of my Family Crew Neck for my rainbow obsessed grandson. It took a good bit of TV knitting but there it is, done. If you want to see me blather on about this sweater, along with an explanation about working the sleeves for an adult version, check out my latest youtube video.
And here’s the little guy, trying to play the solitaire game I taught him the other day. Hmm, wait a minute, the rules seem to have changed drastically!
He is totally knitworthy. He regularly wears the sweaters I knit him last year. I’m hoping this one will last a couple years.
At the bottom of the pullover, I cast off the ribbing with the Icelandic Cast Off. I cast off quite tightly if I’m not paying attention. I thought this might work better but it’s a little wavy. I’m not happy. I may have to rip it back and do a normal cast off after all.
Now the sleeves. I’m going to work one stripe on one sleeve and the same stripe on the other sleeve. This will make them go quite quickly, right? Here’s hoping.
Meanwhile on the helical front, I’m down to the bottom of the yoke.
I used my oM1 increase in the yoke, mostly because I like to see where they are. It reassures me.
I made a couple of changes to simplify things which I put in the second one. I have to see if they work before I get too much further. I’m also trying to figure out how to get a bit more room in the Front and make the Back a little narrower. That is what I like for my own figure.
It is a little hard to see the grey and green but they are there.
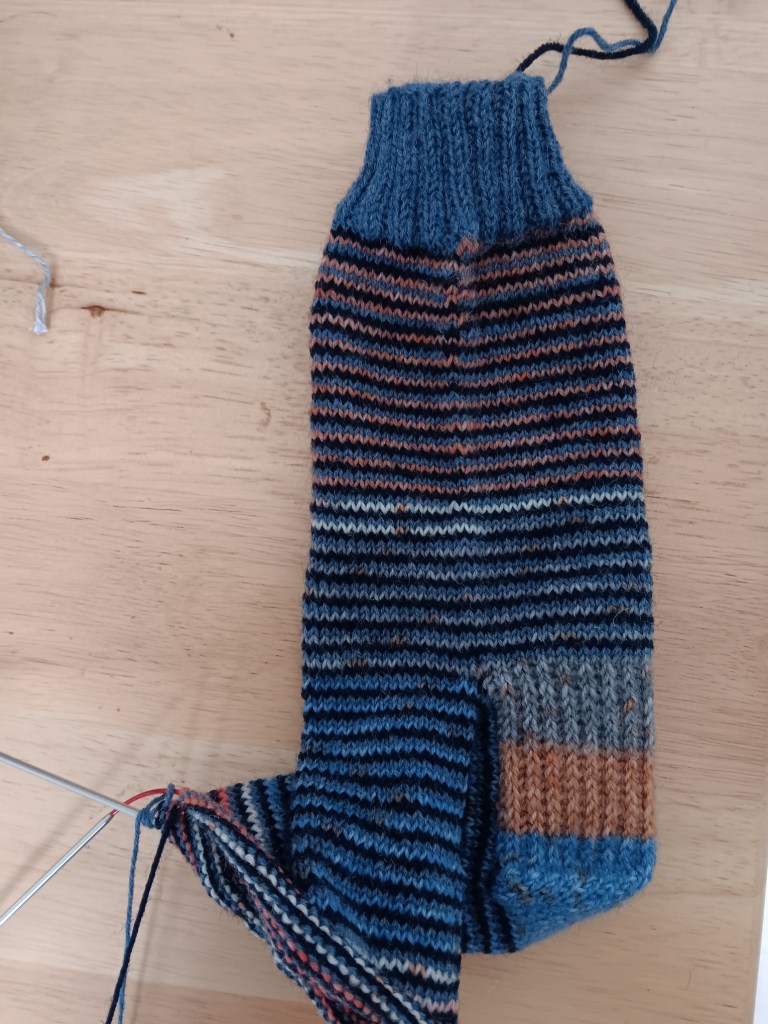
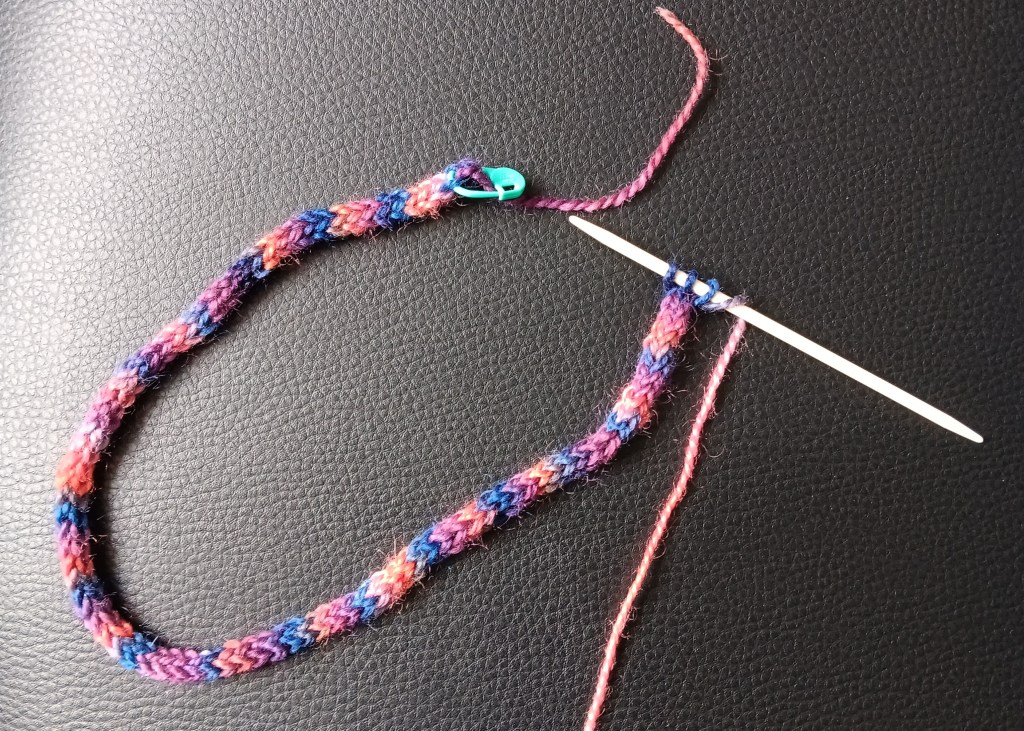
As I was already doing the helical thing, I started a pair of socks using 3 colours in the same helical method. Once I choose the 3 balls of yarn out of my odd-ball bag, I try to predict which colour will shine through. I am always wrong!
I didn’t realize that the variegated yarn had such a long colour change to it. That’s what makes helical socks so cool, you can never predict, or at least I can never predict, how the colours will end up.
A question that comes up when helical knitting is how to keep the colours straight and not too tangled up. Here is my solution. I move the colour to the end of the line of colours every time I finish with it. This totally works for me.
That’s a wrap for this week. Hopefully, two sleeves done by next week and maybe a sock. Days are getting a tiny bit longer. Yay!
My Family Crew Neck is just buzzing along. Therainbow stripes were a great motivator. I wanted to see what each new stripe would look like.
Now I’m at the point in this Family Crew Neck where I get into trouble. I want the body to be done, so I measure every couple rounds, thinking it will be the length I need before I start the ribbing. Even stretching the tape measure isn’t getting me there and you know I’m trying. Every time I’m sure that I must be there by now! Nope. A couple more rounds, a couple more rounds, a couple more rounds.
This is my weekly Youtube video if you want to see where I’m at on my two sweaters.
To keep my round measuring stress at bay, I am working on my Circular Yoke. The Short Rows are done and now I’m working the helical knitting rounds.
If you are serious about stash busting, this is a terrific technique. It makes one-round stripes, in my case, with 3 colours. That means I don’t have to buy an entire sweaters worth of yarn. I can stash dive and find enough of 3 colours, that when combined, will make up the amount I need for one sweater.
Here’s a video of how I got the stripes started and how to change colours. For this sweater the change takes place at the shoulders. Changing colours in the same place every time is the simplest way to work the helical method.
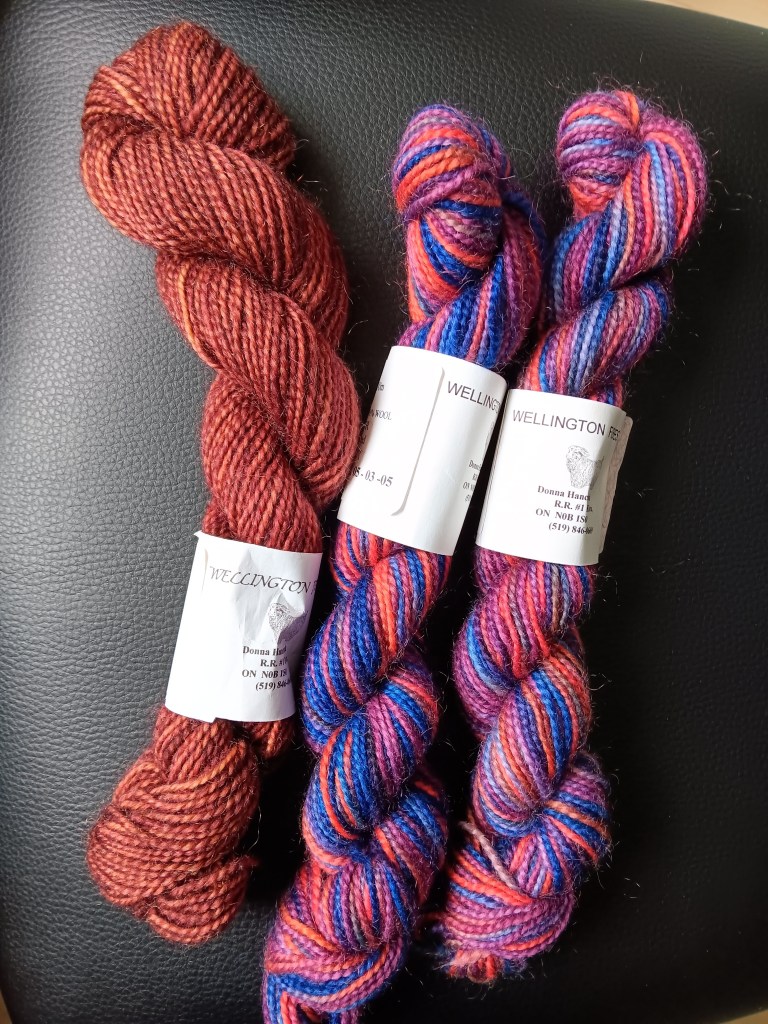
The trouble is that I chose colours that sort of blur into each other, much more than I thought. This is very deep stash from Wellington Fibres.
I am using the brown wool for my increase round, and you would think it would be easy to see, but, no.
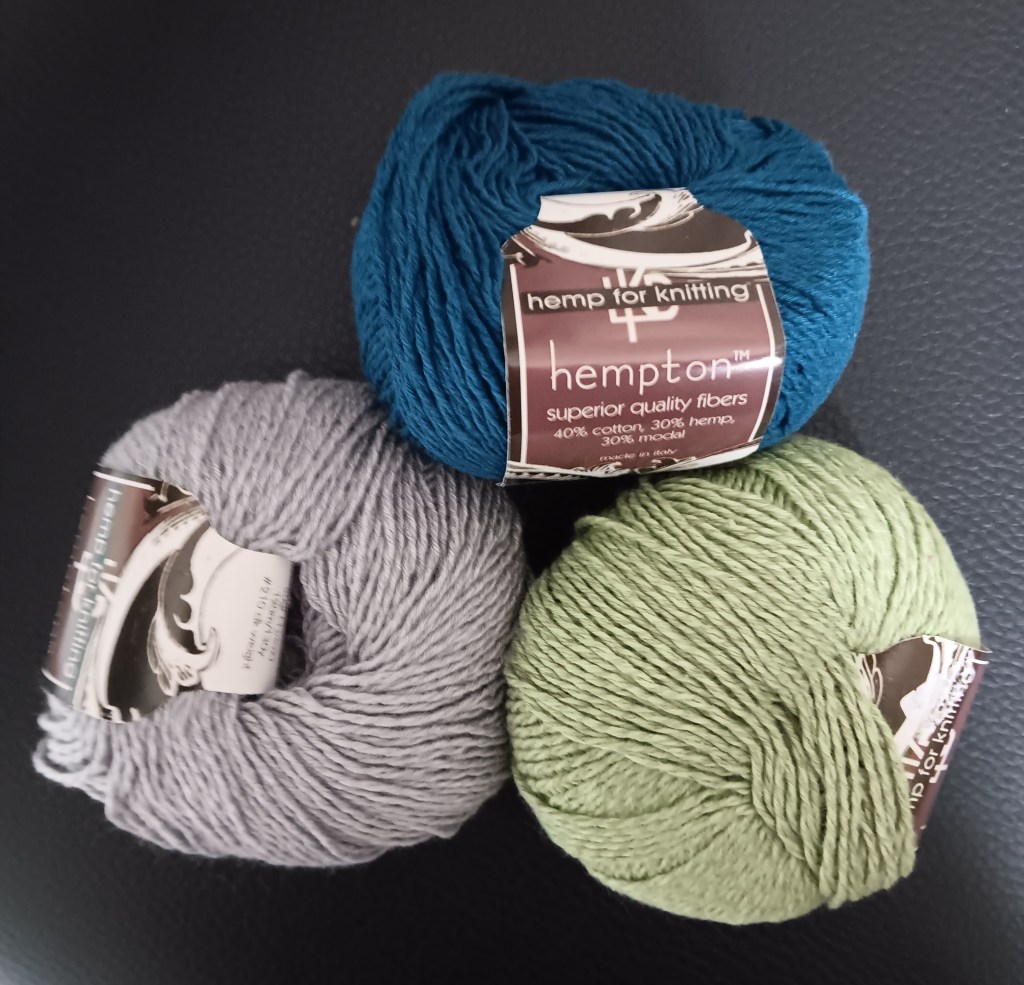
How about starting another one?! Sure, why not. I am thinking of summer here.
I have 8 x 50g of the grey, 8 x 50g of the teal and 2 x 50g of the green. I think that’s enough green to get 3 stripes going in the yoke. This is Hempton by Lana Knits: 40% cotton, 30% hemp and 30% modal. That’s summery yarn, right? Again the grey and green are a little too close in value but I think they will show the helical stripes better. Here’s hoping!
I had a oops. I didn’t guess correctly on my needle size to get the gauge I wanted for my Family Crew Neck. If I was a smart person I would have notes on the needle sizes I have used before for this yarn, but … no notes. So I guessed. The gauge isn’t even close to what I wanted. So my first beginning of this Family Crew Neck for my grandson is toast.
Say goodbye to this one, it’s way too big. The gauge is closer to 5 sts/1″ and I was looking for 6 – 6 1/2 sts /1″.
New start.
This is obviously working great. I got the gauge I wanted by going down a couple more needle sizes and voila, stripes are appearing like magic.
Here’s my weekly update.
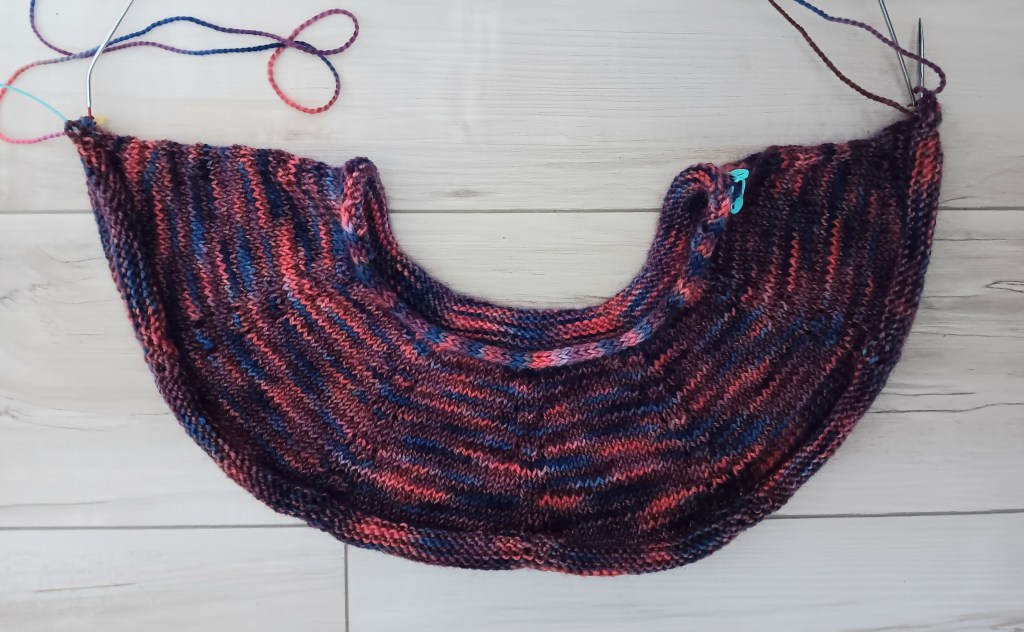
Because I can’t just knit just one sweater, I’m also knitting a Circular Yoke for myself. I started with an I-Cord 24″ long. I think this is a fairly good size for the neck opening. The I-cord idea came to me because I didn’t want to knit a swatch. I could knit the I-cord to the length I wanted, gauge doesn’t matter, it’s the length I needed. Don’t you sometimes just want to dive in? I do most of the time.
Once I picked up stitches around the I-cord I worked short rows using these Twin Stitches. Here’s a close up video of them.
The complete round where you have to close those last gaps from the back and forth short rows, is so much better with these Twin Stitches.
I can’t wait to get going on my 1-round stripes. I’m going to use the helical stripe method. Have you tried this?
It’s time to get started on my 2025 knitting. Have you started? I’m a little late to the party but I had to clear the decks, so to speak, and get those WIPs out of the way. Well, not out of the way exactly, but finished and delivered to the wearers, one of which is me.
Now I am starting on a request from my grandson for a rainbow sweater. It’s another Family Crew Neck, my 6th one. The modification for this one will be rainbow stripes. If you haven’t tried this pattern because of the math, I’ve done a video for the beginning cast on which shows my math for a 4 year old size. You can follow along over the coming weeks.
Also in the works is a top down circular yoke sweater. In the works at this point means I think about it at 3 a.m. There are so many ways to tackle a circular yoke. How could I work the yoke increases? Should I set up 8 or 12 markers and increase there every x number of rounds, as I work down the yoke? Maybe I could do a round with many, many increases and then work straight to the next round of many increases?
I have made 2 decisions so far. I am starting this circular yoke with an I-cord for the neck opening edge.
Then I am going to work in stripes of 2 rounds of variegated wool and one round of brown, worked in the helical method.
If you haven’t tried this, it’s a fantastic way to work one round stripes. Stay tuned. A video may be coming your way.
I’ve published the Contiguous Drop Shoulder pattern on ravelry. It’s an Any Gauge recipe style pattern. Oh, and it’s free. I have done a couple of videos for it too. Have a great time with this pattern. My daughter loves hers.
This one is in chunky weight yarn and was very fast to knit up.
The one for me is taking a little longer. I had a different idea for the sleeves and after knitting them decided it didn’t work. Rip, rip, rip and start again. Now they are mostly done the second time around.
I knit the sleeves with all the orange yarn I have left. I still have a tiny bit of blue and grey, about 2 or 3 rounds of each and then the sleeves are done. Three quarter length sleeves it is.
I used all the one dye lot skeins of worsted weight wool I had. Yay.
I worked the bottom grey colour in a floating seed stitch pattern since that ball of wool was ripped back from another project. I didn’t want to recondition the yarn so the stitch pattern is a distraction from the crinkly yarn. I think it’s doing it’s job.
I don’t know that this stash buster is fashion forward but it is very comfy. Just a perfect winter knit.
I’ve decided to put my future patterns out for free. I am finding that as soon as I’ve finished the knitting and writing, I really want to get it out to you. The time involved in the publication of a properly priced pattern puts this off for many, many months. It’s more than I want to be involved in right now that I am more or less retired. My friend, Dana, has knit this and given me a couple of much needed corrections. Thanks Dana.
Here is a video tour of the Any Gauge 6×6 Cardigan pattern.
Download your pattern at my ravelry store. I hope you enjoy knitting it. I’m here if you have any questions: debgemmellmods@gmail.com. I knit mine, the purple one, in Shelridge DK and the gold one, for my daughter, is in Estelle Worsted.
It’s time to tidy up before Christmas. So here is where I’m at. Look at this. The Contiguous Drop Shoulder is almost done. I’m so excited. Only the cuffs to go. Watch for the pattern on my ravelry site because it should be up for free as soon as I can get a proper photo.
The sweater colours are a little brighter than this. At 7am,there is not much choice in lighting. I have to leave at 8 to go to curling. But I wanted to show you that the sleeves are almost done. Yahoo. Did I already say I was excited? I’m excited!
I also finished my christmas knitting. One pair of double mittens (one pair stuffed inside the other) of my Any Gauge Mittens. (discount MITTENS is still in effect).
That’s a wrap. Have a wonderful Holiday Season. See you on the other side. I am already planning my next sweater. How about you?