Knit to Fit: More bust shaping

My theory is that the front of our sweaters should be wider than the backs for two obvious reasons.

We don’t need it to be wider everywhere. Just where we need it. (Do I need Bust Darts?)

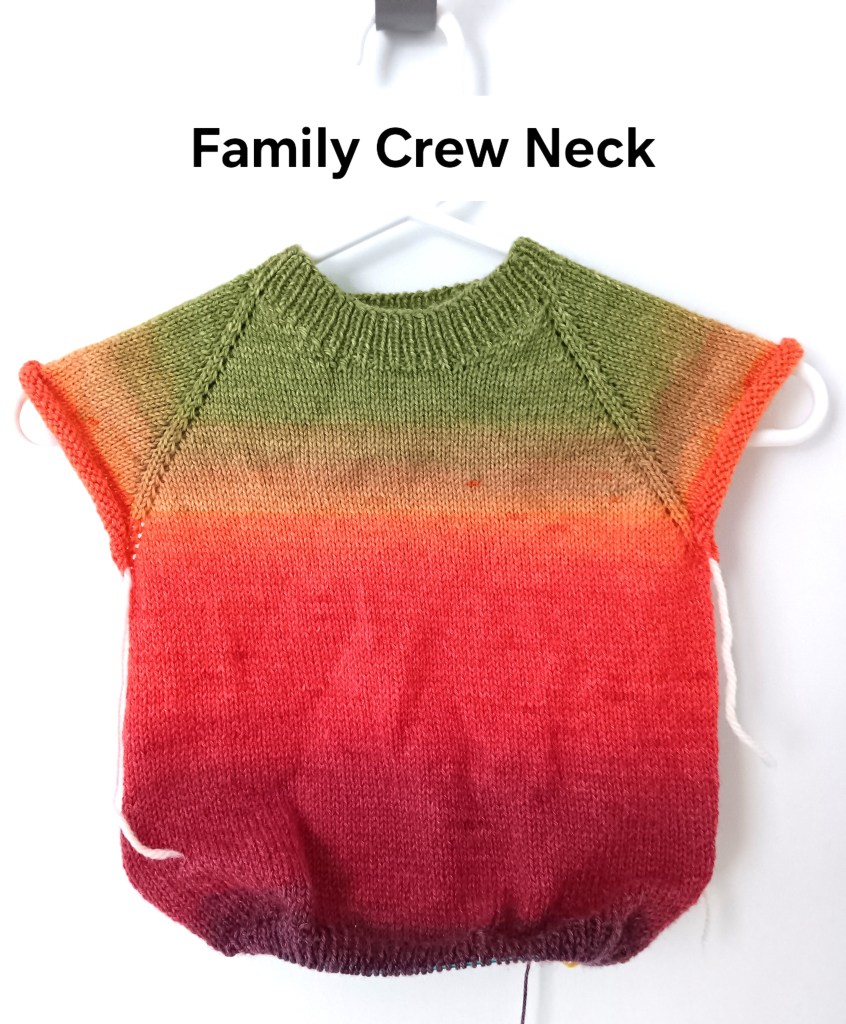
This is a refined version of the Knit for Fit: Top Down Easy Bust Shaping and what I actually do for many of my sweaters. The Family Crew Neck and the Any Gauge Raglan Pullover have the instructions to do this in the Modification Pages.

As I approach the bottom of the yoke, I work an extra increase beside the raglan increase ON THE FRONTS ONLY. Now I have added an extra stitch on both sides of the front. (The black slashes are where the extra increases are.) I usually do this for several rows or rounds.

Here’s a more obvious example on a sweater I’m knitting now. In Aran weight yarn (heavy worsted) you can see the increases clearly. I did quite a few because this is a cardigan and I didn’t want the dreaded button pull on the front.

The change from the last post is that at the same time I was working these extra increases on the fronts, I STOP INCREASING ON THE BACK. Can you do that? Just stop increasing? Yes you can.

This is all done very close to the bottom of your yoke. You get a little straight line on the back, very near the underarm, so no one can see it.

  1. The bonus is that my back is now 2+” narrower than the front of my sweater.

2. The second bonus of working the extra increases beside the raglan increases on the front and not increasing on the back is that you are still increasing 8 stitches on every increase row or round. It doesn’t mess with the number of stitches you need at the bottom of the yoke.

You do have to work decreases down the sides of the front body between the largest point of your bust and your waist to take all or some of these extra front stitches away. Then begin your hip shaping.

Yes, shaping your sweaters does have lots of parts to it. Try one step at a time. You are the boss of your knitting.

Cheers, Deb

Any Gauge and Gauge-Free patterns by Deb

Deb.gemmell on instagram

Knit to Fit: Top Down Easy Bust Shaping

Would you like the front of your sweater to be wider than the back? There are two obvious reasons why you might need that. Knit to Fit: Do I Need Bust Darts?

If you are working a casual Raglan sweater from the Top Down here is an easy way to get some extra width across the Front just where you need it: not over the entire front of the sweater and expecially not around the top of the shoulders and neckline, just at the bust.Body schematic bust shaping Top Down

As you work down your yoke, you are working increases at the raglan lines.Top Down pullover schematic

As you approach the bottom of the yoke, what would happen if you doubled up the increases on the Front only? Wouldn’t there be more width on the Front?

In the bottom couple of inches of the yoke, on the Front only, you could work an additional M1 increase beside the raglan increases you are already working, separated by a stitch or two. This could easily add an extra 2″- 3″ to the Front.Bust shaping Yoke increases Body schematic
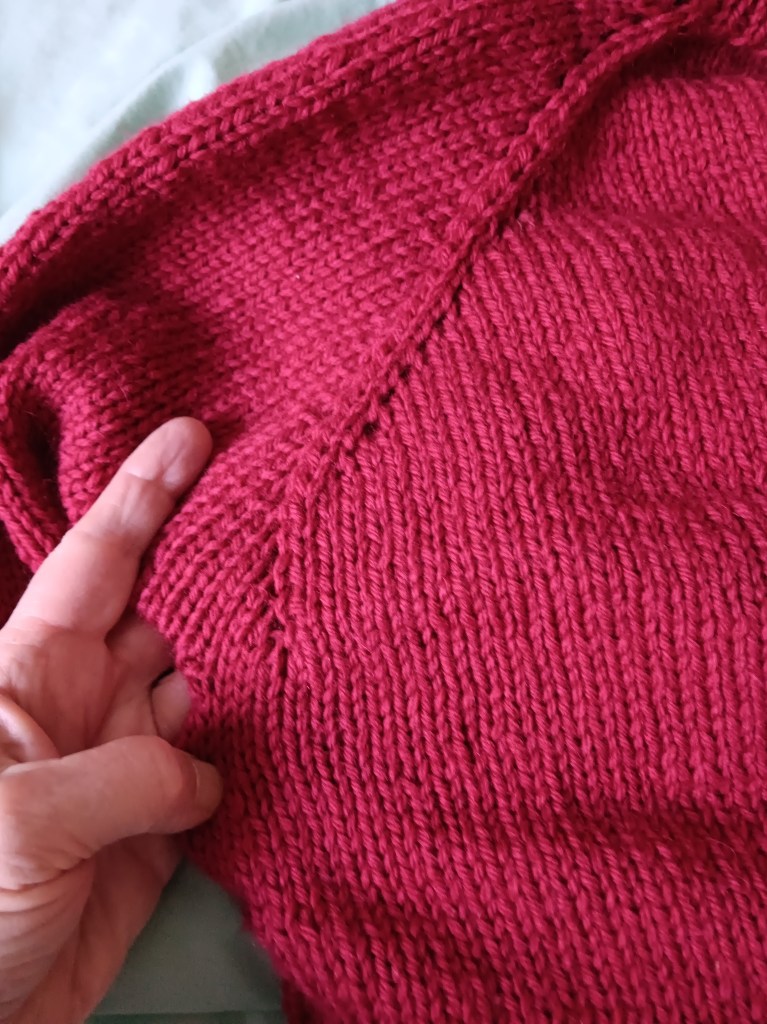
Would the extra increases show? Not really. You can put them in just before the underarm. Can you see them?Everyday Cardigan close up bust shaping yoke

They’re right there.Everyday Cardigan close up bust shaping yoke showing

At my gauge of 5 sts = 1″,  5 extra increases on each side of my front (yes I did work 5 extra  increases but I can’t find the 5th one) for a total of 10 extra stitches, which gives me 2″ of extra width across the front, above my bust. Great for my casual cardigan.Everyday Cardigan Yoke shaping

Now for the nitty gritty details. Here is an example of how it works for a cardigan:

Double Increases on Fronts for Bust Shaping

Increase Row: (RS) Work across the Front to 2 stitches before Marker#1, M1L (extra increase for bust), K1, work your regular raglan increase, K1, slip Marker#1, K1, work raglan increase, work across Sleeve to 1 stitch before Marker#2, work raglan increase, K1, slip Marker, K1, work raglan increase, knit across Back to 1 stitch before Marker#3, work raglan increase, K1, slip Marker#3, K1, work raglan increase, work across Sleeve to 1 stitch before Marker#4, work raglan increase, K1, slip Marker#4, on the Front work K1, work raglan increase, K1, M1R (extra increase for bust), knit across remaining stitches of Front to end of row. – increase of 10 sts, 8 raglan increases + 2 extra bust increases on Fronts only.

You can use this in addition to other bust shaping techniques for more width or shaping. You can add this shaping to any Top Down Raglan sweater pattern where the front and back are the same width.

You can decrease these extra bust stitches away as you work towards your waist or leave them there. It’s a casual cardigan so I just left them there. It helps to prevent button gap.

There it is. One easy way to make some extra width for your bust.

Thanks for reading,

Deb

M1L: Work before the Raglan line:  With Left needle, lift the running thread between the stitch just worked and the next stitch, from front to back, and knit into the back of the resulting loop.

M1R: Work after the Raglan line:  With Left needle, lift running thread between the stitch just worked and the next stitch, from back to front, and knit into the front of the resulting loop (this is tight to work).

ANY GAUGE and GAUGE-FREE patterns by Deb

Cabin Fever No-Sew patterns

Deb on instagram


Too Many WIPs

I have definitely dug myself into a big hole with all of my WIPs. It’s a somewhat comfortable hole since I am sitting on a pile of knitting but I’m overwhelmed and discouraged.

It’s was a bad sign when I had to take the needle tips off of this project to knit something else. This is a Family Crew Neck for my grandson. Part of my procrastinating is that I’m not at all sure what to do with the sleeves. I have a second ball of this yarn for the sleeves but I’m wondering how to do the stripes on the sleeves so that they sort of match the body. Some more thinking is needed.

I grabbed the needles from that project to do an Any Gauge Raglan Pullover because I’m running a class right now and thought I should knit along with my students. I encouraged them to knit with worsted weight yarn or chunky yarn so they could get their pullovers done over the 6 weeks. I, of course, am knitting mine in fingering weight yarn. I feel like I am knitting furiously and getting nowhere. Sigh, I know. What was I thinking?!

Then there is the blog which you have been reading. I have wanted a Family Crew Neck for some time. I will be getting back to that soon. I have so much more to tell you about getting a good fit with your raglan.

You would think that three sweaters is enough to keep me busy. Then I cast on a hat. I knit the whole hat on the wrong size needle, ran out of yarn, pulled it out and am now on the redo with the correct needle. Not much more to say about that!

Am I finished? Apparently not.

For the month of February I am teaching a sock class. My first time sock students are knitting boot socks in worsted weight yarn. They will have a pair of socks done by the end of the month. I will, maybe, have one sock done past the heel with my sock yarn.

HOW DID THIS HAPPEN??? I hope you are in better control of your knitting. Cheers, Deb

Any Gauge and Gauge-Free knitting patterns by Deb

Deb.gemmell on instagram

What if … the bust and sleeve could both fit?

What if … the raglan markers on your Top Down sweater were only a guideline for the size of your sleeve and not the exact size of the sleeve?

“Why don’t you knit sweaters for yourself?” I have asked this question of a lot of knitters. The answer, quite often, is that the sleeves never fit. A lot of knitting pattern sizes are based primarily on the measurement around your bust. If your bust measurement and your arm measurement don’t agree with the size chart the designer is using, then you are not getting a good fit.

This is one of the problems I wanted to solve in the adult sizes of my series of Any Gauge Raglan patterns. I have written these patterns for one person at a time – you. You don’t have to compare yourself to a size chart.

In these patterns, you take your bust measurement and arm measurement with a tape measure, and, after converting to the number of stitches, make the raglan yoke to these measurements (Bust + Arm + Arm). Yes, when you finish the yoke,it would fit you like a second skin.

Then you put the exact number of stitches for your arm on spare yarn for your sleeve.

Here is the bottom of my Family Crew Neck yoke with one set of sleeve stitches on spare (red) yarn.

My sleeve stitches on the spare yarn are inside the raglan markers.

In this case my sleeve stitches are 6 sts narrower (1.25″ narrower) than where the raglan markers would indicate. Whether the sleeve stitches end up inside or outside the raglan markers depends on where the markers are set up in the neckline and the size of your arm, of course.

But it fits like a second skin? How is that going to work?

Wait, there’s more. Cast on the number of stitches you need for the amount of ease you want on the body. It could be anywhere between 4″- 7″ or even more, if you wish. Cast on 1/2 the ease at one underarm and the other 1/2 at the other underarm.

Now this sweater body has been knit to your specific measurements at the bust and arm. Ease has been added. This sweater body will fit you and only you.

Is this a really radical idea? Questions?

Cheers, Deb

Any Gauge and Gauge-Free patterns by Deb

Deb.gemmell on instagram