Winter blahs

I’m feeling that middle-of-the-winter slump. I curl 3 times a week, which usually helps the winter go by, but I am not doing very well, in fact, I have lost every game for 2 weeks. I guess that’s not helping! My knitting is coming through for me though. What do people do who don’t knit?

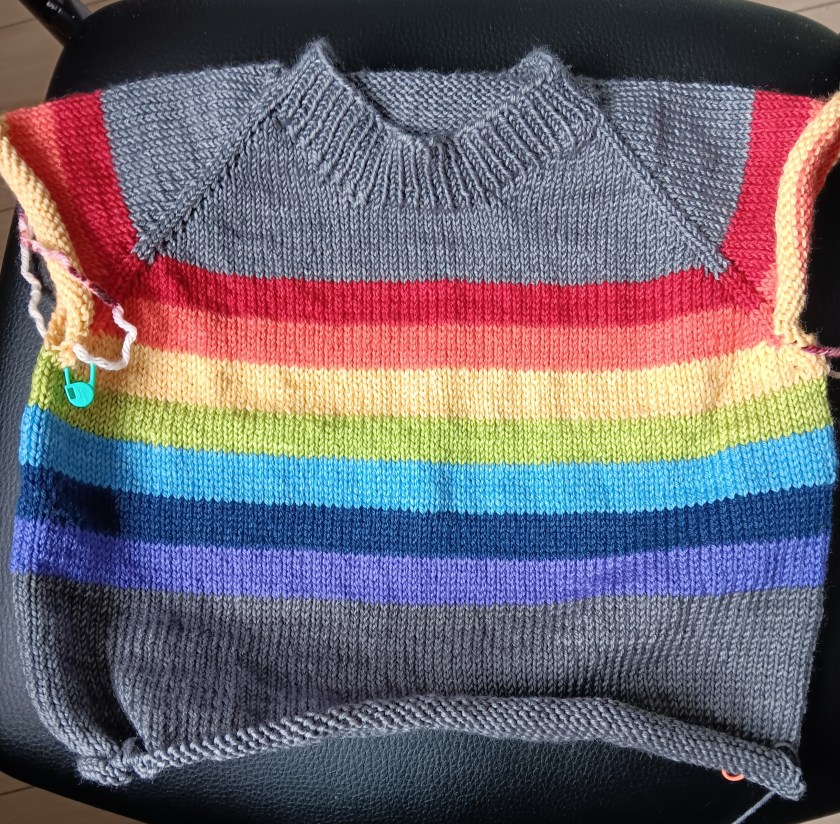
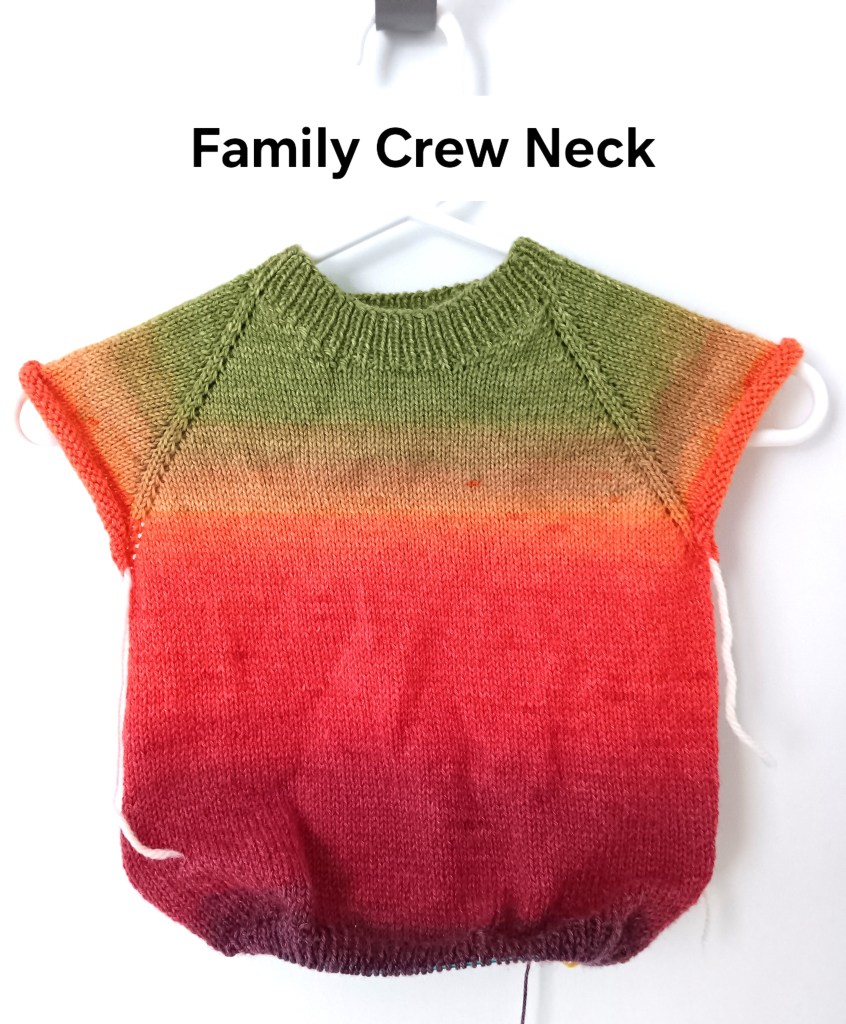
I finished the body of my Family Crew Neck for my rainbow obsessed grandson. It took a good bit of TV knitting but there it is, done. If you want to see me blather on about this sweater, along with an explanation about working the sleeves for an adult version, check out my latest youtube video.

And here’s the little guy, trying to play the solitaire game I taught him the other day. Hmm, wait a minute, the rules seem to have changed drastically!

He is totally knitworthy. He regularly wears the sweaters I knit him last year. I’m hoping this one will last a couple years.

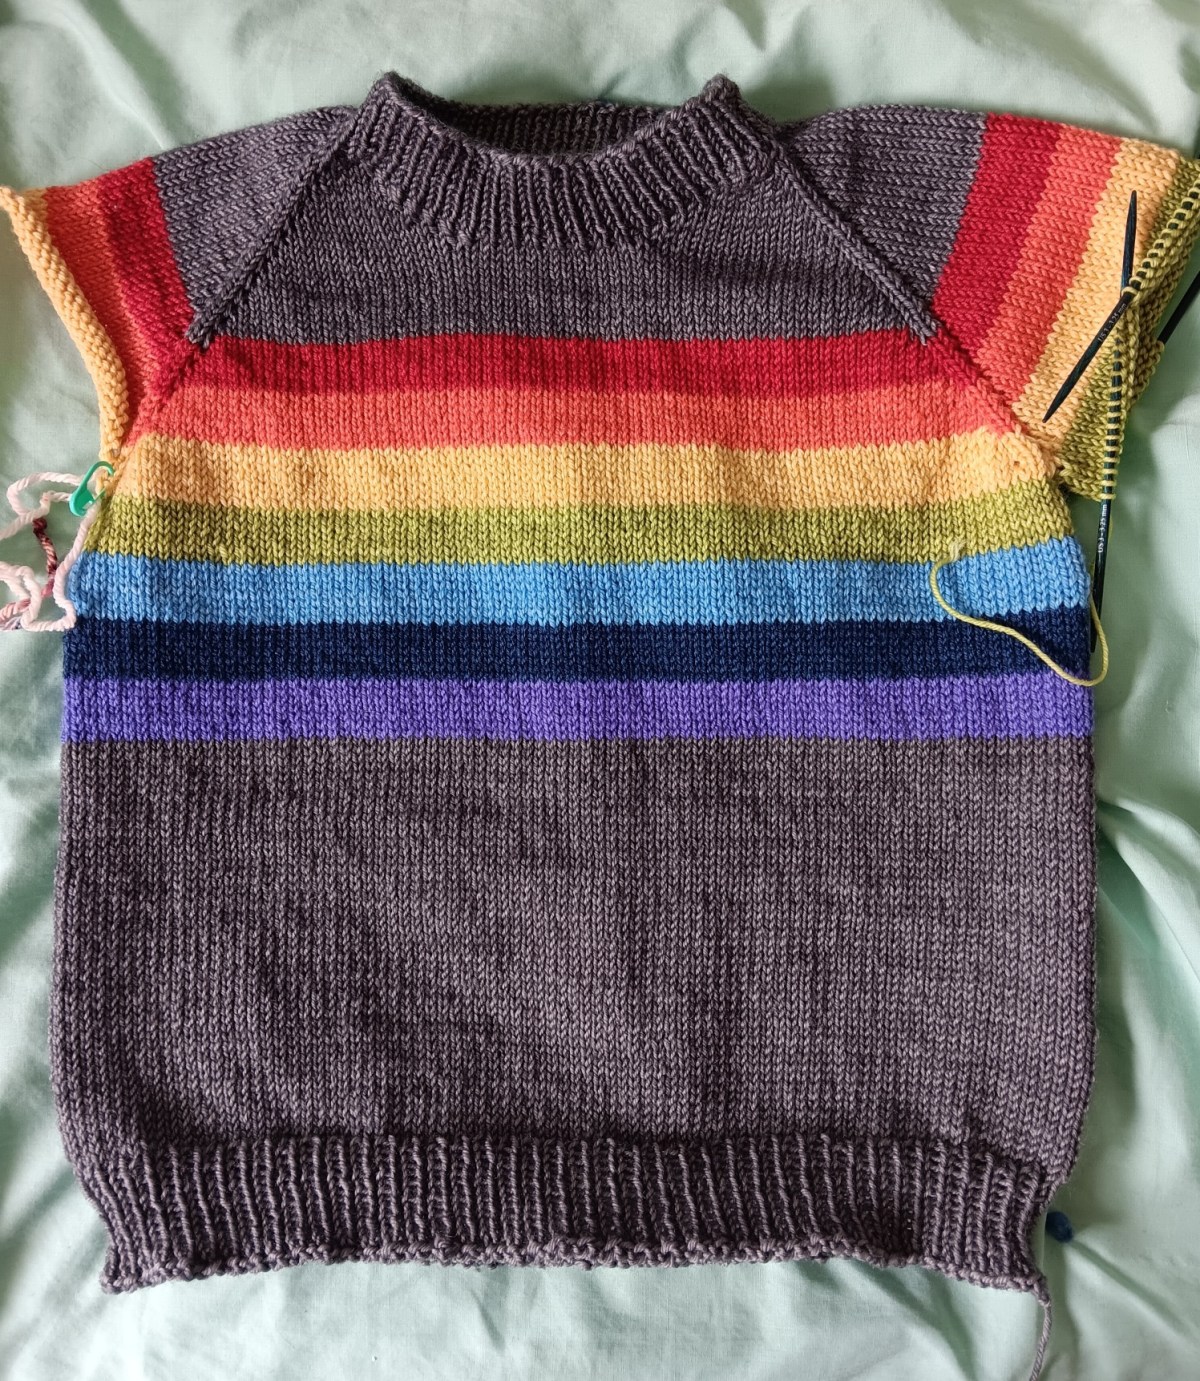
At the bottom of the pullover, I cast off the ribbing with the Icelandic Cast Off. I cast off quite tightly if I’m not paying attention. I thought this might work better but it’s a little wavy. I’m not happy. I may have to rip it back and do a normal cast off after all.

Now the sleeves. I’m going to work one stripe on one sleeve and the same stripe on the other sleeve. This will make them go quite quickly, right? Here’s hoping.

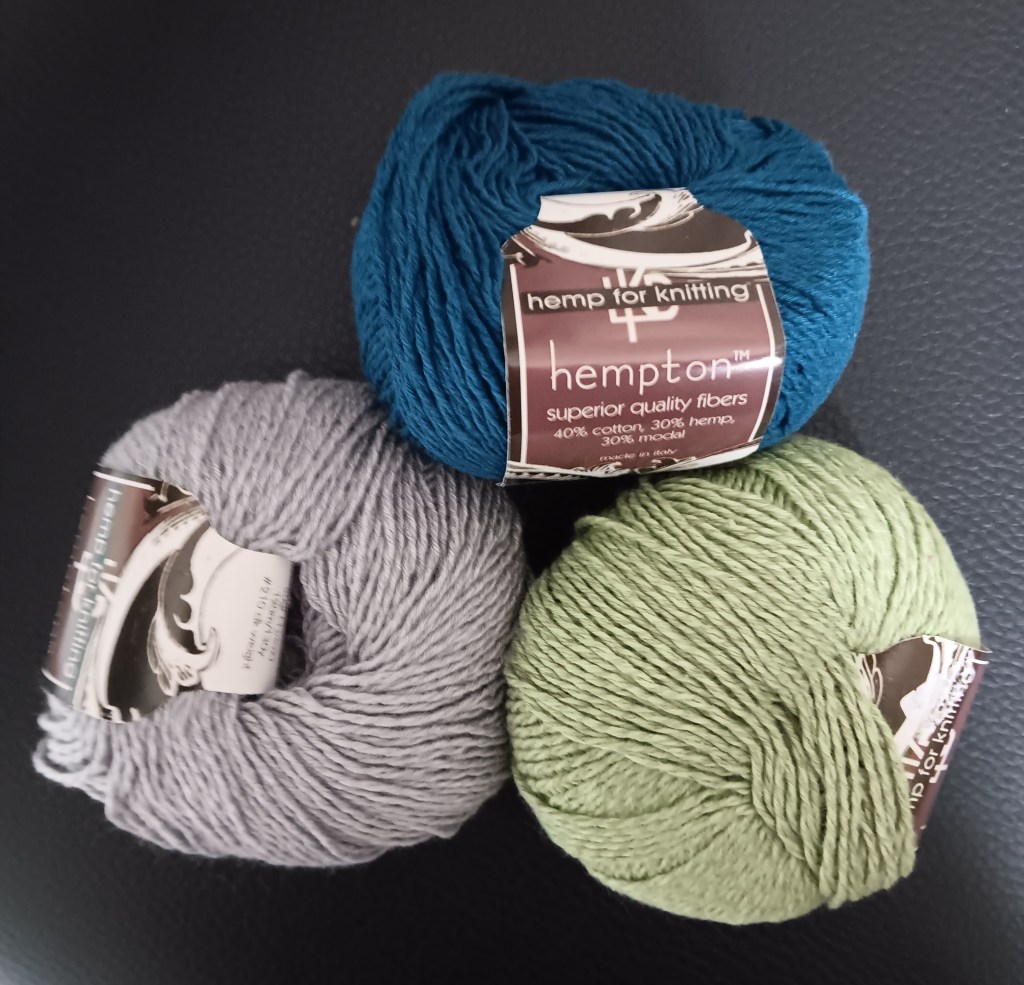
Meanwhile on the helical front, I’m down to the bottom of the yoke.

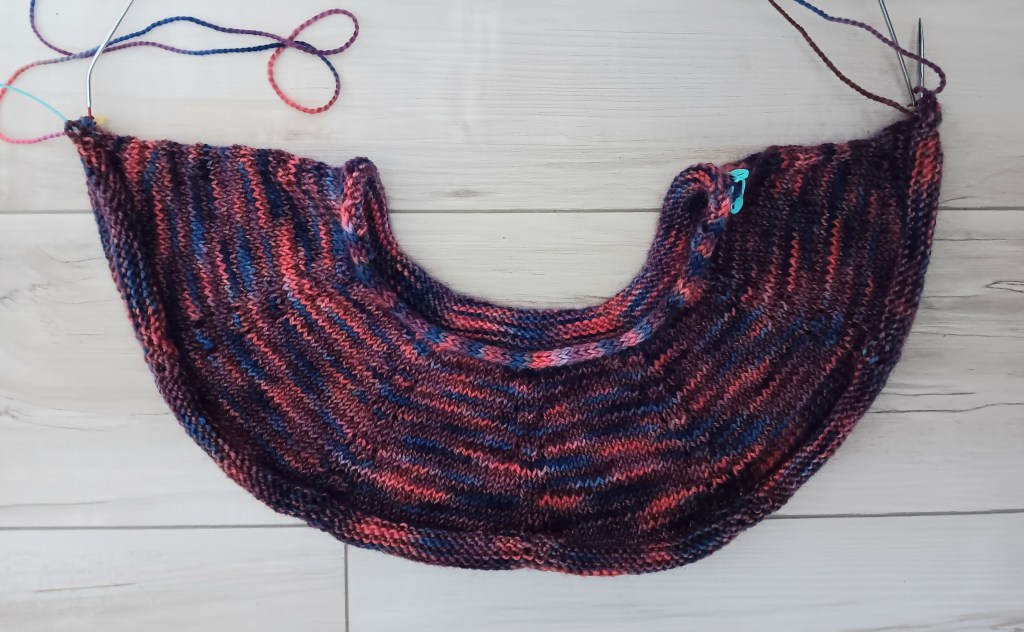
I used my oM1 increase in the yoke, mostly because I like to see where they are. It reassures me.

And I started a second one in Hempton by Lana Knits.

I made a couple of changes to simplify things which I put in the second one. I have to see if they work before I get too much further. I’m also trying to figure out how to get a bit more room in the Front and make the Back a little narrower. That is what I like for my own figure.

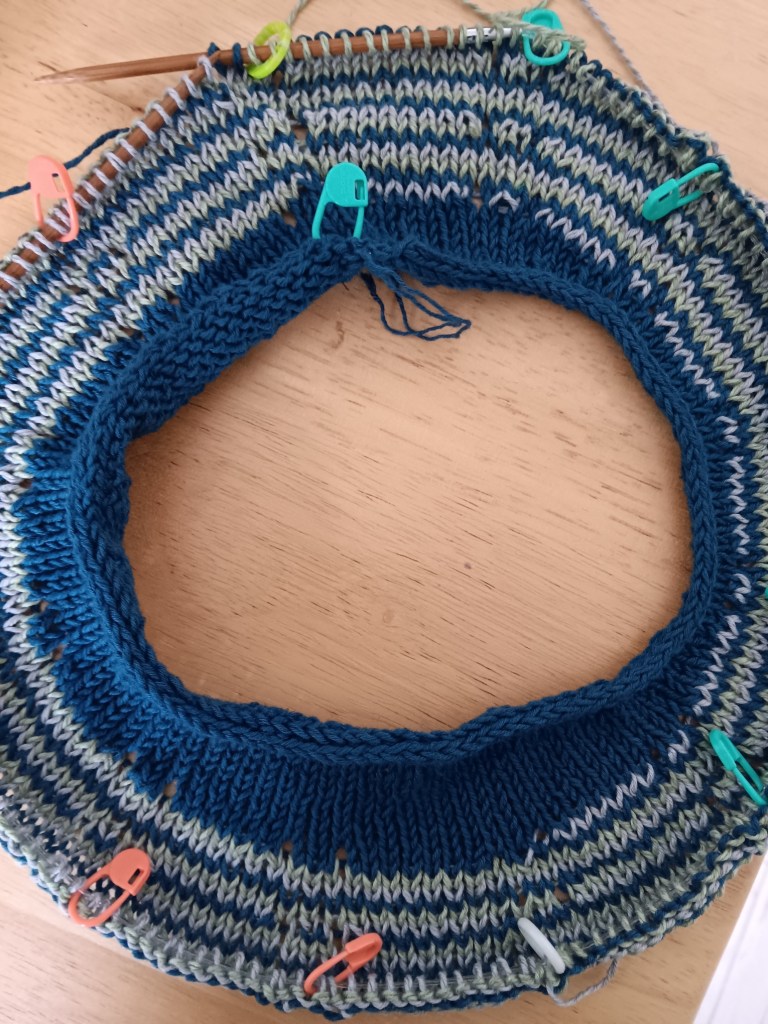
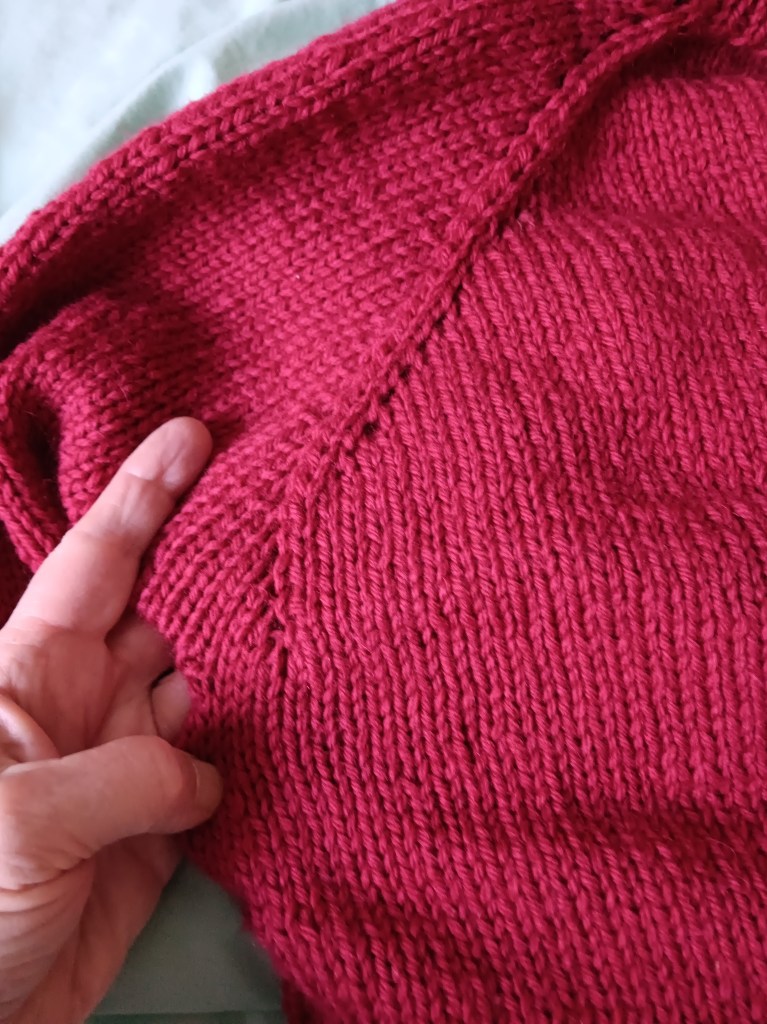
It is a little hard to see the grey and green but they are there.

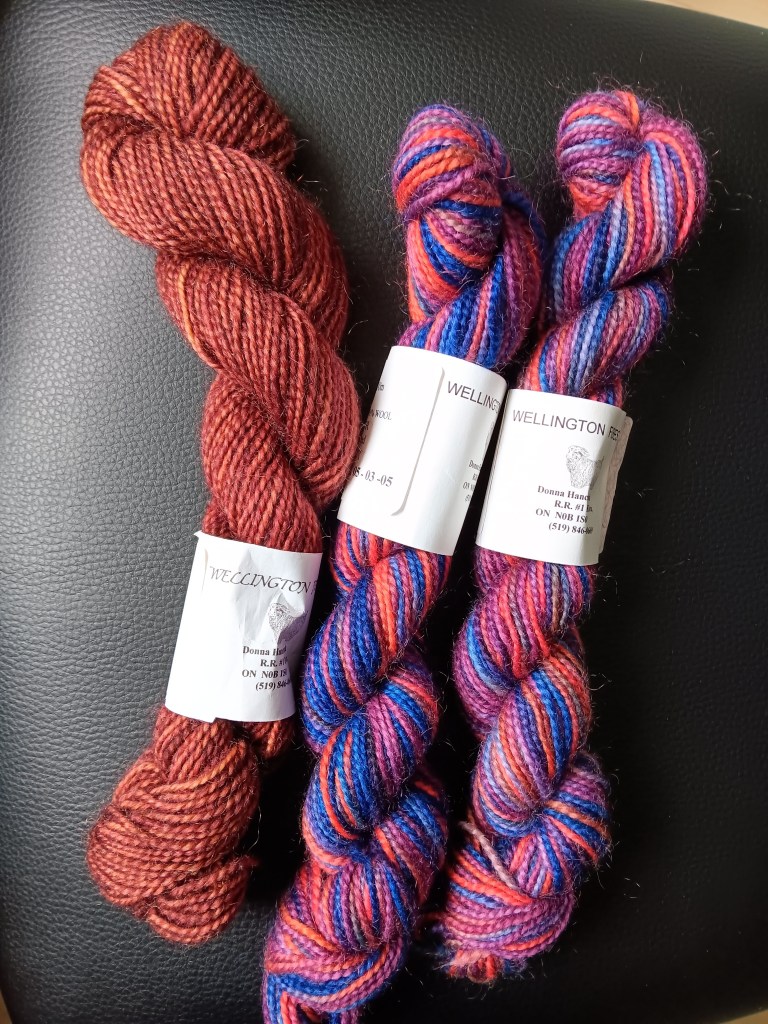
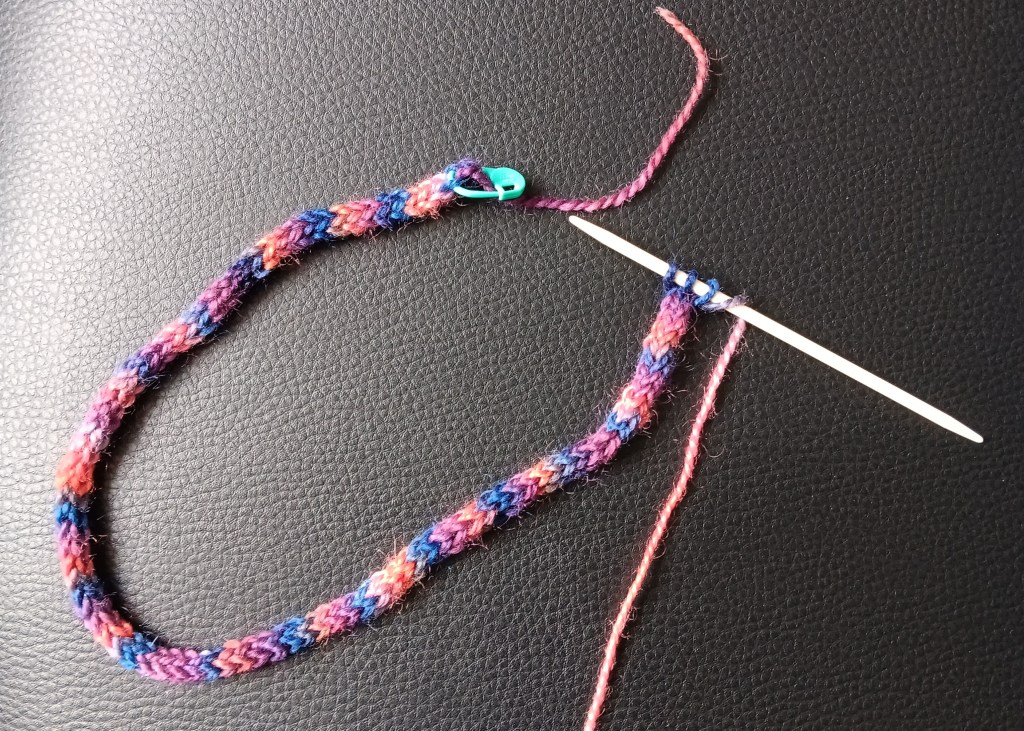
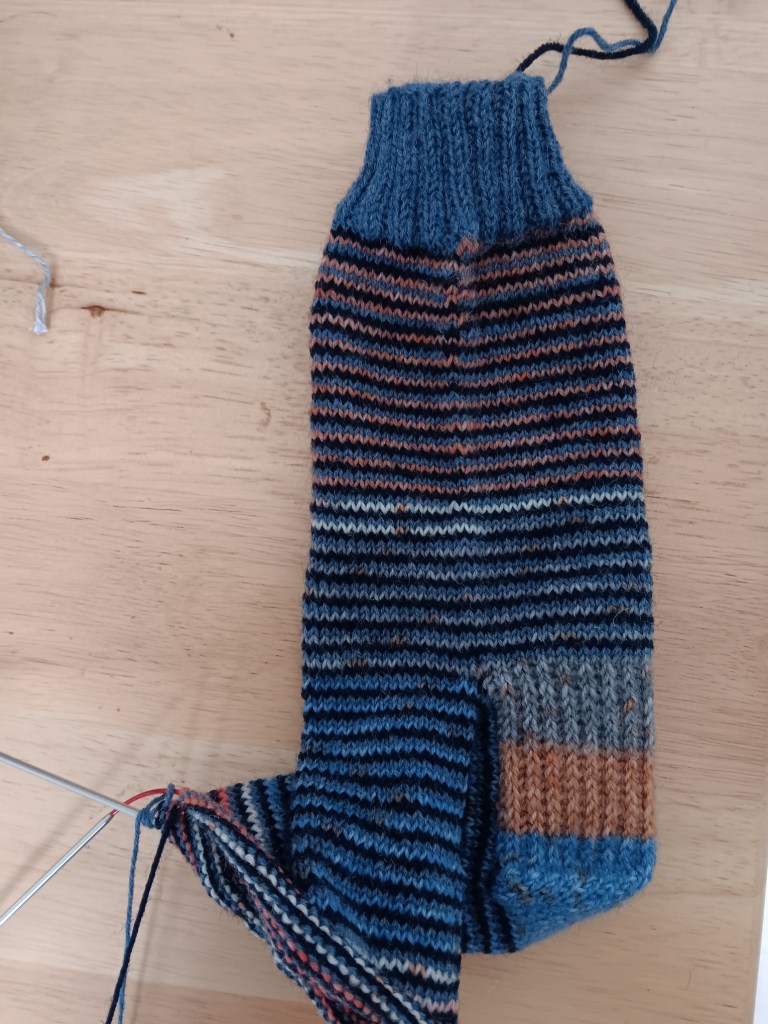
As I was already doing the helical thing, I started a pair of socks using 3 colours in the same helical method. Once I choose the 3 balls of yarn out of my odd-ball bag, I try to predict which colour will shine through. I am always wrong!

I didn’t realize that the variegated yarn had such a long colour change to it. That’s what makes helical socks so cool, you can never predict, or at least I can never predict, how the colours will end up.

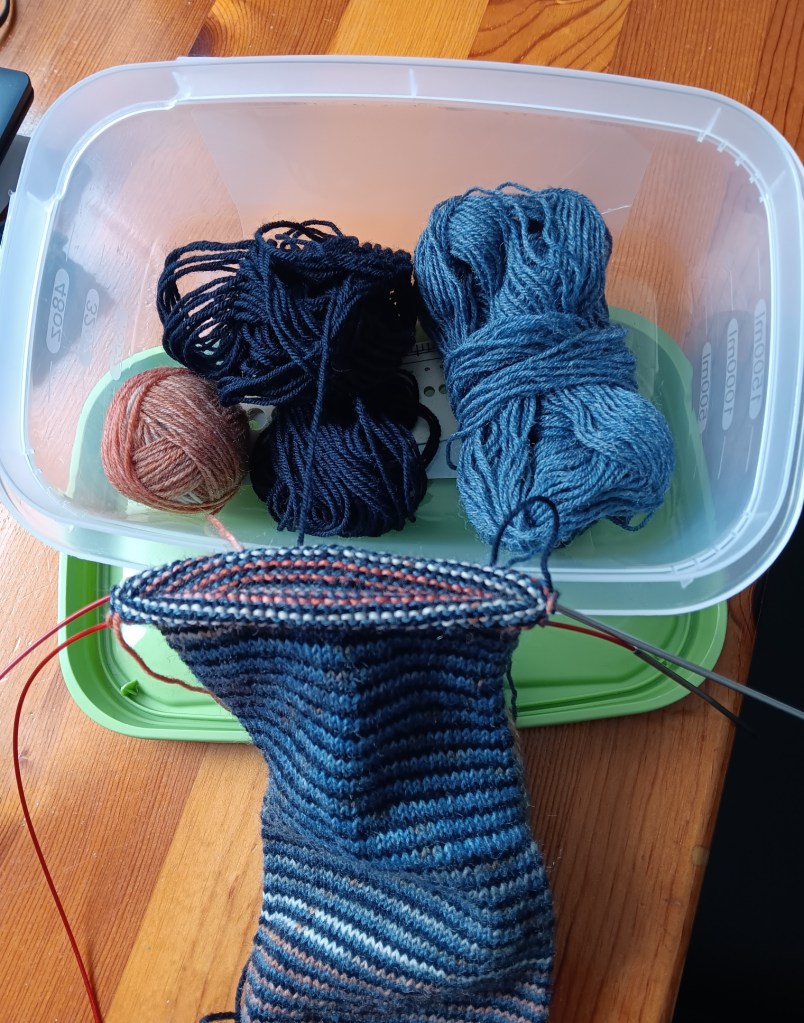
A question that comes up when helical knitting is how to keep the colours straight and not too tangled up. Here is my solution. I move the colour to the end of the line of colours every time I finish with it. This totally works for me.

That’s a wrap for this week. Hopefully, two sleeves done by next week and maybe a sock. Days are getting a tiny bit longer. Yay!

Cheers, Deb

Any Gauge and Gauge-Free patterns by Deb

deb.gemmell on instagram

Debgemmell435 on Youtube

Two Sweaters and Helical stripes set up

My Family Crew Neck is just buzzing along. Therainbow stripes were a great motivator. I wanted to see what each new stripe would look like.

Now I’m at the point in this Family Crew Neck where I get into trouble. I want the body to be done, so I measure every couple rounds, thinking it will be the length I need before I start the ribbing. Even stretching the tape measure isn’t getting me there and you know I’m trying. Every time I’m sure that I must be there by now! Nope. A couple more rounds, a couple more rounds, a couple more rounds.

This is my weekly Youtube video if you want to see where I’m at on my two sweaters.

To keep my round measuring stress at bay, I am working on my Circular Yoke. The Short Rows are done and now I’m working the helical knitting rounds.

If you are serious about stash busting, this is a terrific technique. It makes one-round stripes, in my case, with 3 colours. That means I don’t have to buy an entire sweaters worth of yarn. I can stash dive and find enough of 3 colours, that when combined, will make up the amount I need for one sweater.

Here’s a video of how I got the stripes started and how to change colours. For this sweater the change takes place at the shoulders. Changing colours in the same place every time is the simplest way to work the helical method.

The trouble is that I chose colours that sort of blur into each other, much more than I thought. This is very deep stash from Wellington Fibres.

I am using the brown wool for my increase round, and you would think it would be easy to see, but, no.

How about starting another one?! Sure, why not. I am thinking of summer here.

I have 8 x 50g of the grey, 8 x 50g of the teal and 2 x 50g of the green. I think that’s enough green to get 3 stripes going in the yoke. This is Hempton by Lana Knits: 40% cotton, 30% hemp and 30% modal. That’s summery yarn, right? Again the grey and green are a little too close in value but I think they will show the helical stripes better. Here’s hoping!

Cheers, Deb

Any Gauge and Gauge-free patterns by Deb

deb.gemmell on instagram

A Do-over for the Family Crew Neck and a new Circular Yoke beginning.

I had a oops. I didn’t guess correctly on my needle size to get the gauge I wanted for my Family Crew Neck. If I was a smart person I would have notes on the needle sizes I have used before for this yarn, but … no notes. So I guessed. The gauge isn’t even close to what I wanted. So my first beginning of this Family Crew Neck for my grandson is toast.

Say goodbye to this one, it’s way too big. The gauge is closer to 5 sts/1″ and I was looking for 6 – 6 1/2 sts /1″.

New start.

This is obviously working great. I got the gauge I wanted by going down a couple more needle sizes and voila, stripes are appearing like magic.

Here’s my weekly update.

Because I can’t just knit just one sweater, I’m also knitting a Circular Yoke for myself. I started with an I-Cord 24″ long. I think this is a fairly good size for the neck opening. The I-cord idea came to me because I didn’t want to knit a swatch. I could knit the I-cord to the length I wanted, gauge doesn’t matter, it’s the length I needed. Don’t you sometimes just want to dive in? I do most of the time.

Once I picked up stitches around the I-cord I worked short rows using these Twin Stitches. Here’s a close up video of them.

The complete round where you have to close those last gaps from the back and forth short rows, is so much better with these Twin Stitches.

I can’t wait to get going on my 1-round stripes. I’m going to use the helical stripe method. Have you tried this?

Cheers, Deb

Any Gauge and Gauge-Free knitting patterns by Deb

deb.gemmell on instagram

Debgemmell435 on youtube

One more Family Crew Neck and some thoughts about Circular Yokes

It’s time to get started on my 2025 knitting. Have you started? I’m a little late to the party but I had to clear the decks, so to speak, and get those WIPs out of the way. Well, not out of the way exactly, but finished and delivered to the wearers, one of which is me.

Now I am starting on a request from my grandson for a rainbow sweater. It’s another Family Crew Neck, my 6th one. The modification for this one will be rainbow stripes. If you haven’t tried this pattern because of the math, I’ve done a video for the beginning cast on which shows my math for a 4 year old size. You can follow along over the coming weeks.

Also in the works is a top down circular yoke sweater. In the works at this point means I think about it at 3 a.m. There are so many ways to tackle a circular yoke. How could I work the yoke increases? Should I set up 8 or 12 markers and increase there every x number of rounds, as I work down the yoke? Maybe I could do a round with many, many increases and then work straight to the next round of many increases?

I have made 2 decisions so far. I am starting this circular yoke with an I-cord for the neck opening edge.

Then I am going to work in stripes of 2 rounds of variegated wool and one round of brown, worked in the helical method.

If you haven’t tried this, it’s a fantastic way to work one round stripes. Stay tuned. A video may be coming your way.

Cheers, Deb

Any Gauge and Gauge-Free patterns by Deb

deb.gemmell on instagram

Time consuming but worth it

How long does a sweater of yours  sit unfinished?

This little 4 year sized Family Crew Neck sat for quite a while because I didn’t know how to do the sleeves.

The colour fade yarn was great. I had already bought a second ball to do the sleeves.

I wound off the lime green, yellow and into the orange of the second ball of yarn.

I wound up all the orange into a separate ball. Then, I wound off some of that orange ball to make 2 equal sized balls. I knit one sleeve and then the other until the length of the orange in the sleeve was as close as I could get it to the body.

Then I did the same with the red and then again with the purple.

Yes, it was time-consuming, but I’m really happy with the result.

He likes likes it. He really likes it.

Cheers, Deb

Any Gauge and Gauge-free patterns by Deb

Deb.gemmell on instagram

Done? Well almost

Yarn chicken and I won. Yahoo!!!

This is where knitting the Family Crew Neck or any top down knit comes into its own.

As it became increasingly obvious I would be very close on the amount of yarn I had left, I took some time to sort through  my priorities. I did need the body to be long enough. I could deal with a sleeve modification.

So, I  knit the sleeves to just before the cuffs and broke the yarn. If I ran out of yarn, I could rip them back to make them 3/4 length.

Then, I knit the body to the bottom border. I decided a split hem would serve me best at this point. I worked the front panel of the split hem. Not as long as I would like but the minimum amount. Broke the yarn again.

I’m sure you can see the theme here: knit, look at the ball of yarn I have left, work some more, stare harder at the little ball, make a decision and knit some more.

Done.

There are many, many ends to sew in but I’m happy with this Family Crew Neck knit with Shelridge Yarns W4 worsted.

Can you tell I’m 😮 surprised and so very pleased. Whew.

Hope your knitting is successful too.

Cheers, Deb

Any Gauge and Gauge-Free patterns by Deb

Deb.gemmell on instagram

Now You See It

My Family Crew Neck was progressing nicely. The body was knit to the waist, and I had knit one sleeve to above the cuff and started the second sleeve.

Then, because that little voice in my head kept bothering me, I decided to count stitches.

Oops, it was huge and my idea of working an a-line body was making it worse. So, now you see it …

… and now you don’t. Rip, rip, rip.

In the end, this was the only solution. Now I have hours of extra knitting to do. That’s not a bad thing, right?

Back on track and much happier.

Here’s hoping your knitting is going a little bit better.

Cheers, Deb

Any Gauge and Gauge-Free patterns by Deb

deb.gemmell on instagram

Knit to Fit: More bust shaping

My theory is that the front of our sweaters should be wider than the backs for two obvious reasons.

We don’t need it to be wider everywhere. Just where we need it. (Do I need Bust Darts?)

This is a refined version of the Knit for Fit: Top Down Easy Bust Shaping and what I actually do for many of my sweaters. The Family Crew Neck and the Any Gauge Raglan Pullover have the instructions to do this in the Modification Pages.

As I approach the bottom of the yoke, I work an extra increase beside the raglan increase ON THE FRONTS ONLY. Now I have added an extra stitch on both sides of the front. (The black slashes are where the extra increases are.) I usually do this for several rows or rounds.

Here’s a more obvious example on a sweater I’m knitting now. In Aran weight yarn (heavy worsted) you can see the increases clearly. I did quite a few because this is a cardigan and I didn’t want the dreaded button pull on the front.

The change from the last post is that at the same time I was working these extra increases on the fronts, I STOP INCREASING ON THE BACK. Can you do that? Just stop increasing? Yes you can.

This is all done very close to the bottom of your yoke. You get a little straight line on the back, very near the underarm, so no one can see it.

  1. The bonus is that my back is now 2+” narrower than the front of my sweater.

2. The second bonus of working the extra increases beside the raglan increases on the front and not increasing on the back is that you are still increasing 8 stitches on every increase row or round. It doesn’t mess with the number of stitches you need at the bottom of the yoke.

You do have to work decreases down the sides of the front body between the largest point of your bust and your waist to take all or some of these extra front stitches away. Then begin your hip shaping.

Yes, shaping your sweaters does have lots of parts to it. Try one step at a time. You are the boss of your knitting.

Cheers, Deb

Any Gauge and Gauge-Free patterns by Deb

Deb.gemmell on instagram

Too Many WIPs

I have definitely dug myself into a big hole with all of my WIPs. It’s a somewhat comfortable hole since I am sitting on a pile of knitting but I’m overwhelmed and discouraged.

It’s was a bad sign when I had to take the needle tips off of this project to knit something else. This is a Family Crew Neck for my grandson. Part of my procrastinating is that I’m not at all sure what to do with the sleeves. I have a second ball of this yarn for the sleeves but I’m wondering how to do the stripes on the sleeves so that they sort of match the body. Some more thinking is needed.

I grabbed the needles from that project to do an Any Gauge Raglan Pullover because I’m running a class right now and thought I should knit along with my students. I encouraged them to knit with worsted weight yarn or chunky yarn so they could get their pullovers done over the 6 weeks. I, of course, am knitting mine in fingering weight yarn. I feel like I am knitting furiously and getting nowhere. Sigh, I know. What was I thinking?!

Then there is the blog which you have been reading. I have wanted a Family Crew Neck for some time. I will be getting back to that soon. I have so much more to tell you about getting a good fit with your raglan.

You would think that three sweaters is enough to keep me busy. Then I cast on a hat. I knit the whole hat on the wrong size needle, ran out of yarn, pulled it out and am now on the redo with the correct needle. Not much more to say about that!

Am I finished? Apparently not.

For the month of February I am teaching a sock class. My first time sock students are knitting boot socks in worsted weight yarn. They will have a pair of socks done by the end of the month. I will, maybe, have one sock done past the heel with my sock yarn.

HOW DID THIS HAPPEN??? I hope you are in better control of your knitting. Cheers, Deb

Any Gauge and Gauge-Free knitting patterns by Deb

Deb.gemmell on instagram

What if … the bust and sleeve could both fit?

What if … the raglan markers on your Top Down sweater were only a guideline for the size of your sleeve and not the exact size of the sleeve?

“Why don’t you knit sweaters for yourself?” I have asked this question of a lot of knitters. The answer, quite often, is that the sleeves never fit. A lot of knitting pattern sizes are based primarily on the measurement around your bust. If your bust measurement and your arm measurement don’t agree with the size chart the designer is using, then you are not getting a good fit.

This is one of the problems I wanted to solve in the adult sizes of my series of Any Gauge Raglan patterns. I have written these patterns for one person at a time – you. You don’t have to compare yourself to a size chart.

In these patterns, you take your bust measurement and arm measurement with a tape measure, and, after converting to the number of stitches, make the raglan yoke to these measurements (Bust + Arm + Arm). Yes, when you finish the yoke,it would fit you like a second skin.

Then you put the exact number of stitches for your arm on spare yarn for your sleeve.

Here is the bottom of my Family Crew Neck yoke with one set of sleeve stitches on spare (red) yarn.

My sleeve stitches on the spare yarn are inside the raglan markers.

In this case my sleeve stitches are 6 sts narrower (1.25″ narrower) than where the raglan markers would indicate. Whether the sleeve stitches end up inside or outside the raglan markers depends on where the markers are set up in the neckline and the size of your arm, of course.

But it fits like a second skin? How is that going to work?

Wait, there’s more. Cast on the number of stitches you need for the amount of ease you want on the body. It could be anywhere between 4″- 7″ or even more, if you wish. Cast on 1/2 the ease at one underarm and the other 1/2 at the other underarm.

Now this sweater body has been knit to your specific measurements at the bust and arm. Ease has been added. This sweater body will fit you and only you.

Is this a really radical idea? Questions?

Cheers, Deb

Any Gauge and Gauge-Free patterns by Deb

Deb.gemmell on instagram