Twist stitch patterns are perfect for adding into a sweater. They don’t affect your stitch count so you can just plug them anywhere you want. I put this pattern down the middle of the front of this top down pullover. I will also add this pattern to each side of the body. I might even add them into my cuffs. Why not? I just can’t get enough of them.
Twisted stitches are a two stitch cable without the cable needle. Don’t you love that!
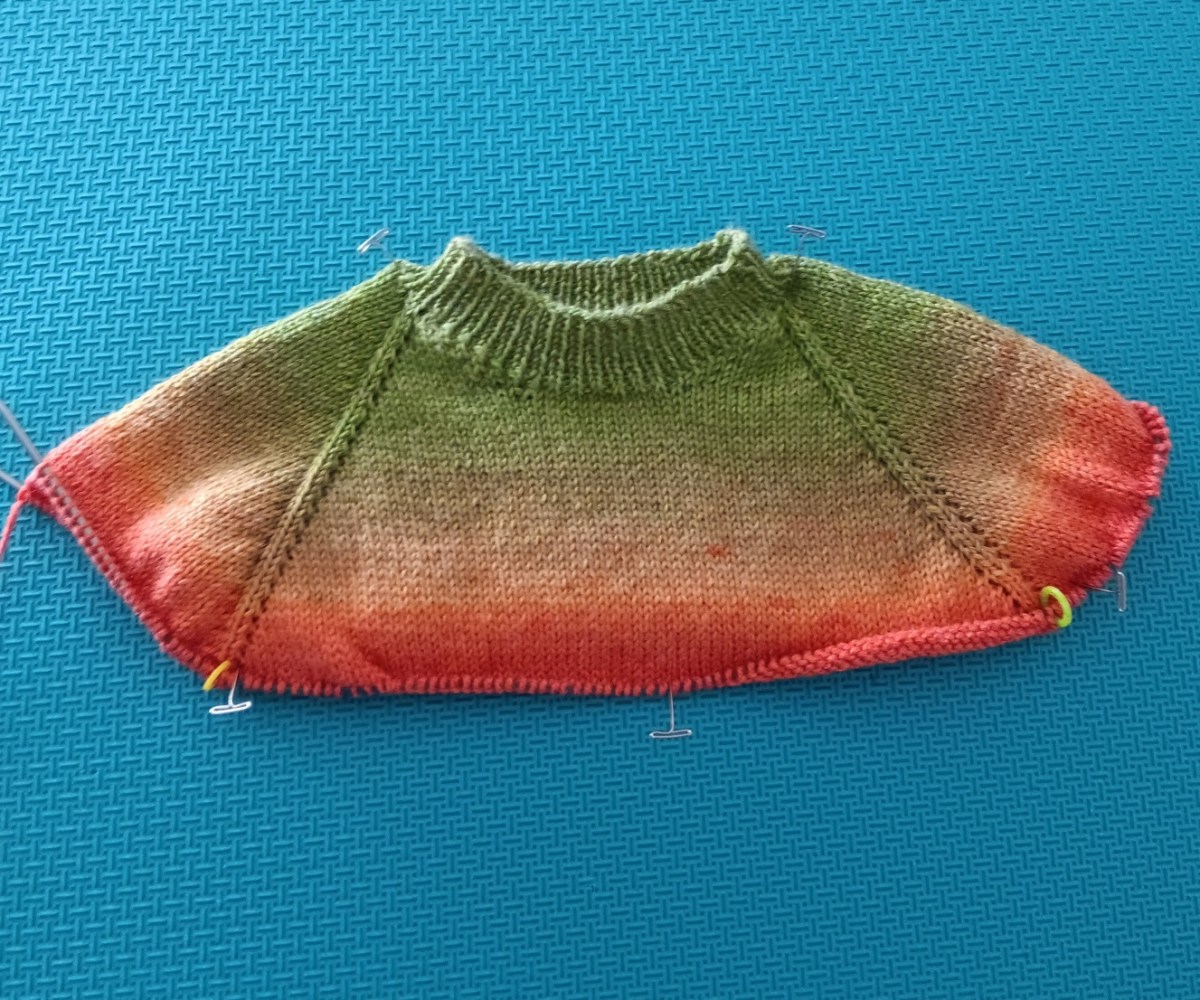
There are parts of sweater knitting that I enjoy over others. Settling in to knit a raglan yoke is one of the most enjoyable parts of the sweater for me. I love keeping track of the increases, seeing it get bigger and bigger, wider and wider, knowing it’s going to be so great.
Both of my Family Crew Neck sweaters are progressing well. The child size 4 is way ahead.
The colouring of the yarn is a great incentive to keep going. This is Maravilla by Katia, a wool & acrylic blend.
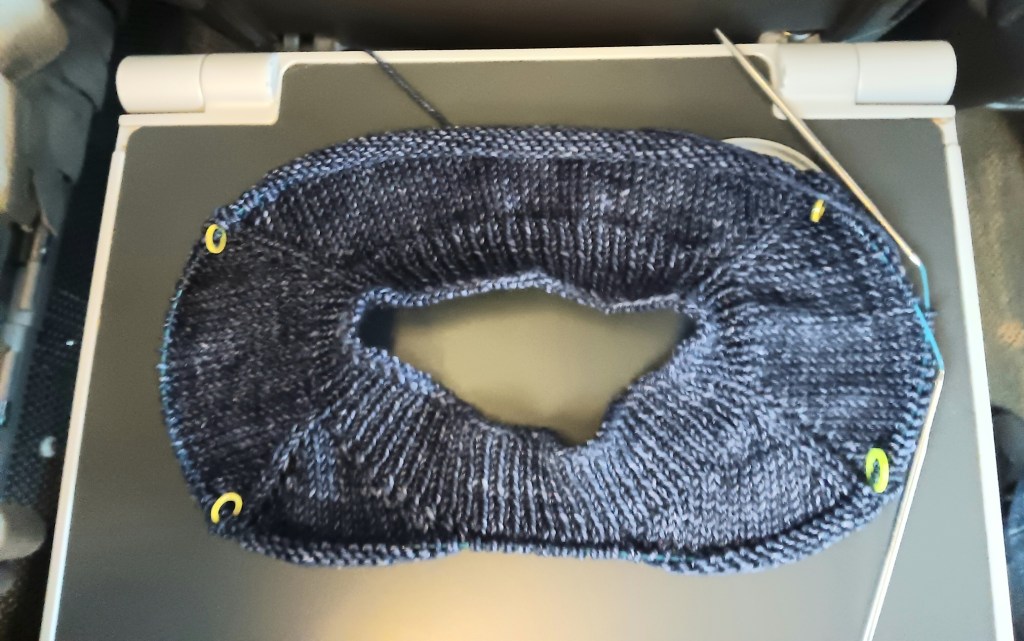
My navy version (Shelridge Yarns, W4 worsted, navy) is coming along. The short rows are done here. I was knitting on a train trip to Ottawa. Perfect knitting conditions: travel mug of tea, audio book and ear buds, hours of quiet knitting time.
Now I’m ready to really go for it. I will be introducing a pattern into the front 20 stitches between the ends of the short rows. Fun, fun, fun. Isn’t knitting just the greatest!
This will be my first sweater of 2024 and I am so excited to get started. If you want to knit along with me, the Family Crew Neck is on ravely. I am going to make videos for most of the sections of the sweater so you can see how this pattern works. It’s an Any Gauge pattern so I don’t know what yarn or what size you are knitting, that was the challenge of writing this pattern.
I am going to knit a 4 year old size for my grandson and an adult size for myself. I had knit one for my son-in-law, my grandson (both in the photo), one for my daughter-in-law (also in photo), and one for my daughter. I didn’t knit one for myself!!! It’s obviously time.
This is a longish post. Getting started always takes a bit of time. Hang on, there are videos and photos of the Cast On for both sizes.
Here we go. Because this pattern is for Any Gauge of yarn, you do have to do some math. Sorry, but there is no avoiding it. You need your gauge (# of sts in 1″) and a couple more numbers. Nothing your calculator can’t handle.
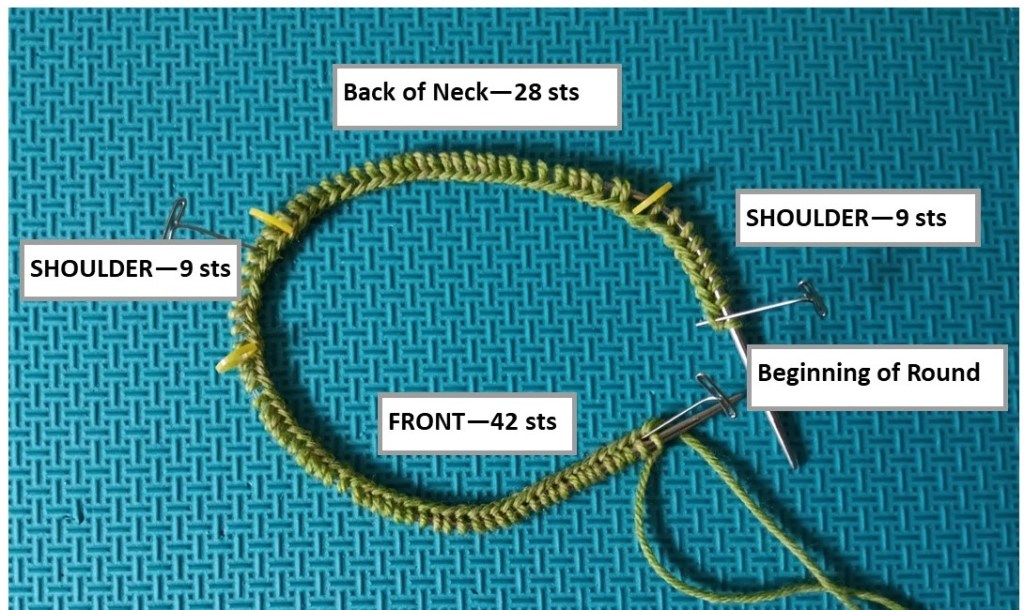
Here is my cast on. Gauge is DK weight yarn (5.5 sts = 1″), 4 year old size with 5″ Back of Neck (BofN).
Yes, there are a lot of Front sts, that’s totally correct. The extra Front sts will form a dropped front to the crewneck.
Here is my cast on for an adult size in worsted weight yarn (gauge is 5 sts = 1″) with an 8″ Back of Neck.
And now, how can you cast on when you will be beginning with the neck band and it needs to go over your head easily? I learned this from Cat Bourdhi and now use it all the time.
The construction for working the Family Crew Neck raglan begins with the neckband. This makes it different from a lot of other Top Down patterns. Once the neckband is knit, short rows are worked to create a neckline where the front is lower than the back.
Because the neckband is worked first it’s important that your cast on is especially stretchy. Quite often the neck opening of a crewneck is smaller than your head circumference. It’s not a great feeling to rip your ears off as you pull your sweater over your head. Especially if you’re working a sweater for a child.
I’ve looked for some videos for stretchy cast ons. Here are the ones I use regularly.
Many stretchy cast ons are based on the long-tail cast on and I found the third one mentioned in this video to be the best (found at 5:10 into the video). Three Wasy to Make A Stretchy Cast On I used it here and since I use the long-tail cast on all the time, I found the third method really easy to work. I think it looks great with K1,P1 ribbing and it is indeed, very stretchy.
Another great cast on is the Crocodile Cast On by Cat Bordhi which is also based on the long-tail cast on. This is my usual cast on. It is stretchy too.
The beauty of starting with the neckband is there is no picking up afterwards. I count this as a big advantage.
Would you rather pick up the neckband? Are you good with starting with a stretchy cast on and going on from there?
I’ve asked a lot of knitters “why don’t you knit sweaters for yourself?” Quite often the answer was that the sleeves don’t fit.
It’s easy enough to work out which size to knit according to your bust measurement but it is another thing to also have the correct sleeve size you need, in the same pattern. So …
My “Any Gauge” sweater patterns have a correction for this common problem: the raglan lines are used as a guide only. They indicate the general placement of the sleeves but do not necessarily give the exact width of the sleeve.
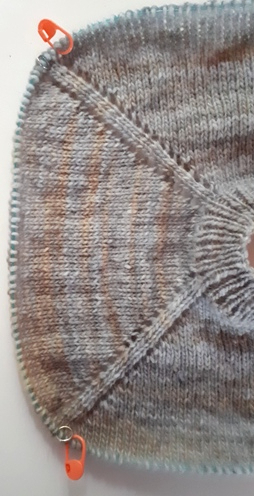
In my latest Family Crew Neck, the sleeve size I want, indicated by the orange markers, is a little wider than the raglan lines.
The pattern is set up to do this. Just before The Great Divide, you place the removable markers (orange) on the circular needle at the exact width you need for your sleeves. They can be inside the raglan lines for a narrower sleeve than the raglan lines indicate, exactly at the raglan lines in the usual way, or outside the raglan lines, like this pullover. The stitches between the orange markers are now the sleeve. Here’s a close-up.
I’m not stealing stitches from the body. The body will still be exactly what I need it to be. The pattern is written in a way to allow for all this variation, to fit both your bust and your arms. It’s working for all the pullovers I’ve knit so far, so I’m quite confident it will also work for you.
One more bit of weird knitting just for you. Enjoy.
The Family Crew Neck pullover is ready to leave home. I’ve hit the publish button so if you’re interested in knitting top down pullovers for every person you know in different weights of yarn, it’s ready to go.
I’m knitting #5 right now. I’ve knit a striped one for my son-in-law, a matching mini-me one for my grandson, a salt & pepper pullover for my son’s girlfriend, a twisted stitch patterned version for my daughter and now, of course, one just one more for my grandson (it’s a grandma thing).
This pattern is a framework for you to play with. There is MATH. Yes, sorry but no getting away from it since it’s for ANY GAUGE of yarn and I don’t know what you’re knitting with. All the body measurements are in inches, which you then multiply by your stitch gauge and voila, stitch numbers, just like that. It’s not hard, really it’s not.
I thought I’d take you on a tour. There may be some weird and wonderful things that are a bit different from top down sweaters you’ve done before. This is a system I’ve devised and used for years.
Here’s the Family Crew Neck . I don’t like picking up stitches, so this pullover begins with the ribbed neckband. It’s all one piece from the beginning. You’ll need a nice stretchy cast on because most neckbands on crew necks are slightly smaller than your head. Do you see me using the magic loop method here? I can learn! It allows for better photos so I’m figuring it out.
Now, work short rows and raglan increases, two things at once. I’m hoping you’re enthusiastic to get going. I always am.
The short rows produce a drop at the front of the neck. The raglan increases are … well, raglan increases. I always think of them in pairs, one before the raglan line marker and one after.
Every Increase Row starts one stitch before the Beginning of Round Marker (yellow) so you can do the pair of increases, one before and one after the marker.
The short rows get longer and longer as they creep down the Front on both sides. The Beginning of Round Marker is at the left front shoulder. A weird place but the short rows work this way.
Still creeping further down the front. Note that the centre front stitches do not get worked until the very end.
And done. Look at that front drop. I love this moment. Do you have moments when you sit back and say ‘just look at that, I did it’?
The tour continues next week with The Great Divide. Another exciting moment, ha, ha, can you stand it?!
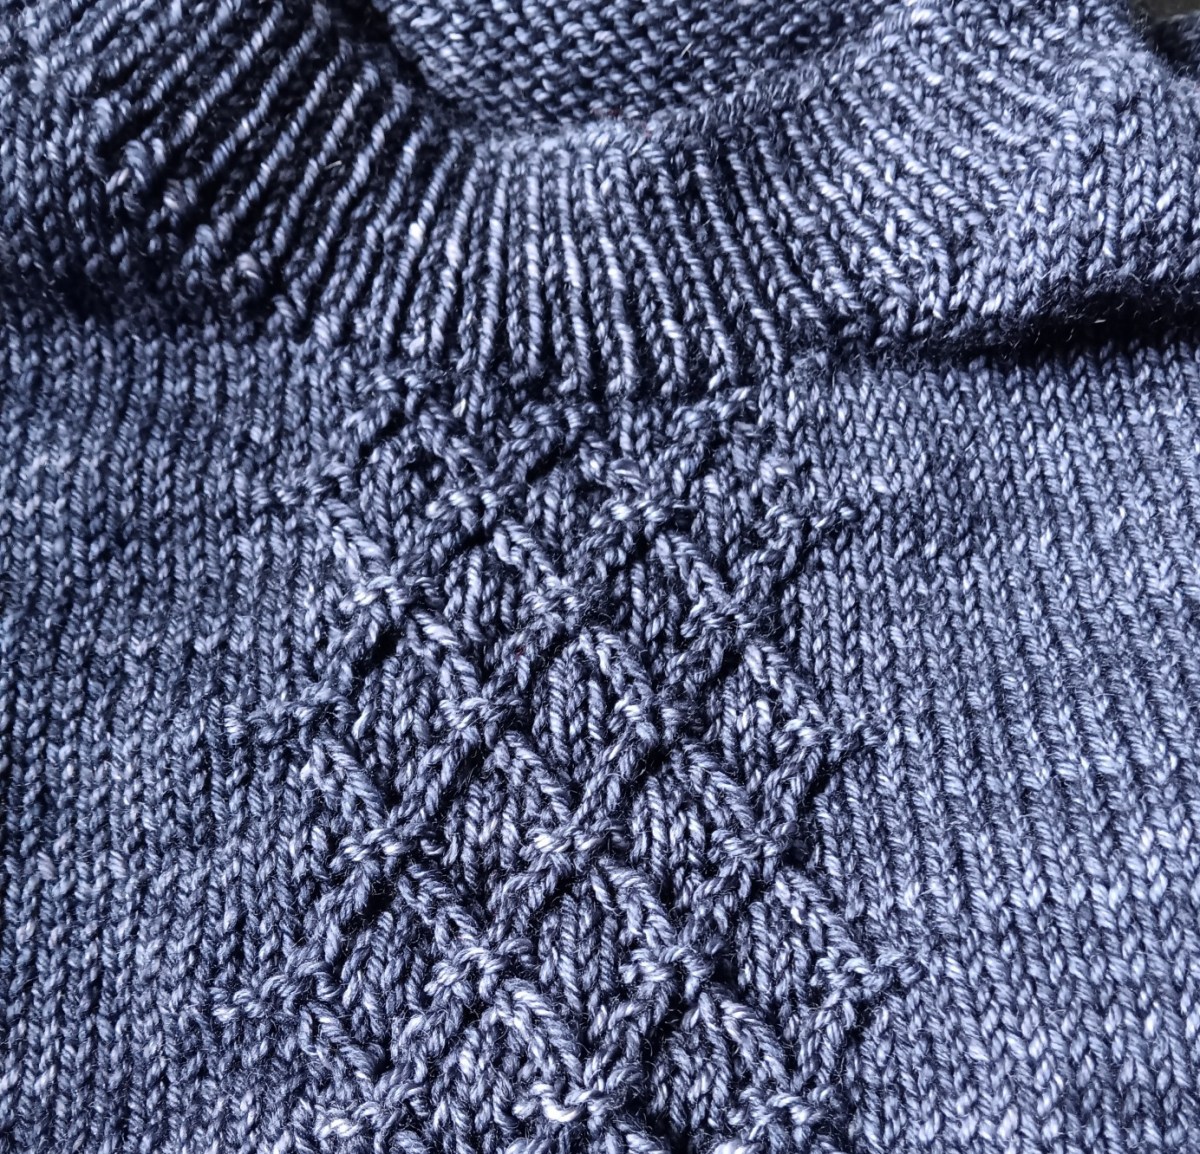
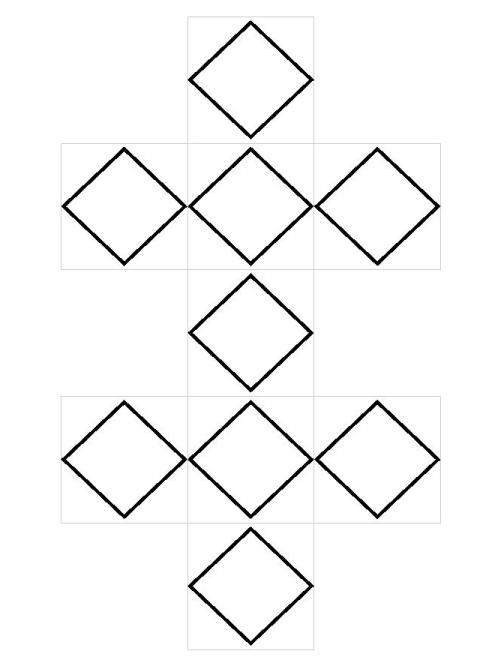
My Family Crew Neck, a pattern-in-progress, is a Top Down pullover which lends itself to working a stitch pattern down the front. The panel can be as wide as that short flat section at the bottom of the crewneck shaping. I’ve been playing with a twisted stitch pattern that makes a diamond. Because I usually use a chart, and the chart is square, I’m thinking of it as a diamond in a box. Only the diamond actually shows but … well my mind won’t make the adjustment.
The little stitch pattern I’ve included in the pattern is 6 stitches wide and 15 rounds high for one diamond.
The easy way to work this as a panel across the 18 stitches I had available on my adult pullover would be to work 3 boxes across and repeat them down the front. Like this:
This is two diamonds high.
Logical and it would look good. But … did I do that?
Three guesses. If the first guess was NO, then you know me pretty well. I decided to do this:
Sometimes I complicate things (are you laughing?!) and live to regret it. Not this time. I had a great time doing this weird zigzag. It was not without the occasional rip back but having to concentrate was not a bad thing.
Now I am contemplating doing a little kid size in a thicker wool. I won’t have many stitches in the centre of the crewneck to work with so I’m contemplating doing this:
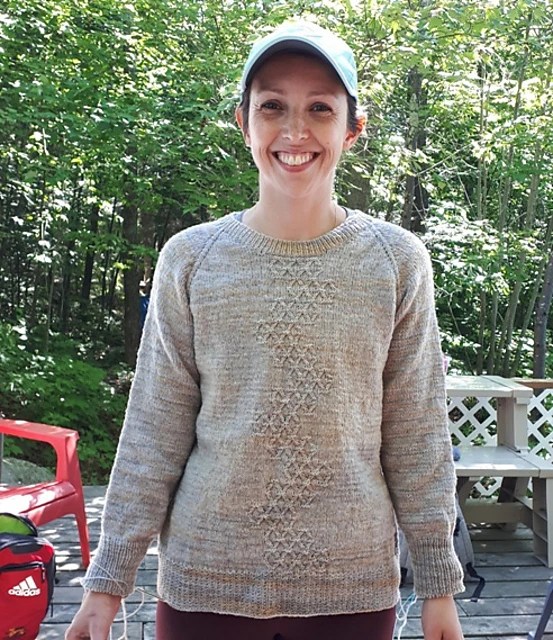
This Any Gauge Family Crew Neck was a fairly quick knit. Nice big needles and an interesting wool for a plain pullover. Now that I have a basic sweater done I can get down to finishing my pattern. No more procrastinating. I’m taking on the challenge of making this pattern for all sizes. This is new for me and something of a formatting nightmare. How do I put in all the information for all the sizes and not overwhelm the knitter who is only knitting one size? Hmm, lots to learn here.
I used Briggs and Little Heritage, Threaded G+W. I knit it at a slightly looser tension (15 sts = 4″/10cm as opposed to the recommended 17 sts = 4″/10cm) for a nice drape. I’m very happy with it.
One more Family Crew Neck pattern prototype is done. I’m going to deliver it this week and will have some photos next week. Now to cast on the next one.
Right now I’m taking a moment to feel the satisfaction of a sweater finished. Don’t you love that feeling?
Cheers and hope your knitting is going well too. Deb
Working a sweater with big stripes is a great look. If you have tons of yarn available it’s not a problem to get equal sized stripes on the body and the sleeves. I made sure I bought enough. Knitting this prototype for the Any Gauge Family Crew Neck Raglan sweater for my SNL was really fun.
Then I decided to knit a mini-me sweater for my grandson with all the odd balls I had left over. Now I have a limited amount of yarn to work the body and sleeve stripes.
How do you divide your yarn so you’re sure to have enough for the sleeve stripes while you’re working the body? I didn’t want to knit the body sweating about the sleeve stripes. I wanted a nice relaxing knit.
If you have a scale to weigh your yarn and you have decided on the finished size of the sweater, you can follow along. Here is how I did it for my sweater sized for a 1 year old:
Formula: weight of yarn available = body circumference + sleeve circumference + second sleeve circumference.
Now the calculator comes out: Divide the grams of yarn by the total circumference of body and sleeves. This will give you the number of grams of yarn needed to knit once around the body and two sleeves.
Here are the numbers I used with my left-over balls of yarn:
35g of rust colour = 22″ body + 9″ sleeve + 9″ sleeve (1 year size)
35g = 40″ circumference
Divide as follows: 35 divided by 40 = number of grams to knit one round of the body and two sleeves
0.875g of yarn needed for every round of stripes knit
Separate Yarn to use for body and sleeve stripes : OK, now that I have this weird number from the formula I can divide my yarn into enough for the body stripe and 2 equal sized balls for each sleeve stripe:
22″ body x 0.875g = 19.25g of yarn for a body stripe
9″ sleeve x 0.875g = 7.87g of yarn for each sleeve stripe
Weigh out your yarn. Give yourself a safety margin. I wound a ball weighing 18g for the Body stripe. Now I’m sure to have more than enough left for the sleeve stripes.
Once I knew I would have enough for the sleeves I could make a decision on the actual size of the rust stripe, knowing I could mimic it in the sleeves. I didn’t need all 18g for the body stripe I wanted so I ended up with a little left over. Then I knit the sleeve stripes, counting rows so they were the same as the body stripe. This worked out perfectly. At least I think it did.
The new pattern I’m working on for a Family Crew Neck Pullover begins by knitting the neckband in the round. This is not the usual way to start a raglan pullover.
Usually you would cast on for the shoulder, back of neck and second shoulder and work back and forth to form the crewneck. You would work your usual raglan increases along with an increase at the beginning and end of the row to form the crewneck angle on the Front. Then cast on some centre front stitches and work your yoke in the round. Pick up the neckband afterwards.
Have you made a pullover that begins like this?
But of course, I am not doing this pullover like that. As my husband would say, “Have you met me?”.
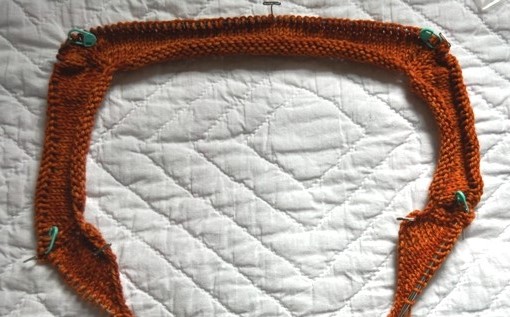
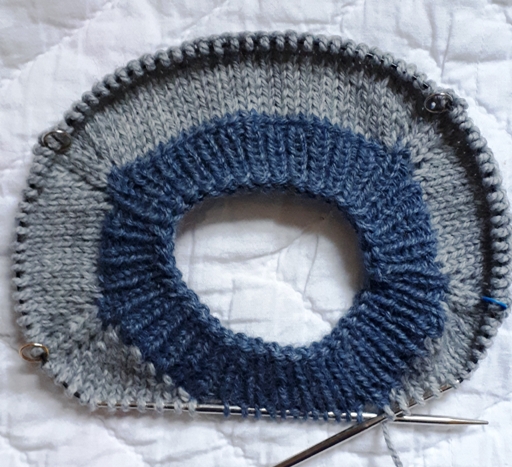
I am starting with the neckband already knit in the round and to form the crewneck front, I’m going to work short rows. Why? Because I love short rows and they work.
Look at that. To me it’s a thing of beauty. I know, it’s a weird designer thing. But I do love looking at this stage in my pullover. The Back is raised. The Front is lowered. And now we’re working in the round for the rest of the yoke.
Now I have a question for you. Here it is with a colour change.
Is the angled edge of the Front with the short rows too messy?
Here’s a close up of both sides. Messy?
I don’t mind it at all but …
Would you like one round of grey knit before starting the short rows? Yes or No?