Gauge-Free, Build A Vest

This vest, and the cardigan I’m modifying it from (Build a Bigger V), will be Gauge-Free. No swatch needed. No talk about gauge at all, none, throughout the entire pattern. How freeing is that?

How can it possibly work?

Start with a couple of stitches and build a triangle with increases worked on either side of the centre marker. Work until the solid edge of the triangle is the width of the Back of Neck. Mine is 8″ wide.

Width of Back of Neck is 8″.

That sets the number of stitches for the Back Panel. You need to count the number of stitches you set up with at this point but we don’t care how many stitches per inch you are getting here. Any number of stitches will work.

Now, I will keep the same stitch count as I knit the back panel.

The shaded part here is the Back Panel. The triangle begins at the Back of Neck and the Back Panel is knit down to the desired length.

The decision will be how long I want this vest to be. Lots of knitting for the next week.

Cheers, Deb

Any Gauge and Gauge-Free patterns by Deb

Deb.gemmell on instagram

Modular knitting continues

I seem to be in learning mode these days. This is my default when things get tough. Elderly care is taking up a lot of my emotional bandwidth so I need something to concentrate on in small doses. The Jigsaw Blanket by Stephen West was great for this. https://www.ravelry.com/patterns/library/jigsaw-puzzle-blanket

But I wasn’t done with modular knitting. I took all the techniques I learned from the blanket to the Conglomeration Caper Cushion by Woolly Thoughts (free download).

This pattern has lots of information about working all the shapes but does not give you row by row instructions for joining. It was fun to work on trying to transfer techniques to see if I had actually learned anything.

Not bad but I’m thinking of doing one more cushion cover to consolidate my knowledge. I have lots of partial balls left over from both projects.

So onward.

Cheers, Deb

Yarn by Shelridge Yarns https://www.shelridge.com/

Gauge-free and Gaugless patterns by Deb https://www.ravelry.com/stores/debgemmellmods

Jigsawing away

I’m obsessed! I can’t seem to stop.

Do you find that you deep dive into some projects? I do if I’m learning something new. This Jigsaw blanket is a modular workshop for me. Working with 2 strands is also new to me and coupling colours together for the marl affect is an adventure.

Have you taken on something intriguing?

I am finding that some of my pairings didn’t work well. This is a beautiful blue green with a speckled beige sock yarn. The blue shade is gone, and to my eye, it looks hunter green now with speckles. Not a fan of that one.

I love the coral and red together. I was using really tiny left over balls as the second colour. Ran out of red so added a small ball with a bit more yellow in it and the bottom is a multicolored bit with some orange in it.

Isn’t this one beautiful? Teal green and teal blue together. Yummy.

Blue plus a blue-green handpaint. This is lovely too.

Now I think I have a better idea of what’s going to happen when I pair up two colours. I’m trying not to be too smug, ha. I’m probably headed for a fall. Still quite a long way to go yet.

How are your projects coming along?

Cheers, Deb

Gauge-free and Any Gauge patterns by Deb

Purl Back Backwards: New Year, new 2023 challenge

It definitely feels like this year needs something new. So I have given myself a challenge: videos. The first one is purling back backwards (near the bottom of this post).

I’m ok with amateur-hour videos as I figure this out. But videos there will be. Let’s begin as I intend to continue, with my first 2023 project with videos.

I was gifted 2 large bags of fingering weight wool by my sister Lyn, of Shelridge Yarns. Yup, this is a lot of excellent wool.

It’s burning a hole in my project bag. Is this even a thing? You know what I mean, right? I need to use it, lots of it, right now!

I’ve chosen to work Stephen West’s Jigsaw Puzzle Blanket. It has a lot going for it. Two strands of fingering are held together throughout. It’s worked on nice big needles and it’s modular too, yahoo.

So far I am on my third section and I can already see that the turning, turning, turning for the garter rows is going to be a drag as this gets bigger.

Purling back backwards is coming to the rescue. You work it with the right side facing (no turning to the wrong side). It gives you the garter stitch bumps needed.

Here’s how it’s done. (You can skip to the video below if you want to.)

With yarn in front, insert the left needle into the back leg of the next stitch, from back to front.

Wrap the yarn around the front needle, counterclockwise.

Push your front needle through the stitch to the back. Purl bump made.

Do you want to see it in real time?

Make purl bumps of garter stitch made with the Right Side facing, no turning needed.

I am going to be soooooo good at this by the end!

Hope you have chosen a gorgeous new project to get you started on 2023.

Cheers, Deb

Any Gauge patterns by Deb https://www.ravelry.com/stores/debgemmellmods

Deb.gemmell on Instagram

Off to a fast start

3-Act Play Scarf https://www.ravelry.com/patterns/library/3-act-play-scarf

I’m now on the second triangle of three which make up the first Act.

Here’s the beginning. Triangle two is getting attached to triangle one. I just love modular knitting!

I’m working this one with eyelets worked every right side row.

I’m noticing that the eyelets, worked every 4th row in triangle one, look different to eyelets worked every 2 rows.

Fascinating.

Done. You know it’s the right project when it whips along this fast.

On to triangle 3.

Cheers. Hope you are enjoying your summer knitting. Deb

3-Act Play Scarf

Any Gauge and Gauge-free knitting patterns by Deb. https://www.ravelry.com/stores/debgemmellmods

3-Act Play, Triangle 3

The 3-Act Play scarf begins with 3 Triangles joined-as-you-go. Why make a point of talking about any one Triangle over the other two? It’s because Triangle 3 has some differences the other two triangle don’t have. It can be knit in garter stitch but here I knit it with eyelets and colour stripes. Yes, it was an adventure.

This was the second 3-Act Play scarf I knit. I decided to add Triangle 3 to the centre colour section by knitting it in two colours, plus the eyelets just to keep the eyelet thing going over all three triangles. I wanted to see how that would play out.

I really like how it looks but it is tricky. This is the 4-Row Eyelet pattern in the Mods pages: 2 rows for the eyelets and 2 rows in garter stitch. The colour of the garter stitch rows are the most obvious when it’s done. That’s a bit of a shame since the eyelets are more decorative but that’s the way it is.

It’s tricky because the beginning of the right side rows, where each new stripe is going to begin, is in the centre at the join between Triangle 2 and Triangle 3. I did a video.

3-Act Play scarf: Triangle 3 with stripes

Moving foward, I’ve ordered wool to make a couple more sweaters. I wish it was here already because I want to knit 2 more sweaters before the summer comes. Wait here, I’ll just go look on the porch to see if it’s come, nope, not today.

In the meantime I’m knitting my little grandson a mini-me sweater. It’s a great way to use up all the left-over odd balls and a testknit for my pattern. Daddy’s sweater and little Max’s sweater.

Cheers, Deb

Any Gauge and Gauge-Free patterns by Deb

Test knitting the 3-Act Play

I don’t know how many times I need to knit this scarf to get the pattern written but I’m now on scarf #3. I am calling it the 3-Act PLAY. I have included different stitch patterns so I hope knitters will have some fun playing with them. I have had lots of fun with them.

It starts with Act I and 3 triangles. Act II is the central straight bias section and Act III is the scalloped tail end.

3-Act Play scarf schematic Aug.9

It’s going to be written as a simple garter stitch scarf. Ok, not exactly simple but there will be lots of garter stitch knitting. I unraveled another shawl and knit right off of it, changing colours as I came to them in the shawl. The knitting is a little kinky (not that way!!) but I like it anyway.

20200809_170320

I’m test knitting now and getting more of the details into the pattern. I am working the first 3 triangles, each in different Eyelet pattern and in one colour.

20200809_170826

Here’s a close up. Right Side: knit. Wrong Side: [YO, P2tog]. I love how different these eyelets look.

20200808_100613

Next up … eyelets worked knitwise in the usual manner just to see how they differ. So far so good. Cheers, Deb

Gauge-Free and Any Gauge patterns by Deb

Cabin Fever No-Sew patterns by Deb & Lyn

Eyelets 4 ways

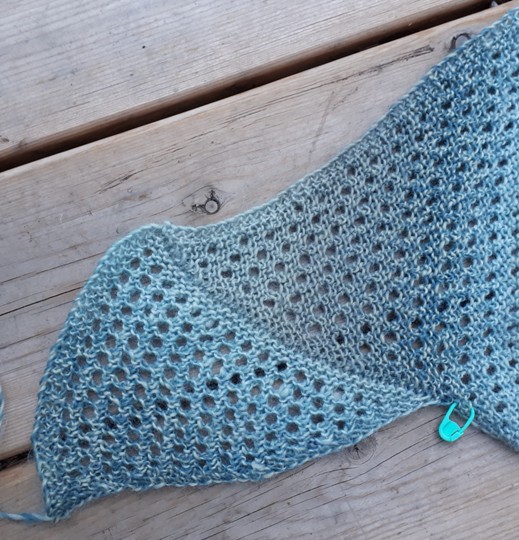
I’m working on the beginning triangles of a new scarf pattern. The triangles get larger and larger until you have the depth of scarf you desire. These triangles will form one of the tails which will hang down the front of the body. I don’t like to have a colour pattern on the tails of a scarf because then I am always fussing to keep the right side of the pattern showing. I decided to try different ways of working eyelets since they look good on both sides.

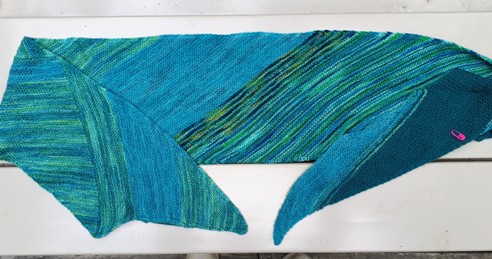
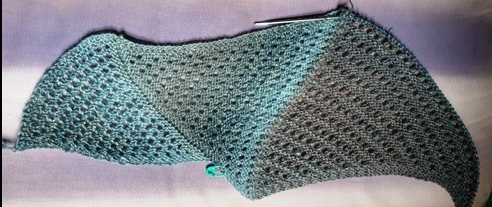
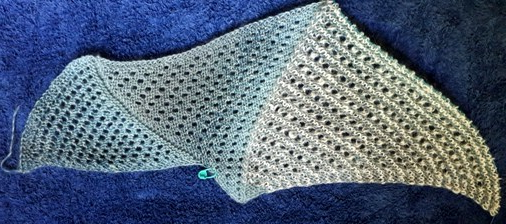
I put my scarf in the sink while still on the needle and hung it out with my laundry. I wanted to see how deep the scarf was going to be. The white hand-spun really bloomed. Good to know that as I go forward. 20200707_132839

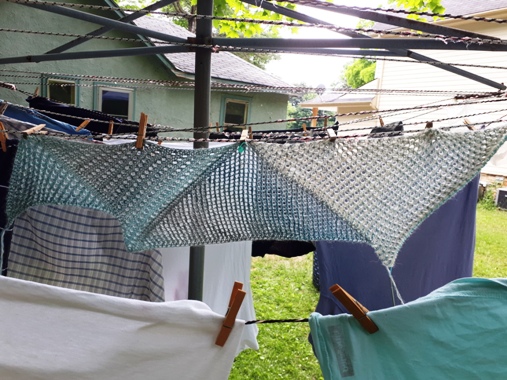
Triangle One (on the far left) has eyelets worked on the wrong side of the fabric. This is a 4 row pattern more or less based on a stockinette stitch background:

Right Side Row 1: Knit.  Wrong Side Row 2: [YO, P2tog] repeat.  Right Side Row 3:  Knit.   Wrong Side Row 4:  Knit. This last row creates a ridge on the Right Side.  I really like that the eyelet holes sit between 2 Right Side knit rows. I think the holes look bigger and more defined.   

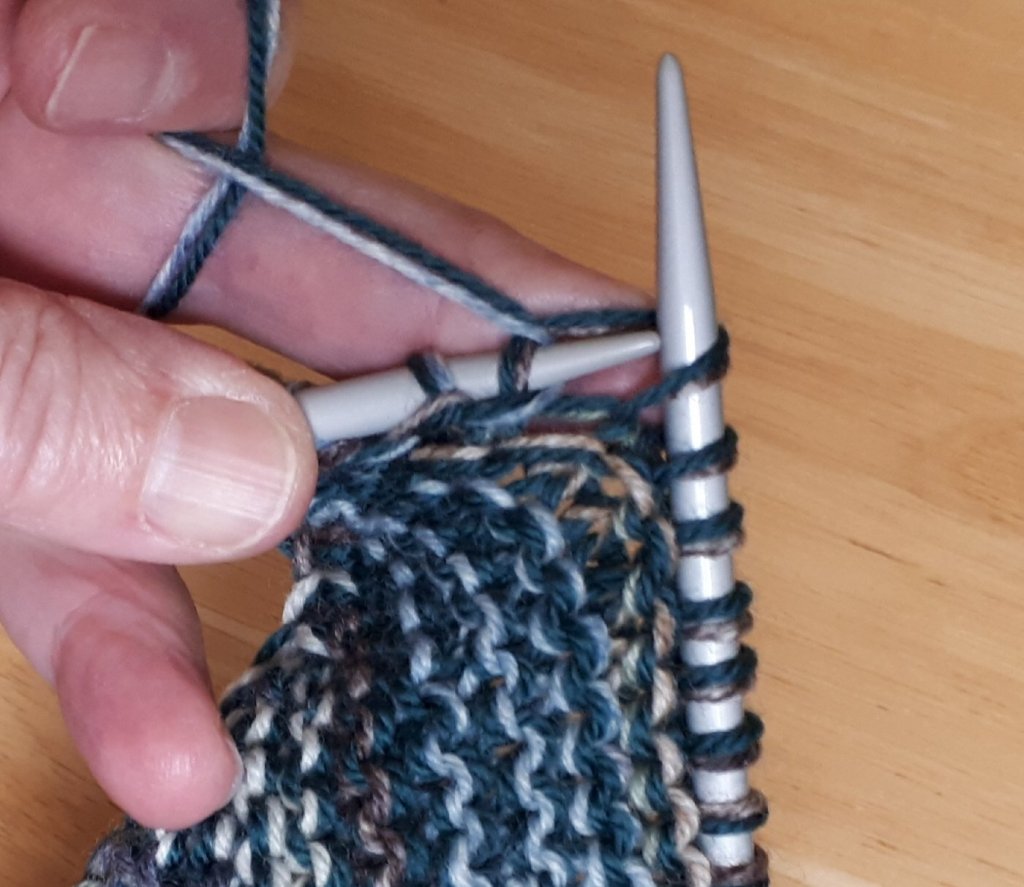
Why bother working the eyelets on the wrong side row? I find that the needle position for working P2tog makes more sense to me and is easier to work than the K2tog. But I get that P2tog may not be your favourite stitch.

So I made Triangle Two with the regular eyelet pattern worked on the Right Side rows with several garter rows in between.

RS Row 1: [YO, K2tog] repeat.  Rows 2, 3, 4, 5 & 6:  Knit.  This pattern places the eyelet holes between two garter ridges.

Just to try that again I worked Triangle 3 with Eyelets worked on the Right Side, every other row. This is one you are probably quite familiar with.

RS Row 1: [YO, K2tog] repeat.  WS Row 2: Knit. 

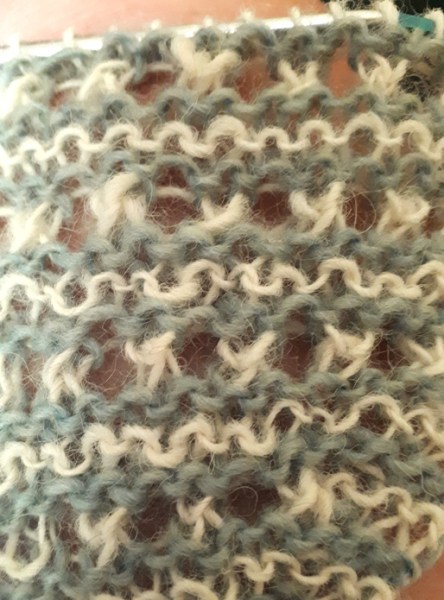
One more triangle, Triangle Four, and back to the beginning with the P2tog eyelets because, well I’d had enough of the other ones. This time I added a second colour. Same 4 row pattern though.

With Main Colour, work  RS Row 1: Knit.  WS Row 2: [YO, P2tog] repeat.

With Contrast Colour, work  RS Row 3: Knit.  WS Row 4:  Knit. 

I have to say I loved this last one and was sorry when the triangle was finished. I’m going to have to use this again somewhere soon. Do you want another look at my laundry?

20200707_132856

There are many ways to use eyelets. These were a couple of easy combinations. Enjoy.

Stay safe and happy knitting,

Deb

Any Gauge and Gauge-Free patterns by Deb

Cabin Fever No-Sew patterns by Deb & Lyn


Contrast colour angst

Are you a good colourist? I find choosing a contrast colour difficult. I’m learning, I hope, but not without lots of confusion, doubt and in the end, much ripping back and starting over.

I chose this Scheepjes Our Tribe sock wool (Cypress Textiles colour) to knit a pair of socks. It’s a blue/green in a light shade and I though a stitch pattern would show well. After getting my socks started I decided that, although it says it’s superwash, it was not spun tight enough to stand up to my rigorous wearing and washing.cypress textiles wool

When I knit socks I have fun with the colours. I knit orange socks, yellow socks, purple socks, green socks and many muli-coloured socks. But this colour, although fine for socks, would not have been my usual colour choice for any other garment.

This then was a learning challenge. My new scarf starts with triangles which, this time, I’m working in different Eyelet patterns. The first two triangles are made with this wool. You can see the slow colour change happening.(It’s greener than this photo shows.)20200628_203305

Now I need to choose a contrast colour. How do I bring the green out? It’s rather pale so any strong colour didn’t look right. Any of the blue yarn I tried didn’t look right either. I tried a taupe colour since there is some in the shading of this yarn.20200627_114135

The overall result is very dark and on this gloomy day I just couldn’t take it. 20200627_110255 - Copy (2)

It didn’t last long. Rip, rip, rip. Back to my stash and more head scratching. When stumped, go the other extreme. I chose the creamiest winter white I had. It lightens the scarf and at this point it seems like the best I can do since my needles are itching to continue.20200627_133338

20200628_131401

Better? It’s not gloomy anyway. This may or may not turn out as I expected, probably not, but …  I won’t know unless I carry on.

Deb

Any Gauge and Gauge-Free patterns by Deb

Cabin Fever No-Sew patterns by Deb & Lyn


A Letter Wrap

My mantra at the moment is Modifications R Us. Although I have been reading and paying attention to world events, I have also been busy knitting. I don’t know what I would do without yarn and needles in my hands.

My project is a wrap, a modification of this All You Need scarf pattern by Heidi Kirrmaier which, by the way, I would highly recommend.

0556aa90-582c-44bc-8792-ef5b88799665_medium4464091546704968419.jpg

I began with a provisional cast on for the letter L because I never intended to knit a scarf. The letters are the really fun part after all. The letters are modular, join-as-you-go. Ms. Kirrmaier suggests that when working the O, in garter stitch in-the-round, to join up the L and V that you might want to go down a needle size. Excellent advice for loose purlers but I’m an excellent purler so of course paid no attention. OK you guessed it, I had to rip back because, hello, she was totally right.Love wrap

My idea was to make a wrap with a decorative edging. I usually don’t do much in the way of fancy stitches, a deep rut that I need to crawl out of, but this was a project that needed a little something. The stitch pattern I chose is from a pair of socks I designed called Pine Cone Sock. It seemed best to start with a pattern I am a little familiar with. 

I changed it from a 9 row pattern to a 10 row pattern and I think it looks pretty good as a border. The pattern is based on Twist Right and Twist Left stitches which are favourites of mine.Love wrap (3)

The wrap is 17″/43cm deep and 48″/127cm long. I might block it one more time for a tiny bit more length. Now back to sock knitting while I think about what’s next on my modifications list.

Cheers, hope you are well and happily knitting,

Deb

Any Gauge and Gauge-Free patterns by Deb

Cabin Fever No-Sew patterns by Deb & Lyn