The Steek, the scissors are out

You don’t have to look if you don’t want to. There will be cutting.

I have used a sewing machine to secure the edges of the steek pathway before but … you knew this was coming, my machine is not out and I’m being lazy and leaving it in the cupboard for now. I really want to see if the crocheted style of steek would work. So here goes. I have knit to the bottom of the armhole depth and cast off the 5 steek pathway stitches.

Now the edges of the steek pathway need to be secured. I used this crochet method. Jessica MacDonald does such a good job of describing and showing how to do this. How to work a crochet steek reinforcement video.

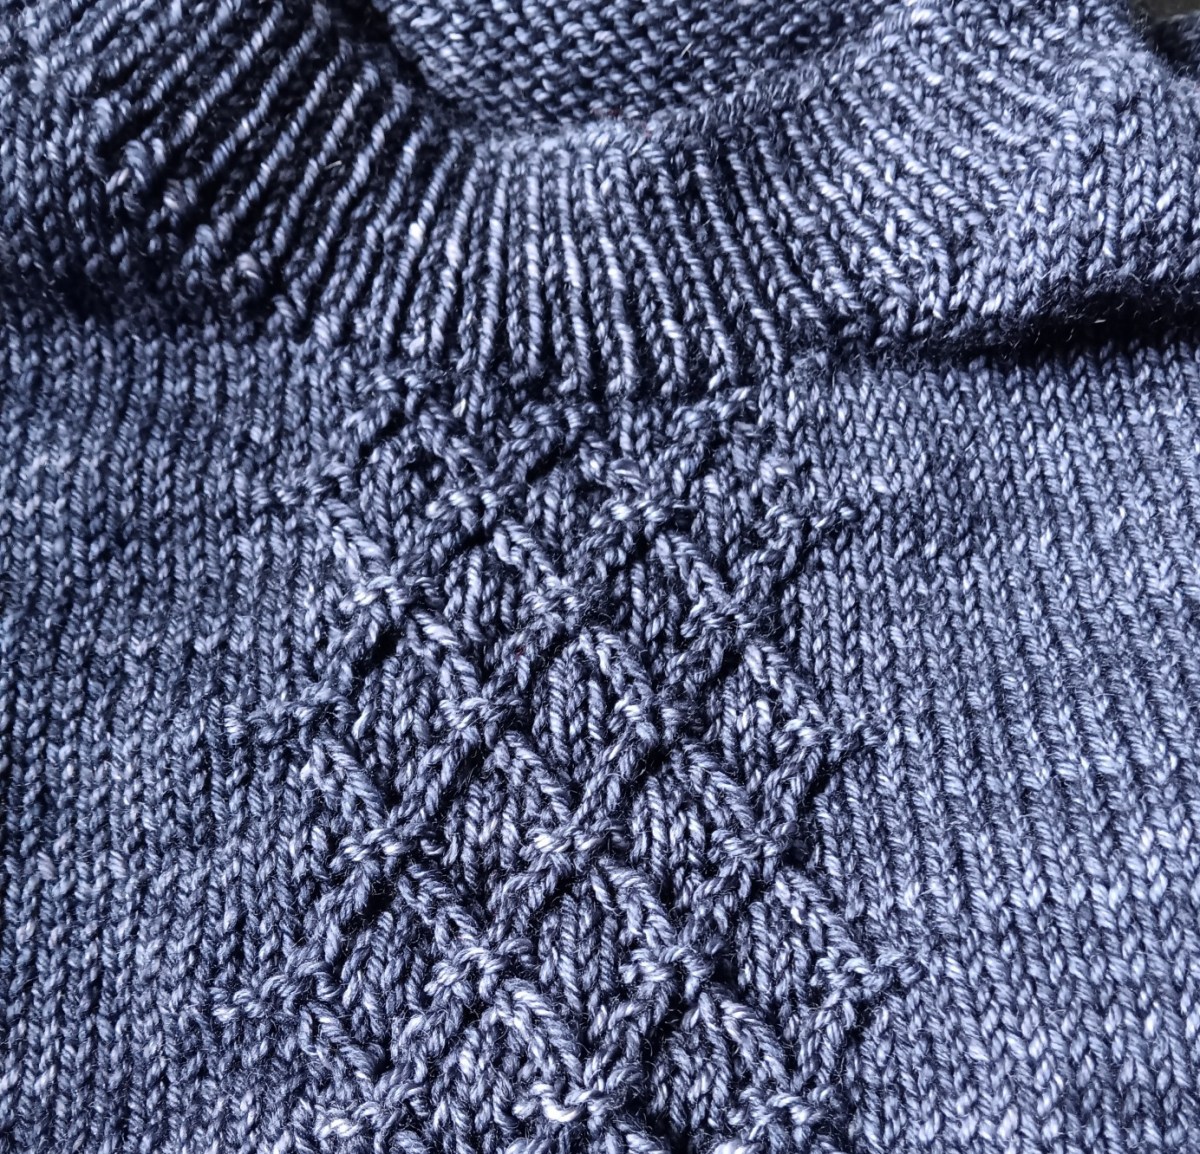
Here we go. This is my 5-stitch steek pathway as seen at the shoulder.

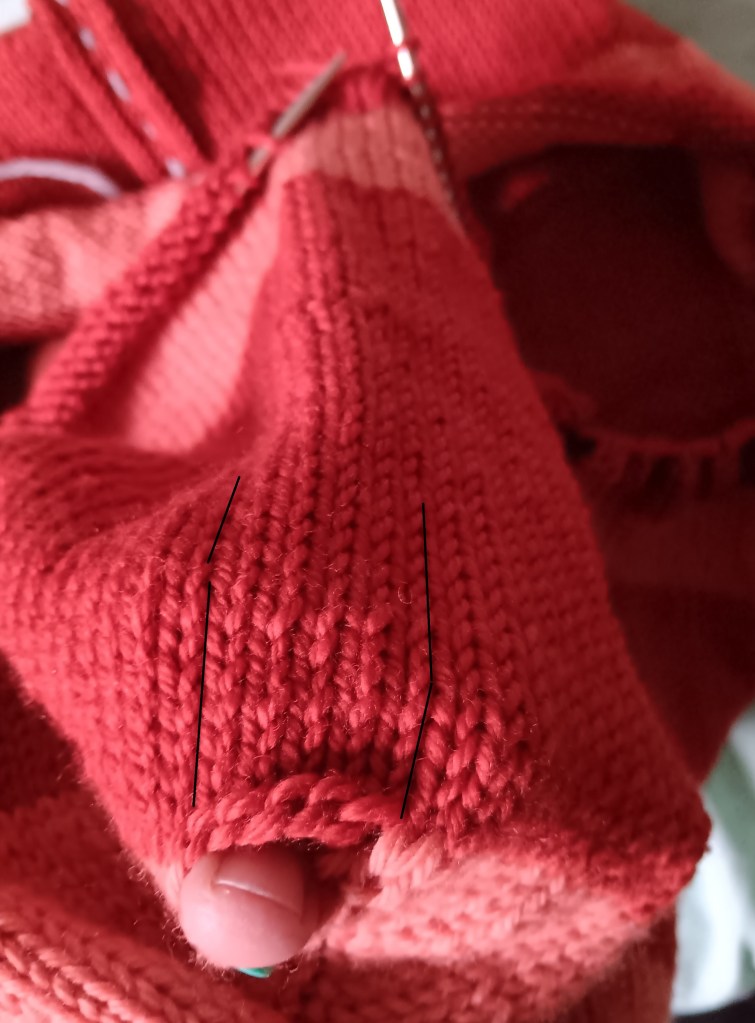
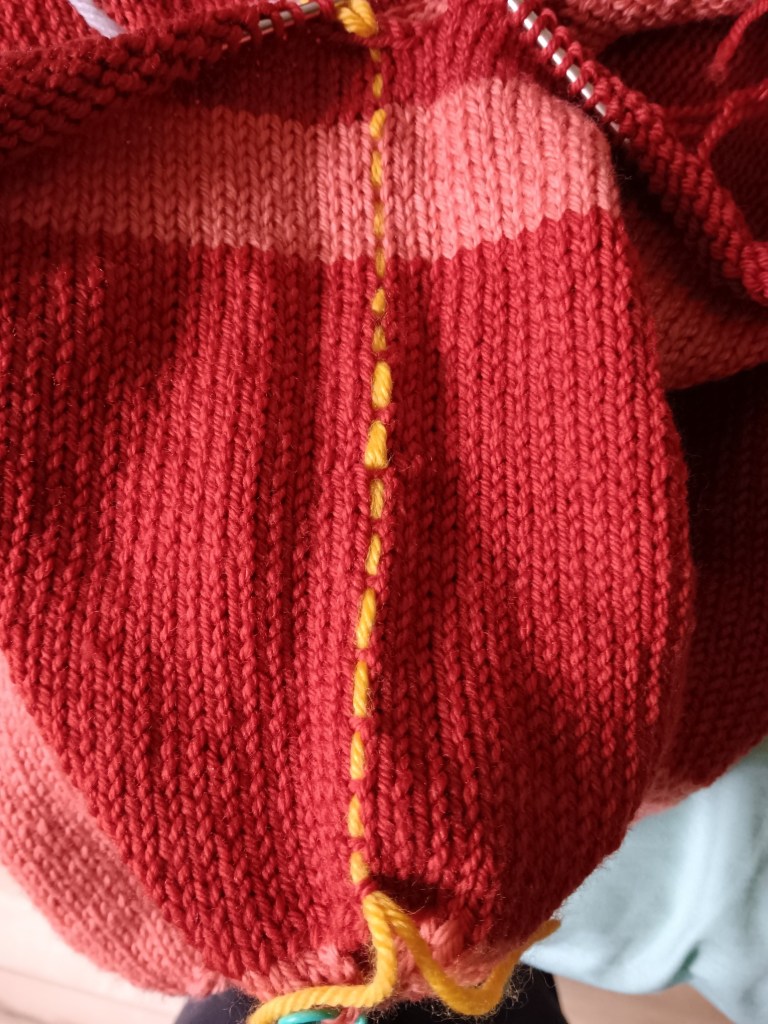
Next, baste down the centre of stitch#3.

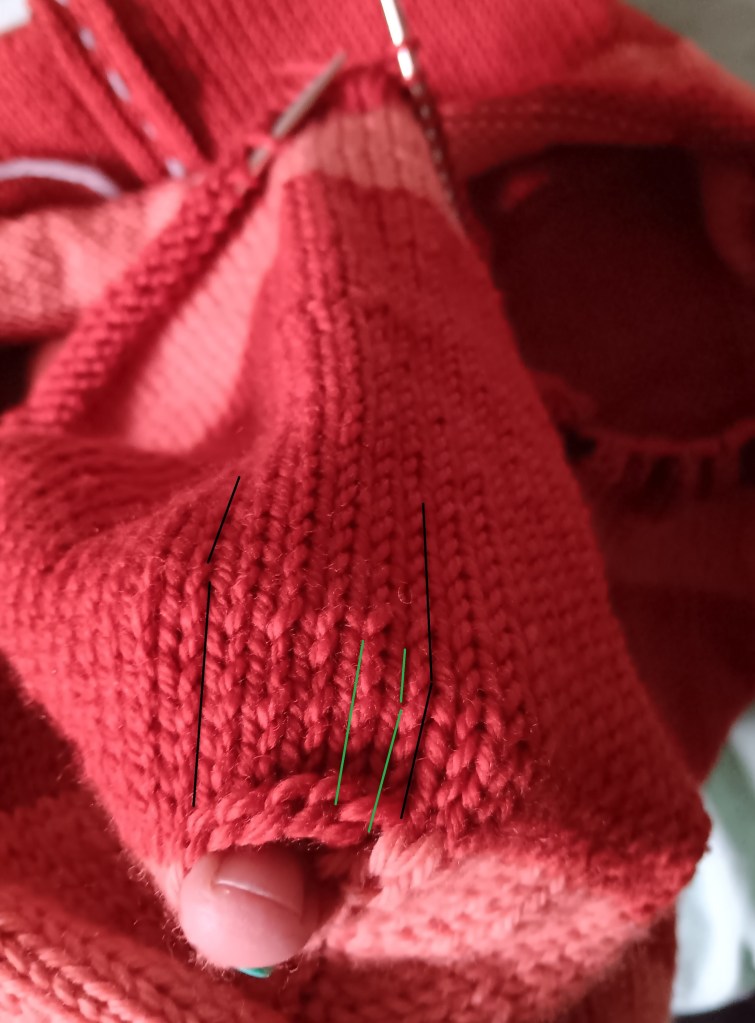
Starting at the shoulder, I crocheted into the left leg of stitch#1 and the right leg of stitch#2, using a crochet slip stitch.

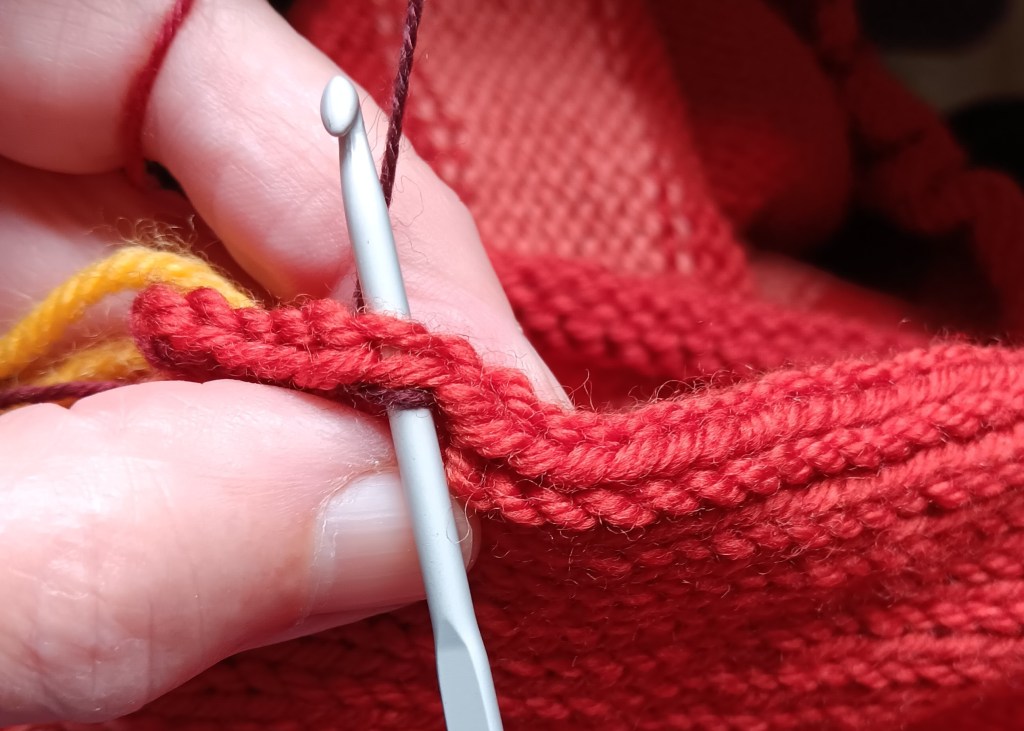
I used a crochet hook 2 sizes smaller than my body-sized knitting needle, and for this worsted weight sweater, sock yarn. My crocheting was not elegant. It was awkward and rather slow going but the result is surprisingly tight. I have no worries about it coming apart.

My best tip is to fold the fabric so the stitch line you are crocheting is on the top.

Next go to the bottom of the steek and work again with one leg of stitch#4 and stitch#5.

Here is the steek with both crochet reinforcements done.

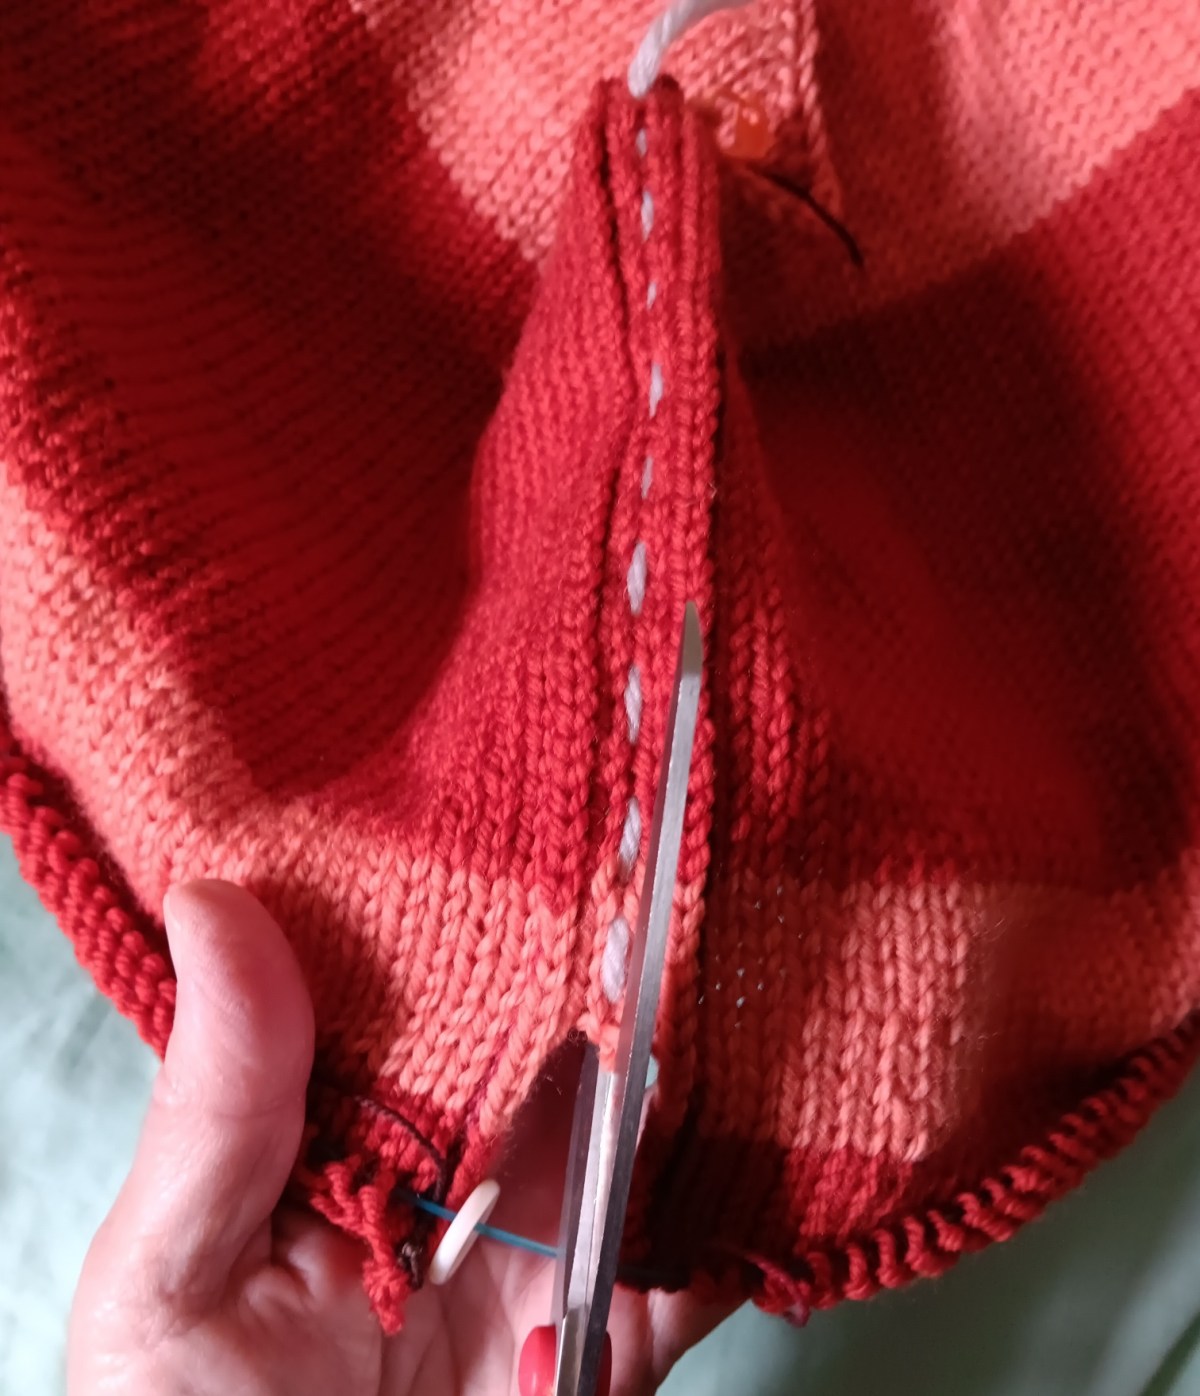
OK, here we go. Scissors out. Cut up the centre of stitch#3.

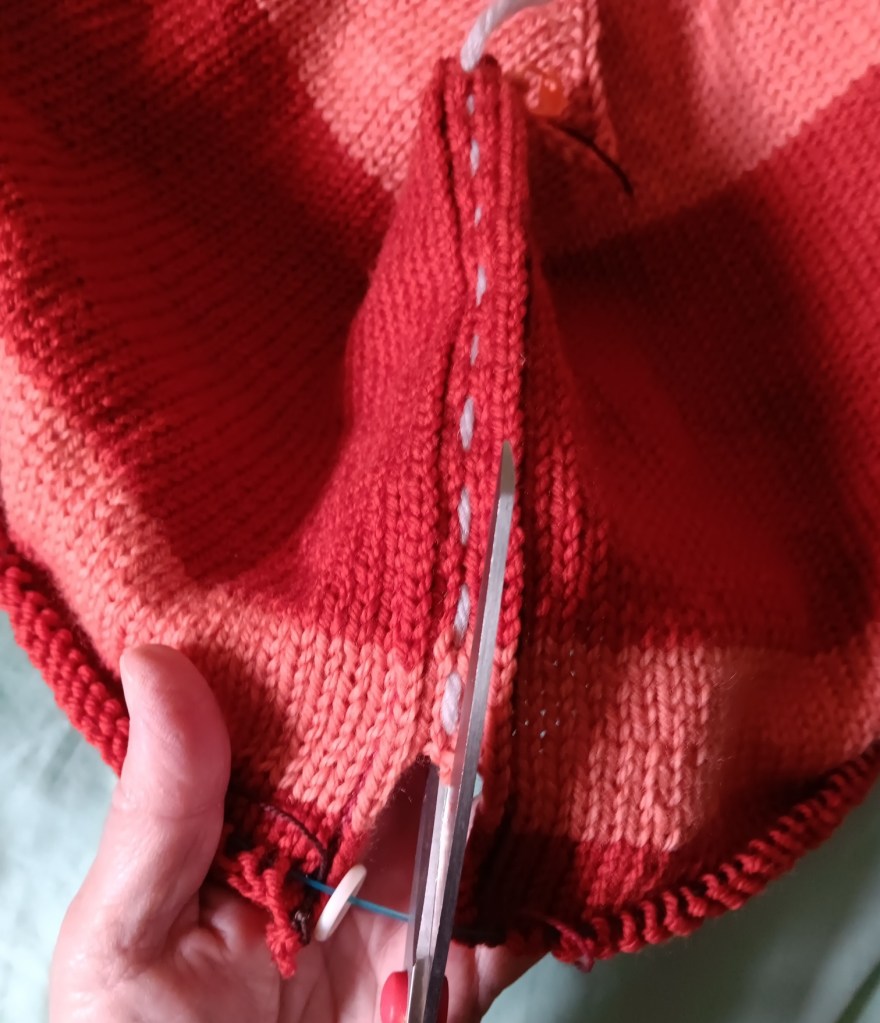
Ta, da. That wasn’t too painful. The wrong side is ok too.

I’m starting my new colour and then I’m going to pick up for my sleeves. Can’t wait.

Cheers, Deb

Any Gauge and Gauge-Free knitting patterns by Deb

deb.gemmell on instagram

To Steek or Not to Steek

Steeks, scary!!! I know, scissors and knitting don’t usually mix. I’m doing it anyway.

I’m doing my armholes as steeks so I can knit round and round and round. I have knit the shoulders so they are wide enough. This pullover is going to have 10″/25cm of ease so the Front and Back of this chunky weight version for my daughter, are both 21″/53cm wide.

Here’s how I start my steek. At the end of the shoulders I cast On 5 sts for the steek pathway.

Now I knit round and round. Yay. I think I will make the armholes around 8-9″/20-23cm deep.

I’m so happy and relaxed. Isn’t this yarn fun? It’s King Cole Hedgerow Chunky. I’m loving the stripes.

Cheers, Deb

Any Gauge and Gauge-Free patterns by Deb

deb.gemmell on instagram

Short Rows to lower the Front

Short Rows are the best. To drop the front of your neckline you basically work back and forth, working more rows across and Back of Neck and never working across all the Front stitches. Every time you turn from the right side to the wrong side at the end of a short row, you create a gap.

Different kinds of short row systems are all about how to close these gaps.

When you cast on for this neckband you cast on many more stitches on the front. The short rows I use end with a decrease: SSK, K1, Turn OR P2tog, P1, Turn (if you knit cuff down heel flap socks you will recognize this short row system). The decreases take care of all those extra Front stitches.

Now the fun part begins, not that knitting short rows isn’t fun, because it totally is.

To knit the shoulders, simply knit round and round, working an increase before and after each of the shoulder markers. That’s an increase of 4 stitches every round until you reach the desired width. That’s the contiguous way.

Almost to my desired width on this chunky weight one. The Short Rows on the worsted weight version are complete so round and round I go. I’m so excited to see it grow. Cheers, Deb

Any Gauge and Gauge-Free patterns by Deb

deb.gemmell on instagram

Contiguous Drop Shoulder, The Beginning

I can’t sit still for long. I have another sweater to knit. This time I’m going to redo one that I have tried before but not to my total satisfaction.

This is a over-sized drop shoulder with contiguous shoulders. You can see the slope that the contiguous line creates. The great thing is that once the V-neck is completed it’s knit round and round, not flat for the back and flat for the front.

So I tried again and thought I had figured out an easier way to get it started.

The neckband done. This is going to be a crewneck worked with short rows to drop the front.

Then I tried out a new idea. You can see that the slope coming down the shoulder is w-a-y too steep. The second slope is much better. So that’s good information. Also the amount of drop in the crewneck was too much.

So that got ripped back to the neckband. No problem, no tears, it’s just part of the deal.

I started again with a shallower crewneck drop and the flatter shoulder slope.

Now I’m off to the races. Just knit round and round until I reach the width I want it to be. How easy is that!

Let me tell you a little about it.

I’m going to offer the recipe for this pullover for free. Once I have my short rows tested I will post it and update it as we go along. This is an Any Gauge pattern. I’m knitting one in chunky weight and a second one in worsted weight. I will be figuring it out as I go along. Do you want to knit along with me?

Cheers, Deb

Any Gauge and Gauge-free patterns by Deb

Deb.gemmell on instagram

Time consuming but worth it

How long does a sweater of yours  sit unfinished?

This little 4 year sized Family Crew Neck sat for quite a while because I didn’t know how to do the sleeves.

The colour fade yarn was great. I had already bought a second ball to do the sleeves.

I wound off the lime green, yellow and into the orange of the second ball of yarn.

I wound up all the orange into a separate ball. Then, I wound off some of that orange ball to make 2 equal sized balls. I knit one sleeve and then the other until the length of the orange in the sleeve was as close as I could get it to the body.

Then I did the same with the red and then again with the purple.

Yes, it was time-consuming, but I’m really happy with the result.

He likes likes it. He really likes it.

Cheers, Deb

Any Gauge and Gauge-free patterns by Deb

Deb.gemmell on instagram

Done? Well almost

Yarn chicken and I won. Yahoo!!!

This is where knitting the Family Crew Neck or any top down knit comes into its own.

As it became increasingly obvious I would be very close on the amount of yarn I had left, I took some time to sort through  my priorities. I did need the body to be long enough. I could deal with a sleeve modification.

So, I  knit the sleeves to just before the cuffs and broke the yarn. If I ran out of yarn, I could rip them back to make them 3/4 length.

Then, I knit the body to the bottom border. I decided a split hem would serve me best at this point. I worked the front panel of the split hem. Not as long as I would like but the minimum amount. Broke the yarn again.

I’m sure you can see the theme here: knit, look at the ball of yarn I have left, work some more, stare harder at the little ball, make a decision and knit some more.

Done.

There are many, many ends to sew in but I’m happy with this Family Crew Neck knit with Shelridge Yarns W4 worsted.

Can you tell I’m 😮 surprised and so very pleased. Whew.

Hope your knitting is successful too.

Cheers, Deb

Any Gauge and Gauge-Free patterns by Deb

Deb.gemmell on instagram

Now You See It

My Family Crew Neck was progressing nicely. The body was knit to the waist, and I had knit one sleeve to above the cuff and started the second sleeve.

Then, because that little voice in my head kept bothering me, I decided to count stitches.

Oops, it was huge and my idea of working an a-line body was making it worse. So, now you see it …

… and now you don’t. Rip, rip, rip.

In the end, this was the only solution. Now I have hours of extra knitting to do. That’s not a bad thing, right?

Back on track and much happier.

Here’s hoping your knitting is going a little bit better.

Cheers, Deb

Any Gauge and Gauge-Free patterns by Deb

deb.gemmell on instagram

Too Many WIPs

I have definitely dug myself into a big hole with all of my WIPs. It’s a somewhat comfortable hole since I am sitting on a pile of knitting but I’m overwhelmed and discouraged.

It’s was a bad sign when I had to take the needle tips off of this project to knit something else. This is a Family Crew Neck for my grandson. Part of my procrastinating is that I’m not at all sure what to do with the sleeves. I have a second ball of this yarn for the sleeves but I’m wondering how to do the stripes on the sleeves so that they sort of match the body. Some more thinking is needed.

I grabbed the needles from that project to do an Any Gauge Raglan Pullover because I’m running a class right now and thought I should knit along with my students. I encouraged them to knit with worsted weight yarn or chunky yarn so they could get their pullovers done over the 6 weeks. I, of course, am knitting mine in fingering weight yarn. I feel like I am knitting furiously and getting nowhere. Sigh, I know. What was I thinking?!

Then there is the blog which you have been reading. I have wanted a Family Crew Neck for some time. I will be getting back to that soon. I have so much more to tell you about getting a good fit with your raglan.

You would think that three sweaters is enough to keep me busy. Then I cast on a hat. I knit the whole hat on the wrong size needle, ran out of yarn, pulled it out and am now on the redo with the correct needle. Not much more to say about that!

Am I finished? Apparently not.

For the month of February I am teaching a sock class. My first time sock students are knitting boot socks in worsted weight yarn. They will have a pair of socks done by the end of the month. I will, maybe, have one sock done past the heel with my sock yarn.

HOW DID THIS HAPPEN??? I hope you are in better control of your knitting. Cheers, Deb

Any Gauge and Gauge-Free knitting patterns by Deb

Deb.gemmell on instagram

What if … the bust and sleeve could both fit?

What if … the raglan markers on your Top Down sweater were only a guideline for the size of your sleeve and not the exact size of the sleeve?

“Why don’t you knit sweaters for yourself?” I have asked this question of a lot of knitters. The answer, quite often, is that the sleeves never fit. A lot of knitting pattern sizes are based primarily on the measurement around your bust. If your bust measurement and your arm measurement don’t agree with the size chart the designer is using, then you are not getting a good fit.

This is one of the problems I wanted to solve in the adult sizes of my series of Any Gauge Raglan patterns. I have written these patterns for one person at a time – you. You don’t have to compare yourself to a size chart.

In these patterns, you take your bust measurement and arm measurement with a tape measure, and, after converting to the number of stitches, make the raglan yoke to these measurements (Bust + Arm + Arm). Yes, when you finish the yoke,it would fit you like a second skin.

Then you put the exact number of stitches for your arm on spare yarn for your sleeve.

Here is the bottom of my Family Crew Neck yoke with one set of sleeve stitches on spare (red) yarn.

My sleeve stitches on the spare yarn are inside the raglan markers.

In this case my sleeve stitches are 6 sts narrower (1.25″ narrower) than where the raglan markers would indicate. Whether the sleeve stitches end up inside or outside the raglan markers depends on where the markers are set up in the neckline and the size of your arm, of course.

But it fits like a second skin? How is that going to work?

Wait, there’s more. Cast on the number of stitches you need for the amount of ease you want on the body. It could be anywhere between 4″- 7″ or even more, if you wish. Cast on 1/2 the ease at one underarm and the other 1/2 at the other underarm.

Now this sweater body has been knit to your specific measurements at the bust and arm. Ease has been added. This sweater body will fit you and only you.

Is this a really radical idea? Questions?

Cheers, Deb

Any Gauge and Gauge-Free patterns by Deb

Deb.gemmell on instagram

Twisted Stitches

I have added a twisted stitch pattern to my Family Crew Neck.

Twist stitch patterns are perfect for adding into a sweater. They don’t affect your stitch count so you can just plug them anywhere you want. I put this pattern down the middle of the front of this top down pullover. I will also add this pattern to each side of the body. I might even add them into my cuffs. Why not? I just can’t get enough of them.

Twisted stitches are a two stitch cable without the cable needle. Don’t you love that!

This diamond pattern is included in the Family Crew Neck.

Cheers, Deb

Any Gauge and Gauge-Free patterns by Deb

Deb.gemmell on instagram