A drop shoulder pullover can be knit in a combination of knit-in-the-round and knit flat, whether it’s knit from the top down or the bottom up. If you add cables to the pattern, like in the Saddle Up pullover, well, it gets a little trickier.
Cable patterns are almost always written to be worked flat, with a right side and a wrong side. The cable crossings are worked on the right side rows. This simplifies things a little bit. You know those right side rows are the ones to watch out for.
At some point, you may need to work in-the-round. Then, you have the right side facing you all the time. Figuring out when to cross cables can be a little more difficult.
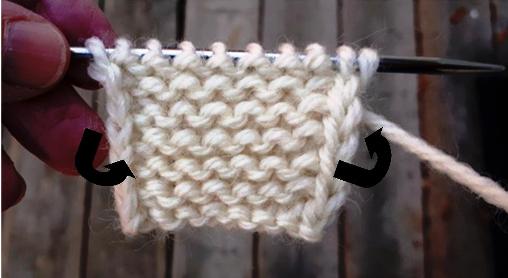
Here is a 4-stitch cable, where two stitches are crossed over two stitches, every 4 rows. The lines in the photo indicate the outside stitch of this Left Cross. See that hole just to the left of the crossing stitches? That’s caused by the crossing. (On a right cross cable, the hole would be on the right of the cable.)
When this cable is worked flat, there is a Right Side Row where you worked the cable cross, followed by a wrong side row, right side row and one more wrong side row. On the next Right Side row you would work a new cable cross.
When you work in-the-round you only have the Right Side facing you. Then you have Round 1 where you cross the cable, followed by Rounds 2, 3 & 4. Then cross again.
If you put something straight into the hole created by the crossing and run it under the horizontal bars to the needle, you should see the 4 bars. I used a sewing up needle but your cable needle may be handy and it would work great.
When you can count 4 bars, you are ready to cross again on the next round. If you have a 6 stitch cable, crossing every 8 rows/rounds, you would work until you can count 8 bars from the hole created by the last crossing. It works.
Have you tried this? I don’t use a cable needle. I was going to say I don’t own one but I think I do. It’s in the container with my set of straight needles which I also don’t use. Why do I still have them? That’s a very good question. Let’s not go there today.
One of my internet friends wanted to know how I get my cables to look so neat and tidy. My first thought was that I had no idea. I just do them and they turn out that way. But then, the next day, I remembered that I don’t use a cable needle. It’s not that I didn’t know I don’t use a cable needle, that would be sort of crazy, it’s that I haven’t used one for quite a long time so it doesn’t occur to me that they are needed to work cables.
So I did a video to show you how I do it. Thanks CD for the question that prompted this. I hope this visualization helps.
Only use the tips of your needles. Push all the stitches on your needles to the tips so you can maneuver your needles without pulling any of the stitches.
Take your needles to the stitches. Load the stitches going to the Back first. Once they are on your needle, Leave Them Where They Lie, usually slightly to the back of your work. Don’t move them because they will pull the stitches that are still hanging free.
Load the stitches going to the Front.
Cross the stitches to the Right or Left and load the stitches on your right needle onto the left needle. Check that you crossed them correctly. If not take them off and start again.
Knit across the cable stitches.
It’s a little risky but so satisfying and no cable needle to lose, imagine that!
Designing your own garment? Maybe you are working on the Saddle Up pullover with me and it’s time to work the cables. Here’s what you need to know.
Cables pull your fabric in as soon as the first cable is crossed. You have to make sure you accommodate for this fact or … well, your sweater or project will be much smaller than you had anticipated.
Let’s say you want to work a 4-stitch Rope Cable (worked by crossing 2 stitches over 2 stitches). This cable is worked in stockinette stitch and is a pretty common cable to work.
Once you start crossing this cable, it is no longer the width of 4 stitches. It is closer to the width of 3 stockinette stitches.
If you have a sweater where you want to introduce a 4-stitch Rope Cable, set it up for 3 stockinette stitches to begin with. Then increase 1 stitch before you work the first cross. That’s it.
A basic rule of thumb: for every 3 stitches of the cable, set up 1 less stitch. Add them back in by working increases before the first cross.
Here’s another example: 6-stitch Rope Cable where you will cross 3 stitches over 3 stitches – set up 4 sts and before the first cross, increase 2 stitches (now you have 6 sts for the cable).
This is fairly straightforward, except … (you knew this was coming, right?), the more complex the cable, the harder it is to do this successfully. Do I have to say the S word? Yeah, I do. You have to swatch!
Elizabeth Zimmermann had some great advice. Her suggestion was to cast on 96 stitches and knit a hat with all the cables. It will fit someone.
That can work as your swatch. Measure across the cable once you have worked the cross several times. Use your stockinette stitch gauge to figure out how wide the cable is in stockinette stitches. That is the number of stitches to set up and how many stitches you need to increase before the first crossing.
Example: Let’s say you have a 12 stitch complex cable, repeated several times on your hat, measuring 1.75″ across. Your stockinette gauge is 20 sts = 4″ OR 5 sts = 1″. 1.75″ x 5 sts = 8.75 sts, rounded up to 9 sts. Set Up the cable with 9 stitches and increase 3 stitches in the first row to 12 stitches and cable away.
Norah Gaughan has coined the phrase SSE: Stockinette Stitch Equivalent. The SSE for the complex cable above is 9 sts, even though the chart for the cable is 12 sts wide. Yeah, I know, this can mess with your head.
I would like to recommend her book, Knitted Cable Sourcebook for this information. There are tons of cables in this book and they all have an SSE. She’s done it for you. No swatching necessary. I don’t receive anything if you buy this book. I’m so happy I bought it. You might know that I am not a happy swatcher.
The latest section of the Saddle Up pattern is in your ravelry library. Update the pattern and set up your cables. Have fun.
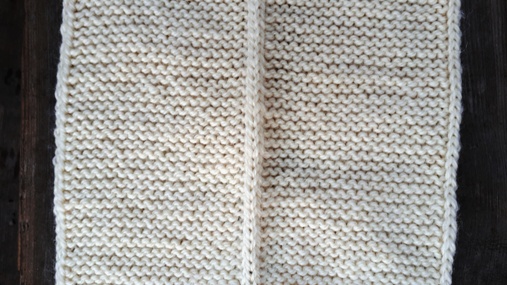
Do you know how I-cords work? They are a little bit of knitting magic. When paired with Garter Stitch they do all sorts of good things.
First, 2 or 3 stitches of I-Cord on the outside edges of garter stitch give it a tidy finish. This is sometimes called a Built-in I-cord because you work the I-cord edge as you knit the garter stitch fabric.
Secondly, because these outside stitches are slipped every other row, they give the edge stability. They are a tiny bit shorter because they are not worked every row. These I-cord stitches hold the edges firmly so the edge won’t stretch.
A small sample showing 2-stitch built-in I-cord. It looks the same on both the right side and the wrong side.
Garter Stitch with 2-stitch I-Cord edge: Knit to last 2 sts, bring yarn forward, slip the last 2 sts. This row is worked over and over, on both the right side and wrong side of the fabric.
Left photo: Yarn forward, Slip last 2 sts. Right photo: Turn and bring yarn across back of work, from third stitch to first stitch, and knit first stitch.
When you slip the last 2 sts, your yarn is attached to the 3rd stitch in from the tip of the needle because that was the last stitch you knit. So what happens in the next row? You need to pull the wool across the back of your work, from the third stitch to the first stitch so you can knit the row. This pulls the first stitch around towards the back of your work, as you knit it.
On one edge the second I-cord stitch rolls to the back. On the other edge the second I-cord stitch rolls to the front.
Because these two stitches are slipped every other row they look like stockinette stitch. A 2-stitch I-cord is the tiniest tube you can knit around the edge of your garter stitch fabric.
The Saddle Up pullover begins with a Garter Stitch Saddle with I-cord edges, of course.
The Saddle begins at the left shoulder and is worked across to the the right shoulder, with a hole for your head in the middle. Pretty straight forward, right?
But that’s not all there is to it, of course. That would be way too easy. There is another way of working the 2-stitch I-cord.
There are occasions when you would like both the I-cord stitches to be rolling to the wrong side of your work. This can be done, too. The Saddle uses this technique for the Back of Neck stitches.
On both edges the second I-cord stitch rolls to the wrong side of the fabric.
2-Stitch I-Cord rolling to the wrong side: Right Side Row: Knit to last 2 sts, leave yarn in the back, slip last 2 sts. Wrong Side Row: Purl 2 sts, knit to last 2 sts, yarn forward, slip last 2 sts.
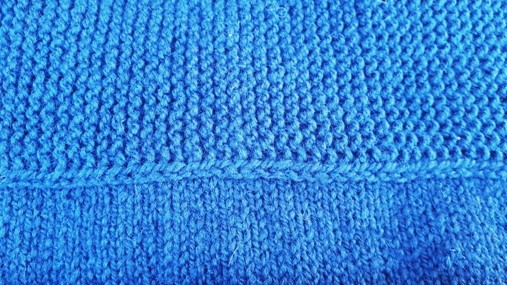
What is that line down the middle of the Saddle? The shoulders of the Saddle for this pullover need a lot of extra stability since the sleeve will be trying to pull it down. So I added some non-stretchy stitches right down the centre. It looks like an I-Cord but it isn’t. The middle 2 stitches are slipped every other row and work the same way, in that these 2 stitches are a tiny bit shorter and won’t stretch. Thanks L for pointing this out.
There is one more reason for all this I-Cord business. A 2-stitch I-Cord gives you a sideways stockinette stitch for every garter ridge. In the Saddle Up pullover, stitches are picked up & knit along the bottom edge of the Saddle to form the Front which is worked flat, down to the bottom of the armhole. If you pick up & knit into the I-Cord stitch that has rolled to the back the Saddle, you get a very lovely line of stitches running between the Saddle and the Front. It will never stretch and it’s so very neat and tidy. Don’t you think?
I’ve done the pick up & knit into the I-cord across the bottom edge of the Saddle and have started my cables down the Front.I picked up & knit along the I-cord stitches on bottom edge of the Back of the Saddle and worked stockinette stitch down the Back.
You can add I-cord stitches to any garter stitch project. You may get to love them as much as I do.
Are you are interested in knitting this Saddle Up, drop shoulder pullover with me? I’m publishing each section as I get it done and tested. I’ll update the pattern with each new section as we go along. The Saddle section is up for sale.
I’m interested in any comments, corrections or problems you have with this pattern. I’ve included lots of photos and my blog posts will be featuring this pullover for the next month. Happy to have you join me.
While I was walking this last week, I had an idea. It just shows that walking can be hazardous to your blog.
I was strolling along, wondering what I would talk about on this blog post, well not really wondering, because it was going to be about cables, but there seems to be a problem. Cables aren’t the problem. The problem is I’m always going to rattle on about what I’m knitting at the moment. Since I’m designing and writing the pattern as I progress, that’s what you’re reading about.
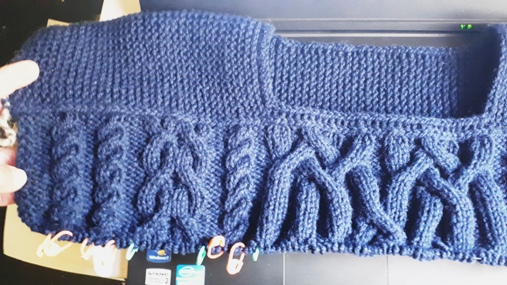
That’s not going to stop. I almost always have some new idea on the needles in my hands. Right now it’s a drop shoulder, top down pullover with cables. This is my first prototype, for my son.
What I find frustrating is the delay between designing something and the pattern publication date. Maybe you find this too. I go on and on for months about a sweater I’m knitting. Then the pattern goes to test knitters and needs photographs and edits. Procrastination kicks in just about here, especially around photos. It won’t come out for several months after I’m done talking about it and definitely onto something new.
So, here goes. This is the idea. I will publish the pattern in stages. I’ll post the beginning of the pattern on ravelry for a small fee. We can call it a Knit-A-Long, sort of like a mystery sweater. I’ll talk about some aspect of it on the blog every week and send you an pattern update every week or so. We can knit the sweater together. This gives me the chance to write my blog as if I was teaching a class where I give you the instructions one page at a time over several weeks. I can tell you so much more about techniques and sizing in the blog than I can in a pattern.
The pattern is the Family Saddle Up pullover with cables. All sizes from 1 year old to large adult in any yarn (my suggestion would be for worsted, heavy worsted/aran weight or chunky weight yarn). The pullover will knit top down with saddle shoulders and drop sleeves. The saddle shoulders and the yoke will be knit flat to the bottom of the armholes, then joined in the round to the bottom. We’ll pick up the sleeves and knit down to the wrists.
I’ve cast on for a second sweater so I’m ready to go.
I’ll knit both the navy and white pullovers as we go along. While I’m at it, I’ll probably do a 2 year old size because I have a little guy to knit for.
I’m going to start next week. If you’ve got some sweater yarn and some free time, I hope you’ll join me. Stay tuned.