Do you know how I-cords work? They are a little bit of knitting magic. When paired with Garter Stitch they do all sorts of good things.
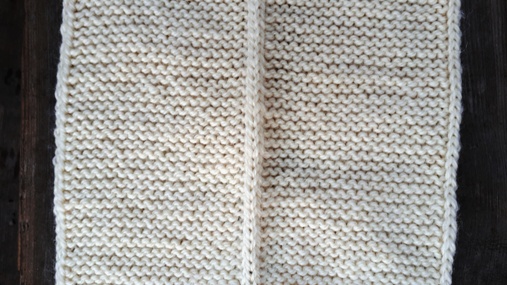
First, 2 or 3 stitches of I-Cord on the outside edges of garter stitch give it a tidy finish. This is sometimes called a Built-in I-cord because you work the I-cord edge as you knit the garter stitch fabric.
Secondly, because these outside stitches are slipped every other row, they give the edge stability. They are a tiny bit shorter because they are not worked every row. These I-cord stitches hold the edges firmly so the edge won’t stretch.

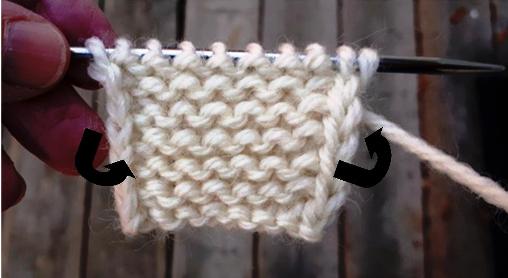
Garter Stitch with 2-stitch I-Cord edge: Knit to last 2 sts, bring yarn forward, slip the last 2 sts. This row is worked over and over, on both the right side and wrong side of the fabric.


When you slip the last 2 sts, your yarn is attached to the 3rd stitch in from the tip of the needle because that was the last stitch you knit. So what happens in the next row? You need to pull the wool across the back of your work, from the third stitch to the first stitch so you can knit the row. This pulls the first stitch around towards the back of your work, as you knit it.
Because these two stitches are slipped every other row they look like stockinette stitch. A 2-stitch I-cord is the tiniest tube you can knit around the edge of your garter stitch fabric.
The Saddle Up pullover begins with a Garter Stitch Saddle with I-cord edges, of course.
The Saddle begins at the left shoulder and is worked across to the the right shoulder, with a hole for your head in the middle. Pretty straight forward, right?

But that’s not all there is to it, of course. That would be way too easy. There is another way of working the 2-stitch I-cord.
There are occasions when you would like both the I-cord stitches to be rolling to the wrong side of your work. This can be done, too. The Saddle uses this technique for the Back of Neck stitches.

2-Stitch I-Cord rolling to the wrong side: Right Side Row: Knit to last 2 sts, leave yarn in the back, slip last 2 sts. Wrong Side Row: Purl 2 sts, knit to last 2 sts, yarn forward, slip last 2 sts.
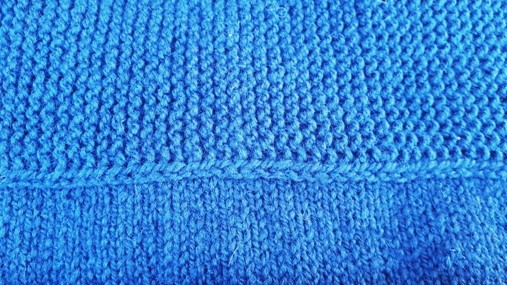
What is that line down the middle of the Saddle? The shoulders of the Saddle for this pullover need a lot of extra stability since the sleeve will be trying to pull it down. So I added some non-stretchy stitches right down the centre. It looks like an I-Cord but it isn’t. The middle 2 stitches are slipped every other row and work the same way, in that these 2 stitches are a tiny bit shorter and won’t stretch. Thanks L for pointing this out.
There is one more reason for all this I-Cord business. A 2-stitch I-Cord gives you a sideways stockinette stitch for every garter ridge. In the Saddle Up pullover, stitches are picked up & knit along the bottom edge of the Saddle to form the Front which is worked flat, down to the bottom of the armhole. If you pick up & knit into the I-Cord stitch that has rolled to the back the Saddle, you get a very lovely line of stitches running between the Saddle and the Front. It will never stretch and it’s so very neat and tidy. Don’t you think?

You can add I-cord stitches to any garter stitch project. You may get to love them as much as I do.
Are you are interested in knitting this Saddle Up, drop shoulder pullover with me? I’m publishing each section as I get it done and tested. I’ll update the pattern with each new section as we go along. The Saddle section is up for sale.

I’m interested in any comments, corrections or problems you have with this pattern. I’ve included lots of photos and my blog posts will be featuring this pullover for the next month. Happy to have you join me.
Cheers, Deb
Any Gauge and Gauge-Free patterns by Deb
Debgemmellmods group on ravelry

Wow Deb, this is just excellent. I love I cord and love it even more with the rolling to one side or the other option.
Sign me up for the sweater pattern.
LikeLiked by 1 person
It’s up on ravelry now. The link is in the blog post.
LikeLiked by 1 person
Thanks for joining.
LikeLiked by 1 person
Bravo, I-cords to the rescue.
LikeLiked by 2 people
A big thank you to you for pointing out the stretchy shoulders. I fixed it with slipped stitches down the middle which worked into the i-cords along the back of neck. That was a challenge to work out. I love a problem to solve.
LikeLiked by 2 people
I’m happy that my bad experience provided some value to another knitter.
LikeLiked by 2 people