A New Knit for Little People

Want to try something new, maybe experiment a little (otherwise known as designing)? Why not try it on a little person sweater first. They’re quick and little people are generally not too fussy as long as you choose the right colour.

Karen asked me about adding a stitch pattern to the raglan lines since she wanted to try it herself. I dug around in my UFO pile of experiments and found something I had started. I don’t even know when. Not finished, imagine that!

DSC_0543

And now it is. It’s in two colours because I didn’t have any more of the original colour dye lot (shh, don’t tell).

20190629_121942 - Copy
Railroad Top Down on ravelry

The garter stitch raglan lines go down the sides of the Body on the Front …

20190629_122126 - Copy

and the Back.

20190629_122025 - Copy

With all this extra patterning, the body knit up in a flash. I’ve added it to the Cabin Fever ravelry store.

Enjoy and Happy Canada Day,

Deb

Deb Gemmell Any Gauge patterns

Cabin Fever patterns and BOOKS on ravelry

Where to Widen Raglan Lines

So I took a chance and decided to Add A Pattern to the Raglan Lines. It looks amazing. The pattern on the raglan lines are perfect. I’m at the bottom of the yoke. After this row it’s really going to look like a sweater and I’m excited. Then it happens, as I put my sleeve stitches on spare yarn I realize my lovely raglan line pattern is half on the sleeve and half on the body and not what I intended. My raglan line pattern is ruined!

Yes, it’s happened to me too. The first time it’s hard to envision the entire process. A little time thinking ahead would have saved me some grief.

Don’t get surprised when you do the Great Divide (separating the Sleeves and Body). Look ahead to the bottom of the Yoke. Where do you want the pattern you’ve added to the raglan lines to end up? Maybe you do want half of it on the Body and half of it on the sleeve. Or do you want the pattern to continue down the sides of the Body?

That’s what I decided to do this time. I wanted to widen the raglan lines so that when I reached the bottom of the yoke and put my sleeve stitches on spare yarn, I would have the raglan patterned stitches on the Fronts and Back.

To do this, at the top of the yoke arrange the raglan lines placing a new raglan marker the number of stitches for the pattern away from the stitches for the sleeve, towards the Front and Back of the yoke.

move raglan lines

The dark lines are where the original Raglan Markers are. Then place a second marker at each raglan line towards the Front and Back, in this case moved over by 5 stitches.

When I place my sleeve stitches on spare yarn at the bottom of the yoke my raglan patterned stitches will remain with the Body.

20190622_115854

Now I can continue down the Body with a nice little pattern down the sides. This is a child-sized sweater so there are no underarm cast on stitches to consider.

20190623_140151

If this was an adult size there would be underarm stitches separating the two sets of  garter stitch patterns. More thinking might be required. I’ll leave that to you. Now I need to get going to finish the Body.

Cheers,

Deb

Any Gauge Patterns by Deb Gemmell

Cabin Fever Patterns and Books on Ravelry

Adding a Pattern to Raglan Lines

K. asked if it was possible to add a pattern in the raglan lines just as I did with the underarm stitches in What to Do with All That Stockinette. She had knit a sweater with patterned raglan lines but didn’t feel she could do it on her own.

Of course you could. Start with something simple and not too wide. I dug around my UFO projects and found one I had started.DSC_0543

Here’s how. Cast On at the top according to the pattern. Stop at the Marker Round (in the round where you are going to place the raglan markers). Do Not knit this round yet. Count across the stitches on your needle and with removable markers, place the markers as the pattern specifies. In the original pattern the marker for the raglan line would have been set up to be worked like this:raglan line

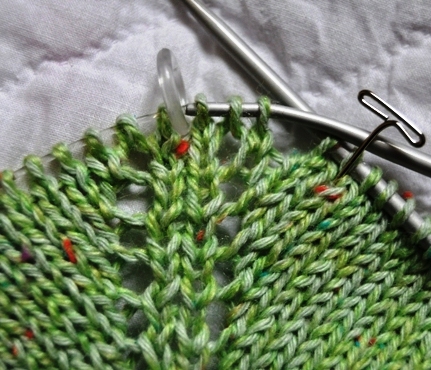
The set up would be to have one knit stitch before the marker and one knit stitch after the marker. The increases would be worked on either side of these 2 knit stitches. The Increase Row would read: Knit to 1 stitch before Raglan Marker, YO, K1, slip Raglan Marker, K1, YO.

Now get 4 more markers and move the markers so there will be more stitches at the raglan lines. I like to keep these knit stitches, YO, K1, marker, … extra sts…, marker, K1, YO in place since it makes reading the pattern easier to follow.

Decide how wide you want the new raglan lines to be. My Raglan Markers are 5 sts apart.DSC_0539

Now the Increase Row at each raglan line will read as:  Knit to 1 stitch before first Raglan Marker, YO, K1, slip marker, Knit 5 stitches, slip Second Raglan Marker, K1, YO. The increase set up is still the same. The only change is now there are several stitches between the 2 increase stitches at each raglan line.

You can put any number of stitches here depending on how many stitches you have in the Front, sleeve, Back sleeve and Front.DSC_0543

This is a really simple example and I’m sure you can improve on it.

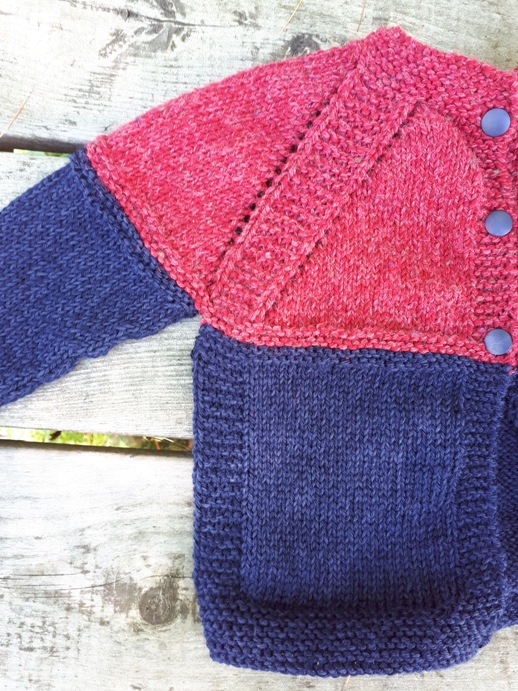
Here is an excellent example of another simple idea where just making the raglan lines wider and staying with stockinette stitch still makes the Sunshine Coast pullover by Heidi Kirrmaier look fantastic.

Top Down Sunshine Coast Heidi Kirrmaier

Are you going to give this a try?

Deb

Any Gauge and GAUGE-FREE patterns by Deb Gemmell Mods

Cabin Fever patterns on ravelry

Deb on instagram

Ease, get the fit you want

I did a talk at a knitting guild last month based on the Any Gauge Raglan. I took them through the entire process from diving into their stash and casting on to figuring out how to get the Bottom of the Yoke to fit their unique body.

In the knitting industry we use the actual measurement of your bust (using a tape measure) + Ease to determine the final size of your sweater. One measurement. I know, it seems crazy. Obviously this one measurement cannot tell the whole story of your figure.

So I had everyone measure their Bust and their Arms. Almost no one had ever measured their arms. It’s important for your sleeves to fit as well as your body. I find that I need a slightly bigger sleeve than most patterns are allowing me for my bust size. I know from talking to many plus sized women that if they are busty the sleeves are often too big for them. Maybe you have found you can’t get both the bust and the sleeves to fit perfectly.

Body Measurement Workshop schematic

I have a solution. In the Any Gauge Raglan the raglan increases in the Yoke are worked until you reach the exact number of stitches needed to go around the Actual measurement of your Bust and both your Arms. At the Bottom of the Yoke it has to fit YOU because they are your measurements.

Any Gauge bottom of Yoke schematic

At this point the sweater would fit you like a second skin. If that’s the size of sweater you want you have it right there.

For a more relaxed fit some Ease (the amount your sweater is bigger than your actual body and arms) is added as you work the Divide Round as Underarm Cast On stitches. Again you get to decide how much ease you would like. Do you want a close fit or looser fit?

Close Fit:  Ease = 5% of Actual Bust measurement

Relaxed Fit:  Ease = 10% of Actual Bust measurement

Comfy Fit:  Ease = 15% of Actual Bust measurement

Loose Fit:  Ease = 20% of Actual Bust measurement

As you work the Divide Round half the Ease stitches are cast on at one underarm and the other half of the Ease stitches are cast on at the other underarm. That way the Total Ease you calculated above is added to the Body of your sweater. Ta, da, as simple as that.

The Any Gauge Raglan Yoke is worked to your personal measurements. Then you get to add the amount of Ease you wish for the fit you want.

Thanks for reading,

Deb

Any Gauge Patterns by Deb Gemmell

Cabin Fever patterns on Ravelry

Any Gauge Raglan, it’s done

Maybe you wake up one morning and decide today is the day you’re going to cast on for a pullover for yourself. It’s time. You go to your stash and pick out some yarn that has been calling to you. You check through your library of patterns at home or on ravelry to see if you have one that matches the pullover you want to make. Time passes, more time passes and you haven’t cast on yet.

What if you could get right to it. Cast on now. That’s what this Any Gauge Raglan pattern is all about.

Any Gauge Raglan Adult front page

I am a problem solving designer. One of my problems and maybe yours too, is that I don’t get gauge with the recommended needle size. I’m a loose knitter so usually go down one needle size to get close to gauge. With this pattern I am going to get to use the unique gauge I get with this particular yarn. One problem solved.

You can Cast On using the gauge information on the ball band if you usually get close to gauge with this yarn (I get close enough with the needle change) or you could do a swatch. Figure out the number of stitches you get in 1″ and you’re ready to Cast On for the neck opening.

DSC_0420

Yes, there is some math, more properly called Arithmetic. Nothing more than taking measurements in inches and multiplying by your Gauge (number of stitches in 1″). You can do this.

I’m really excited to present the Any Gauge Raglan Adult.

Thanks for reading,

Deb

Deb Gemmell Mods Any Gauge patterns on ravelry

Cabin Fever patterns on ravelry

Place Sleeves for Any Gauge Raglans

When you knit a Top Down sweater, you choose the size using your bust measurement. Do the sleeves always fit? They quite often don’t for me.

I think I have solved this problem in the Any Gauge Raglan sweater series. I’m very excited to present the first one. This is a recipe style pattern where you do some math and work according to your own gauge. Tight knitter, loose knitter, it doesn’t matter. Your particular gauge matters.

I’ve started the Any Gauge Raglan series with a baby sizes, Newborn to 4 year old size:  Any Gauge Raglan Baby

What prompted this idea? As a designer, I would usually choose a set of sizes for the Body and Sleeves for each pattern. I would look at the set of sizes and work out the number of stitches needed for the Front, Back and Sleeves at the Bottom of the Yoke. Then I would work backwards up to the neckline to decide on the number of stitches for the neckline for all the sizes. The finished sleeve size dictates how wide the top of the shoulder is at the neckline.

But what if I want a particular shape of neckline? In this case I wanted a rectangular neck opening with a wide shoulder.

DSC_0337

DSC_0330

The size of the shoulders on these neck openings is wide so that there is a drop down the front and back of the neck. After working all the yoke increases the sleeve may not be the proper size for the sleeve you need.  Oh, no, what to do?

What if … we used the Raglan lines as a guide only? What if … your actual sleeve needed could be wider or narrower than the Raglan Markers indicate? I mean, really, are the Raglan Markers set in stone?

I made a video to explain:  Place Sleeves on Any Gauge Raglans

This takes a particular set up which I am working on in the Any Gauge Raglan sweater series. I’m very excited to present the Any Gauge Raglan Baby/Toddler Pullover.

Use ANY YARN you want. Go ahead, dive into your stash and pick the perfect colour in any weight of yarn you have. Cast On and knit any size up to 4 years old.

What do you think of this idea? All comments, questions and photos are welcome. I can’t wait to hear your thoughts.

Thanks for reading,

Deb

Deb Gemmell patterns on ravelry

Cabin Fever patterns and books on ravelry

What If … Diamonds

On your next raglan which you don’t want to be a raglan, you could try this:20180311_162222

Yes, you could.

I’ve written a new pattern based on this idea called Kid’s Diamond Pullover where I moved the markers from the standard raglan set up to new positions. I still worked the same number of increases every other round. Moving the markers changes the shape of the neckline and this set up will give you a slight V in the front and back of the neckline with no trouble at all.

Here is the standard raglan set up with 4 markers for the raglan lines and increases worked on either side of these markers. The 4 markers are set between the sections of this sweater: Front, marker, sleeve, marker, Back, marker, sleeve, marker, second Front.skew 20180408_091840

So what would happen if we just placed the 4 markers equidistant from each other in a pullover? There are still the same 4 markers where you will work a pair of increases every other round. The stitch numbers will work out the same. It’s actually not too much of a leap is it?

Continue reading “What If … Diamonds”

What if … Skew stumbling

Sometimes an idea comes into your head fully formed and all that is needed is execution. It could be a variation on a recipe, a knitting pattern, a paint colour scheme, a new way to wear an outfit, an idea for your garden or something totally other. And sometimes upon execution, as hiccups develop, comes the realization that the idea was not as fully formed as you thought. Do you give up? Do you persevere?

This is happening with my Skew design and I am persevering because I am still excited about the original idea.

I started with the idea of moving one of the raglan increases over and working a stitch pattern into the space.skew 20180408_091905

My first little sweater had some problems. The ribbed stitch pattern was causing the front to pull against the buttonband. It would have to be buttoned up all the time to keep the front edges lined up.20180408_083659

So I changed the ribbing to a broken rib (garter stitches between the twisted cables). Then I realized that the cable pattern had to be more prominent to stand up against the garter stitches. So that got changed too. A couple of hitches fixed up to my satisfaction.20180424_111308

I’m happy with the original idea of the skew which is showing nicely at the bottom of the front.20180424_111411

Almost there. This sweater needs a lighter colour to show the pattern well for photography so the next sweater will be light blue, pink, cream, oatmeal?? That’s my project this week.

I hope all your hiccups are minor and easily solved. Happy knitting this week,

Deb

ANY GAUGE and GAUGE-FREE patterns by Deb

Cabin Fever patterns

Deb on instagram


What Would Happen If …

Have you knit several Top Down Raglans? Are you looking at knitting another one and wonder if there is a small change you could make that would make it new again? I was thinking the same thought.20180408_083659

Continue reading “What Would Happen If …”

Raglan Increases 5 ways

There are so many ways to work every possible technique in knitting that you could, if you are adventurous, view a knitting pattern as a guide rather than written in stone. The ability to substitute different techniques to get a slightly different look means that many more patterns are available for you to use to get the exact garment you had in mind. This also, by the way, could save you quite a bit of time when choosing patterns.

If you are knitting a raglan pullover or cardigan here are 5 ways to work the increases that make the distinctive raglan lines. Do you want decorative holes, small holes or no holes at all? Keep in mind that an increase that is easy for you to work also makes the sweater a happier knit.

Continue reading “Raglan Increases 5 ways”

%d bloggers like this: