
There are so many ways to work every possible technique in knitting that you could, if you are adventurous, view a knitting pattern as a guide rather than written in stone. The ability to substitute different techniques to get a slightly different look means that many more patterns are available for you to use to get the exact garment you had in mind. This also, by the way, could save you quite a bit of time when choosing patterns.
If you are knitting a raglan pullover or cardigan here are 5 ways to work the increases that make the distinctive raglan lines. Do you want decorative holes, small holes or no holes at all? Keep in mind that an increase that is easy for you to work also makes the sweater a happier knit.
All of these raglan increases are worked between two stitches. Each of these are interchangeable with each other. For example, if your pattern calls for a YO increase (which makes holes), any of the other increases below can be used instead.
These Do Not work when the Kf/b increase (knit into the front and back of same stitch) is used for the raglan increases. Here’s a blog post that explains why you can’t substitute any other increase for the Kf/b: M1 vs Kf/b
RAGLAN INCREASES
These Increases make decorative Holes:
YO (Yarn Over): Bring the yarn to the front between needles, swing over Right needle to the back.

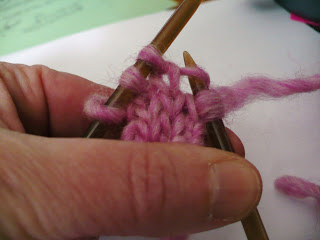
Open M1 (make one stitch): Insert Right needle tip into the space under the horizontal bar between the stitch just worked and the next stitch, from front to back, wrap yarn and pull back through to front. That’s it. Done. It’s very similar to a pick up & knit.

As you might guess, this is one of my favourites!

NO Holes with these Closed Increases:
M1L (make one left): With Left needle tip, lift the horizontal bar between the stitch just worked and the next stitch, from front to back and knit into the back of the resulting loop. This increase shows as a twisted stitch which leans to the left. Work this M1L before the Marker and pair with the M1R.
M1R (make one right): With Left needle tip, lift the horizontal bar between the stitch just worked and the next stitch, from back to front and knit into the front of the resulting loop. This can be fairly tight to knit. This increase shows as a twisted stitch which leans to the right. Work this M1R after the Marker, paired with the M1L.

Backward Loop M1: Make a loop around finger or thumb and place it on the Right needle. On the next row (round) knit or purl into the front or back of this loop whichever twists it one more time. This makes it nice and tight. You can work these two backward loops symmetrically as shown. This works great if you can do it (takes a little practice) and you are working a pullover where you are knitting all rounds. If you are working a cardigan work B on both sides of the Marker and on the wrong side purl as usual.

RLI (Right Lifted Increase): With Right needle tip, lift right leg of the stitch below the next stitch on the left-hand needle and place onto the left needle and knit it.
LLI (Left Lifted Increase): With left needle tip, lift the left leg of the stitch 2 rows below the stitch you just knit on right-hand needle, place loop onto left needle and knit it through the back loop.
I don’t use these regularly so I don’t have a sample to show you but check out this video for a sample and tutorial: Lifted Increases by Very Pink.
There you have it. I hope you will be adventurous and try some of these increases to change up your next raglan sweater. You can join us and try out some DIY knitting with me at the Take It From The Top KAL where we’ll be exploring many options using the Take It From The Top pattern as a Basic guide and adding our own unique design elements.
Thanks for reading,
Deb
Any Gauge and Gauge-Free patterns by Deb
Cabin Feverpatterns
Deb oninstagram

Love your post!
Embarking on a raglan sweater now. You say no M1 substitutes for KFb. Is it ok to do yo increase or pulling stitch through bar between? Love those!
Thanks.
Goldie
LikeLiked by 1 person
Ypu can totally use the yo or pulling the stitch through the bar between to work your raglan. But you have to watch your stitch counts. A Kfb has you knit a stitch and then work an increase (knitting into the back of the same stitch) which will end up beside the first knit stitch. You will have to take a good look at where to place your yo increases if you are substituting them into a pattern that calls for Kfb increases.
LikeLike
How do I get the pattern for the green raglan sleeve pattern that you demonstrated 3 ways to do a raglan increase.
Thank you, Carol
LikeLiked by 1 person
It is the “Take It From the Top” pattern by cabinfever, available on ravelry. I added the cable down the front, that’s not in the pattern.
LikeLike
Thank you for following my blog. Your knitting looks beautiful!
LikeLiked by 1 person