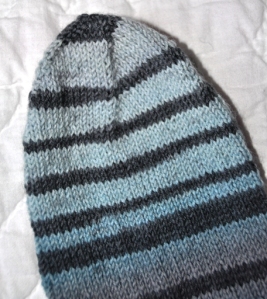
Have you tried Toe Up Socks? They are my go-to method. But maybe getting started has you hesitating. The popular way to get started is with Judy’s Magic Cast On, by Judy Becker, which mimics the Cuff Down grafting of the toe, in reverse. I find it challenging to work well. If you have it down terrific. If not, I have an alternative that is easy and totally works.
It’s called the Star Toe (I did a video, have a look) which begins with a cast on of 8 stitches, in your usual cast on method, Phew. Divide the stitches onto 2 double pointed needles or the 2 tips of your circular needle for Magic Loop and start increasing.
Double point users: I only divide my 8 sts onto two double points for the first round because putting 2 sts on each of 4 double pointed needles leads to much dropping of needles and cursing. As soon as I have enough stitches I add in more double pointed needles.
The toe is divided into 4 sections. Right now there are 2 sts in each of the 4 sections and 2 sections are on each of the needles. As soon as you start the Increase Rounds below the 4 sections become obvious.
The star toe works by increasing into the first stitch of each section. I use the Kfb increase (knit into the front and back of same stitch).
Round 1: *Kfb, K1; repeat from * to end of round. – increase of 4 sts (12 sts on needles)
Now you have enough stitches to add in more double pointed needles. Magic Loopers just continue as set up.
Round 2: *Kfb, K2; repeat from * to end of round.
Round 3: *Kfb, K3; repeat from * to end of round.
You get the general idea here. Continue to work increases into the first stitch of each of the 4 sections until you have approximately 1/2 your total sock stitches.
Now introduce a Knit Round, alternating a knit round and an increase round.
Next Round: Knit.
Increase Round: *Kfb, knit to end of section; repeat from * 3 more times.
Repeat these last 2 rounds until the Star Toe is the correct size.
How do you know it’s the correct size? Measure across the width of the toe OR stick your toes into it. Note: the sock toe is slightly bigger than it appears! That’s because it’s stuck on straight needles so stop increasing when it’s a little tight and it will be correct.
I just finished a sock for my husband. I don’t worry about the exact number of stitches when I start, I just work the toe until it’s the correct width across (4 1/2″) for a 9″ circumference sock for his foot. Then I knit and knit and knit for his size 11 foot.
It turned out perfectly. Onto sock number two.
And the toe fits!!
Hope that encourages you to get started on a Toe Up sock. Thanks for reading,
Deb
ANY GAUGE and GAUGE-FREE patterns by Deb
Cabin Fever patterns on ravelry.
Deb oninstagram
That certainly makes life easier – thank you!
LikeLike
It’s the toe I use all the time.
LikeLike
Interesting; I’ve only knitted socks top down & kitchenered toes so far, planning to make my next pair of bottom up to learn new skills so was researching different types of toe and heel! Thank you for the article. Do you sew up the hole in the toe? Or Kitchener it together?
LikeLike
I just do two little whip stitches and the hole is sewn up. Enjoy your toe up sock adventure. It’s fun to have several ways to knit socks.
LikeLike